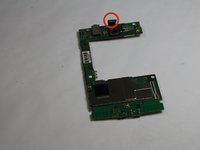
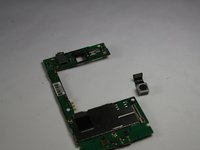
주요 콘텐츠로 건너뛰기

Motorola Triumph Camera Replacement

필요한 것

  1. Motorola Triumph Camera Replacement, Battery: 1 단계, 이미지 1/3 Motorola Triumph Camera Replacement, Battery: 1 단계, 이미지 2/3 Motorola Triumph Camera Replacement, Battery: 1 단계, 이미지 3/3
    • Slide the back cover down.

    • Lift the back cover up.

    • Pry the battery out with the spudger

  2. Motorola Triumph Camera Replacement: 2 단계, 이미지 1/1
    • Gently pry out the battery using the spudger

  3. Motorola Triumph Camera Replacement, Speakers: 3 단계, 이미지 1/1
    • After removing the Battery remove the two screws with a T4 screwdriver.

  4. Motorola Triumph Camera Replacement: 4 단계, 이미지 1/1
    • With the spudger, go around the seam of the phone and pry away the back chassis.

  5. Motorola Triumph Camera Replacement: 5 단계, 이미지 1/1
    • Using the T5 screwdriver, remove all the four screws shown in the picture.

  6. Motorola Triumph Camera Replacement: 6 단계, 이미지 1/1
    • Lift up the motherboard out of the device,

  7. Motorola Triumph Camera Replacement: 7 단계, 이미지 1/1
    • Pry the speakers out using the plastic spudger.

  8. Motorola Triumph Camera Replacement, Camera: 8 단계, 이미지 1/1
    • Locate the camera at the top of the motherboard.

  9. Motorola Triumph Camera Replacement: 9 단계, 이미지 1/2 Motorola Triumph Camera Replacement: 9 단계, 이미지 2/2
    • Use the the spudger to unclip the connector above the camera.

    • Remove the camera.

결론

To reassemble your device, follow these instructions in reverse order.

greg

회원 가입일: 10/07/14

12 평판

안내서 5개 작성하였습니다

USF Tampa, Team 7-5, Leahy Fall 2014 USF Tampa, Team 7-5, Leahy Fall 2014 회원

USFT-LEAHY-F14S7G5

3 회원들

안내서 15개 작성하였습니다

댓글 0개

댓글 쓰기

조회 통계:

24 시간 전: 0

7일 전: 0

30일 전: 3

전체 시간: 215