주요 콘텐츠로 건너뛰기

Motorola V551 Keypad Key Replacement

필요한 것

  1. Motorola V551 Keypad Key Replacement, Battery: 1 단계, 이미지 1/2 Motorola V551 Keypad Key Replacement, Battery: 1 단계, 이미지 2/2
    • Press down on the chrome button on the bottom of the chassis. Simultaneously slide the back cover down, away from the phone.

  2. Motorola V551 Keypad Key Replacement: 2 단계, 이미지 1/1
    • Lever the battery out by pressing upwards on the bottom corners of the battery.

  3. Motorola V551 Keypad Key Replacement, Circuit Board: 3 단계, 이미지 1/3 Motorola V551 Keypad Key Replacement, Circuit Board: 3 단계, 이미지 2/3 Motorola V551 Keypad Key Replacement, Circuit Board: 3 단계, 이미지 3/3
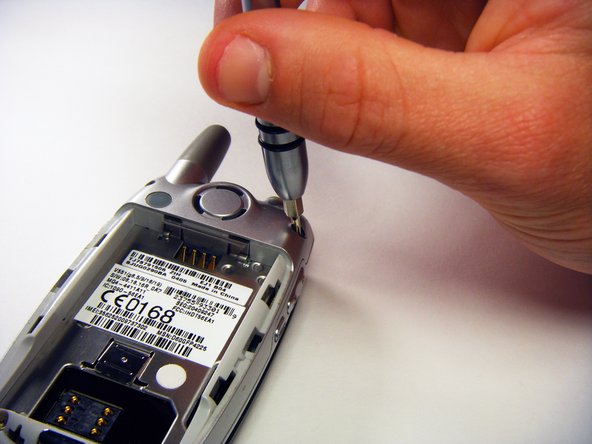
    • Remove the rubber screw covers using a plastic spudger.

    • Use a T6 Torx screwdriver to remove the screws underneath the rubber screw covers.

  4. Motorola V551 Keypad Key Replacement: 4 단계, 이미지 1/1
    • Unscrew the antenna.

  5. Motorola V551 Keypad Key Replacement: 5 단계, 이미지 1/3 Motorola V551 Keypad Key Replacement: 5 단계, 이미지 2/3 Motorola V551 Keypad Key Replacement: 5 단계, 이미지 3/3
    • Gently release the two latches using an opening tool.

    • The plastic latches are very fragile. Don’t use excessive force or they might break.

    • Pry off the back panel by wedging an opening tool into the crevice between the back panel and the circuit board.

    • Lift the back panel off of the phone.

  6. Motorola V551 Keypad Key Replacement: 6 단계, 이미지 1/2 Motorola V551 Keypad Key Replacement: 6 단계, 이미지 2/2
    • Loosen the copper circuit board connection with an opening tool.

    • Gently lift the copper connection.

  7. Motorola V551 Keypad Key Replacement: 7 단계, 이미지 1/3 Motorola V551 Keypad Key Replacement: 7 단계, 이미지 2/3 Motorola V551 Keypad Key Replacement: 7 단계, 이미지 3/3
    • Lift up and pull out the pressure pad from under the buttons on the side of the chassis.

    • Gently lift the motherboard off of the front panel.

  8. Motorola V551 Keypad Key Replacement, Keypad: 8 단계, 이미지 1/3 Motorola V551 Keypad Key Replacement, Keypad: 8 단계, 이미지 2/3 Motorola V551 Keypad Key Replacement, Keypad: 8 단계, 이미지 3/3
    • Push both side keys in so they are not sticking out of the phone.

    • Remove the keypad.

  9. Motorola V551 Keypad Key Replacement, Keypad Key: 9 단계, 이미지 1/2 Motorola V551 Keypad Key Replacement, Keypad Key: 9 단계, 이미지 2/2
    • Gently squeeze the bottle of super glue so that only a small amount (about 1/3 pinky width) is a applied to the back side of the key.

    • Be careful while applying the super glue as it can be quite strong.

  10. Motorola V551 Keypad Key Replacement: 10 단계, 이미지 1/2 Motorola V551 Keypad Key Replacement: 10 단계, 이미지 2/2
    • Carefully place key onto the key pad so that it will be properly oriented and in line with the other keys.

결론

To reassemble your device, follow these instructions in reverse order.

다른 한 분이 해당 안내서를 완성하였습니다.

gregatron

회원 가입일: 10/29/09

105 평판

안내서 6개 작성하였습니다

Cal Poly, Team 6-6, Maness Fall 2009 Cal Poly, Team 6-6, Maness Fall 2009 회원

CPSU-MANESS-F09S6G6

4 회원들

안내서 12개 작성하였습니다

댓글 0개

댓글 쓰기

조회 통계:

24 시간 전: 0

7일 전: 1

30일 전: 1

전체 시간: 1,936