주요 콘텐츠로 건너뛰기

Munchkinz Speaker Replacement

필요한 것

  1. Munchkinz Speaker Replacement, Opening Device: 1 단계, 이미지 1개 중 1개
    • Insert spudger into the USB Micro slot and pry the case apart.

    • Be careful not to go too deep and bend the prong inside the Micro USB port.

  2. Munchkinz Speaker Replacement, Pry Device Apart: 2 단계, 이미지 2개 중 1개 Munchkinz Speaker Replacement, Pry Device Apart: 2 단계, 이미지 2개 중 2개
    • Slide the wide plastic opening tool across the seem, separating it if you can't pry the device open using just the spudger.

    • Gently separate the case so none of the cords inside are disconnected

  3. Munchkinz Speaker Replacement, Separated Device: 3 단계, 이미지 1개 중 1개
    • After prying the device apart, it should look like this.

  4. Munchkinz Speaker Replacement, Pry Speaker: 4 단계, 이미지 2개 중 1개 Munchkinz Speaker Replacement, Pry Speaker: 4 단계, 이미지 2개 중 2개
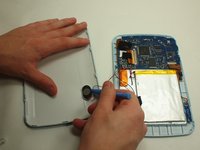
    • Use the slim plastic opening tool to remove the speaker from its position on the case.

  5. Munchkinz Speaker Replacement, Locate Wires: 5 단계, 이미지 1개 중 1개
    • Locate the red and black wires that connect the speaker to the motherboard.

  6. Munchkinz Speaker Replacement, Solder Wires: 6 단계, 이미지 1개 중 1개
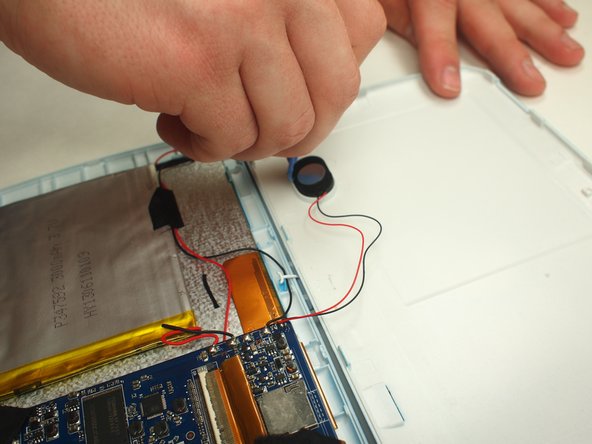
    • Un-solder the red and black speaker wires that are connected to the motherboard

결론

To reassemble your device, follow these instructions in reverse order.

작성자

2다른 기여자 명과 함께

David Wood

회원 가입일: 02/05/15

440 평판

안내서 4개를 작성함

UW Tacoma, Team 3-6, Rose Winter 2015 UW Tacoma, Team 3-6, Rose Winter 2015 회원

UWT-ROSE-W15S3G6

3 회원들

안내서 14개를 작성함

0가이드 댓글

댓글 쓰기

조회 통계:

지난 24시간: 0

지난 7일: 0

지난 30일: 4

전체 시간: 223