주요 콘텐츠로 건너뛰기

NPET K10V3 Membrane Replacement

필요한 것

  1. NPET K10V3 Membrane Replacement, Key Cap: 1 단계, 이미지 1/1
    • Remove the keyboard from its power source.

  2. NPET K10V3 Membrane Replacement: 2 단계, 이미지 1/2 NPET K10V3 Membrane Replacement: 2 단계, 이미지 2/2
    • Firmly grasp the key that will be removed.

    • Remove the keycap by pulling directly upward.

    • Not pulling straight upward or securely will cause damage to the device.

    • If your fingers cannot get a good grip the key cap, use a key cap puller in the same orientation as with fingers.

  3. NPET K10V3 Membrane Replacement, Membrane: 3 단계, 이미지 1/1
    • Flip the keyboard over so the bottom is facing upwards.

    • Remove fifteen 4.5 mm screws using a Phillips #2 screwdriver.

    • Remove three 9 mm screws using a Phillips #2 screwdriver.

    • Remove the screws from the kickstand plate first followed by the remaining screws for removal of the backplate.

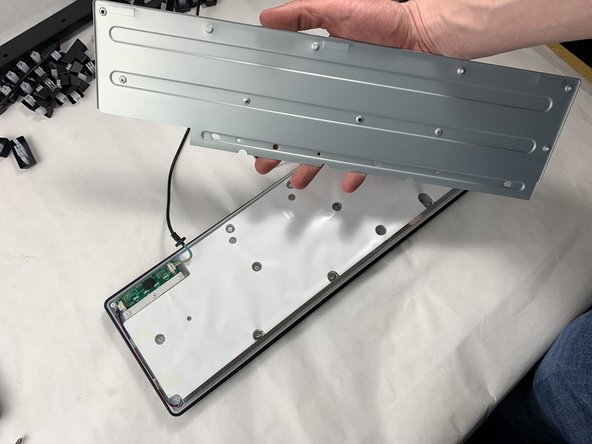
  4. NPET K10V3 Membrane Replacement: 4 단계, 이미지 1/2 NPET K10V3 Membrane Replacement: 4 단계, 이미지 2/2
    • Remove the kickstand.

    • Remove the back plate.

    • Keep in mind the location of the USB cable to ensure it is not damaged when re-assembling.

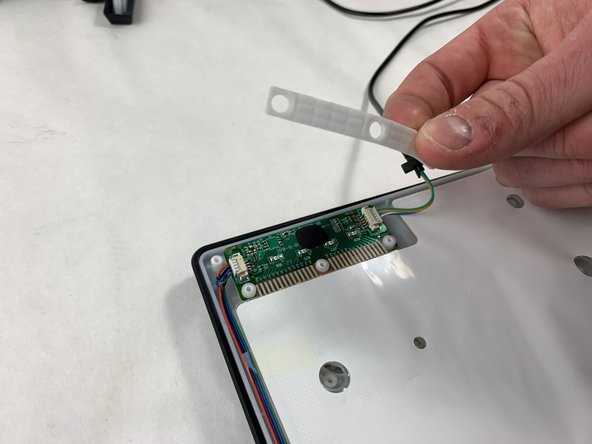
  5. NPET K10V3 Membrane Replacement: 5 단계, 이미지 1/2 NPET K10V3 Membrane Replacement: 5 단계, 이미지 2/2
    • Remove the rubber gasket that compresses the connections.

    • When removing the gasket, lift straight upward to avoid damage and snagging.

    • Clean the gasket if there is any dirt or debris.

    • Do not use chemicals or liquids when cleaning to avoid damage.

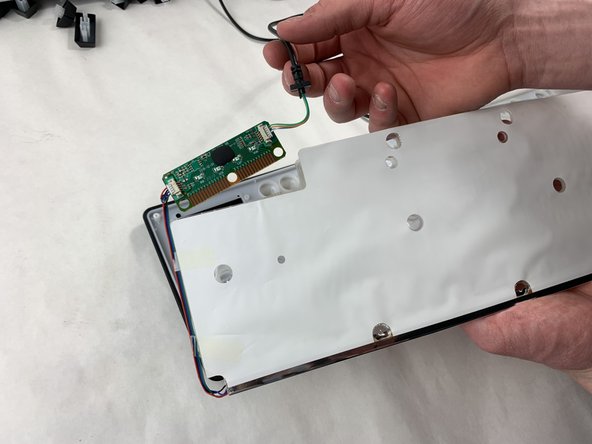
  6. NPET K10V3 Membrane Replacement: 6 단계, 이미지 1/2 NPET K10V3 Membrane Replacement: 6 단계, 이미지 2/2
    • Remove the membrane gently to reveal the copper connections for both motherboard and membrane.

    • Remove the motherboard from the membrane.

    • Remove the membrane out with the motherboard.

    • When removing both parts, lift straight upward to avoid damage and snagging.

  7. NPET K10V3 Membrane Replacement: 7 단계, 이미지 1/1
    • Place the membrane with the motherboard on a clean surface.

    • If the membrane is dirty around the key gaskets, clean gently without chemicals or liquids.

결론

To reassemble your device, follow these instructions in reverse order.

다른 한 분이 해당 안내서를 완성하였습니다.

Matthew Costa

회원 가입일: 03/18/24

343 평판

안내서 2개 작성하였습니다

UMass Dartmouth, Team 2-6, Konn Spring 2024 UMass Dartmouth, Team 2-6, Konn Spring 2024 회원

UMASSD-KONN-S24S2G6

5 회원들

안내서 3개 작성하였습니다

댓글 0개

댓글 쓰기

조회 통계:

24 시간 전: 0

7일 전: 7

30일 전: 7

전체 시간: 84