이 버전에는 잘못된 편집 사항이 있을 수 있습니다. 최신 확인된 스냅샷으로 전환하십시오.
필요한 것
-
이 단계는 번역되지 않았습니다. 번역을 도와주십시오
-
Remove the seven 10-mm black Phillips screws from the blaster casing with a #1 Phillips Screwdriver.
-
-
이 단계는 번역되지 않았습니다. 번역을 도와주십시오
-
Slowly pull apart the blaster casing, starting at the battery location.
-
Keep pulling apart slowly until it separates completely. Be cautious as to not send the internal components flying.
-
-
이 단계는 번역되지 않았습니다. 번역을 도와주십시오
-
Use a #1 Phillips screwdriver to remove the 10 -mm screw that secures the battery plate, then remove the battery cover using your hands.
-
-
-
이 단계는 번역되지 않았습니다. 번역을 도와주십시오
-
Remove the laser trigger by grabbing the trigger with your fingers and pulling it up and out.
-
-
이 단계는 번역되지 않았습니다. 번역을 도와주십시오
-
Gently pull up on the circuit board located near the gun handle until it separates from the gun.
-
-
이 단계는 번역되지 않았습니다. 번역을 도와주십시오
-
Grip the circuit board located at the base of the laser with your fingers; rotate it towards the ammo compartment on the blaster until the guide hole is clear of the guide pin.
-
Slide the laser assembly out.
-
-
이 단계는 번역되지 않았습니다. 번역을 도와주십시오
-
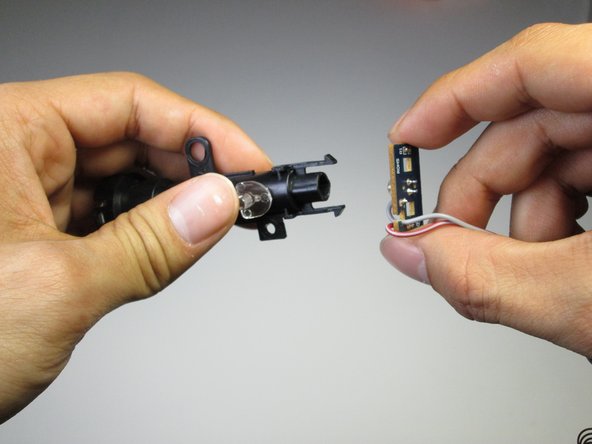
Pinch the clips holding the laser beam casing to the circuit board with your fingers. Slide off the casing revealing the LED.
-
-
이 단계는 번역되지 않았습니다. 번역을 도와주십시오
-
Use a soldering iron to heat up the two connections holding the LED to the circuit board. Remove the LED.
-


다른 6명이 해당 안내서를 완성하였습니다.

팀

Cal Poly, Team 15-6, Amido Spring 2015 Cal Poly, Team 15-6, Amido Spring 2015 회원
CPSU-AMIDO-S15S15G6
3 회원들
안내서 8개 작성하였습니다