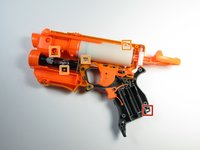
주요 콘텐츠로 건너뛰기

Nerf N-Strike Firestrike Laser Assembly Replacement

단지 전제 조건
이 안내서는 다른 가이드의 선행 작업으로 사용하기 위한 것입니다. 그 자체로는 불완전합니다.

필요한 것

  1. Nerf N-Strike Firestrike Laser Assembly Replacement, Remove battery cover: 1 단계, 이미지 1/1
    • Use a #1 Phillips screwdriver to remove the 10 -mm screw that secures the battery plate, then remove the battery cover using your hands.

  2. Nerf N-Strike Firestrike Laser Assembly Replacement: 2 단계, 이미지 1/2 Nerf N-Strike Firestrike Laser Assembly Replacement: 2 단계, 이미지 2/2
    • Slide out the two AAA batteries using your fingers.

  3. Nerf N-Strike Firestrike Laser Assembly Replacement, Blaster Casing: 3 단계, 이미지 1/1
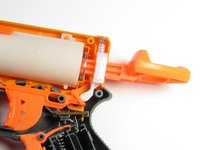
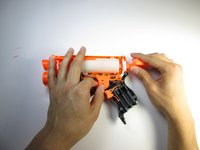
    • Remove the seven 10-mm black Phillips screws from the blaster casing with a #1 Phillips Screwdriver.

  4. Nerf N-Strike Firestrike Laser Assembly Replacement: 4 단계, 이미지 1/2 Nerf N-Strike Firestrike Laser Assembly Replacement: 4 단계, 이미지 2/2
    • Slowly pull apart the blaster casing, starting at the battery location.

    • Keep pulling apart slowly until it separates completely. Be cautious as to not send the internal components flying.

  5. Nerf N-Strike Firestrike Laser Assembly Replacement: 5 단계, 이미지 1/2 Nerf N-Strike Firestrike Laser Assembly Replacement: 5 단계, 이미지 2/2
    • For reassembly, ensure that the chrome nut gets put back in the proper location, signified by the red box.

    • For reassembly, ensure that all the parts are lined up correctly on the dowels, signified by the four orange boxes.

    • For reassembly, note the location of the springs as highlighted in the second photo.

  6. Nerf N-Strike Firestrike Laser Assembly Replacement, Laser Trigger: 6 단계, 이미지 1/2 Nerf N-Strike Firestrike Laser Assembly Replacement, Laser Trigger: 6 단계, 이미지 2/2
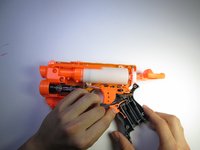
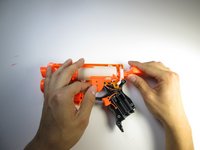
    • Remove the laser trigger by grabbing the trigger with your fingers and pulling it up and out.

  7. Nerf N-Strike Firestrike Laser Assembly Replacement, Firing Trigger: 7 단계, 이미지 1/2 Nerf N-Strike Firestrike Laser Assembly Replacement, Firing Trigger: 7 단계, 이미지 2/2
    • Remove the firing trigger by grabbing the trigger with your fingers and pulling it up and out.

  8. Nerf N-Strike Firestrike Laser Assembly Replacement, Laser Assembly: 8 단계, 이미지 1/1
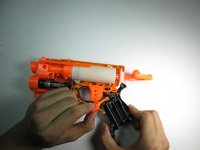
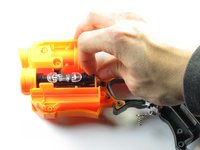
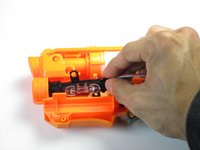
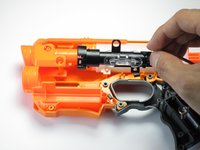
    • Gently pull up on the circuit board located near the gun handle until it separates from the gun.

    • The wire that attaches to the circuit board is also attached to the laser. Be careful not to use excessive force and damage or disconnect the wire.

  9. Nerf N-Strike Firestrike Laser Assembly Replacement: 9 단계, 이미지 1/3 Nerf N-Strike Firestrike Laser Assembly Replacement: 9 단계, 이미지 2/3 Nerf N-Strike Firestrike Laser Assembly Replacement: 9 단계, 이미지 3/3
    • Grip the circuit board located at the base of the laser with your fingers; rotate it towards the ammo compartment on the blaster until the guide hole is clear of the guide pin.

    • Slide the laser assembly out.

결론

To reassemble your device, follow these instructions in reverse order.

Hayes Kimball

회원 가입일: 04/19/15

742 평판

안내서 5개 작성하였습니다

Cal Poly, Team 15-6, Amido Spring 2015 Cal Poly, Team 15-6, Amido Spring 2015 회원

CPSU-AMIDO-S15S15G6

3 회원들

안내서 8개 작성하였습니다

댓글 0개

댓글 쓰기

조회 통계:

24 시간 전: 0

7일 전: 0

30일 전: 0

전체 시간: 136