주요 콘텐츠로 건너뛰기
수리 커뮤니티 가입 - 계정 만들기

Nextbook 8 Camera Replacement

필요한 것

  1. Nextbook 8 Camera Replacement, Battery: 1 단계, 이미지 2개 중 1개 Nextbook 8 Camera Replacement, Battery: 1 단계, 이미지 2개 중 2개
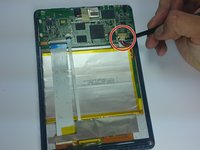
    • Use the plastic opening tool to remove the back cover. Carefully slide the tool between the front glass and back cover.

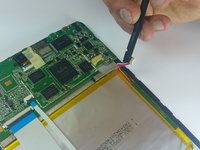
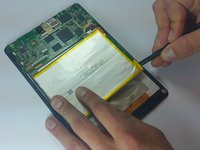
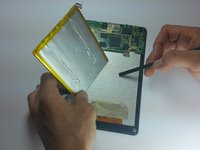
    • Slide the tool along the edge to work the back cover off.

    • It helps to have an extra tool to stick in the gap and keep the back cover separated from the glass as you slide the other tool.

  2. Nextbook 8 Camera Replacement: 2 단계, 이미지 2개 중 1개 Nextbook 8 Camera Replacement: 2 단계, 이미지 2개 중 2개
    • Remove the tape covering the motherboard.

    • Remove the silver tape holding the white ribbon cables to the battery.

  3. Nextbook 8 Camera Replacement: 3 단계, 이미지 2개 중 1개 Nextbook 8 Camera Replacement: 3 단계, 이미지 2개 중 2개
    • Use a spudger to carefully disconnect the battery connector from the motherboard.

    • When working with electronics, it's important to choose a tool that's ESD-safe to avoid accidental damage to the device. The regular black nylon spudger or a plastic opening tool should be used whenever possible.

  4. Nextbook 8 Camera Replacement: 4 단계, 이미지 1개 중 1개
    이 단계에 사용된 도구:
    Tweezers
    $4.99
    • Use a spudger to lift up the black bar on the two ZIF connectors located above the battery.

    • Pull the ribbon cables out of the connectors with tweezers or two fingers.

  5. Nextbook 8 Camera Replacement: 5 단계, 이미지 2개 중 1개 Nextbook 8 Camera Replacement: 5 단계, 이미지 2개 중 2개
    • Using the flat end of a spudger, carefully work the spudger under the battery, lifting it off of the device.

    • The battery is very malleable, so do not try to pull it off all at once.

  6. Nextbook 8 Camera Replacement, Camera: 6 단계, 이미지 1개 중 1개
    • Slowly pull up masking tape by pulling down from the top.

    • Be careful because both the front and rear cameras are attached to each other.

  7. Nextbook 8 Camera Replacement: 7 단계, 이미지 1개 중 1개
    • Peel the bottom part of the masking tape off to reveal the ribbon connector.

  8. Nextbook 8 Camera Replacement: 8 단계, 이미지 1개 중 1개
    • Pull both camera lenses out of the holes.

  9. Nextbook 8 Camera Replacement: 9 단계, 이미지 1개 중 1개
    • Use a spudger to disconnect the two camera lenses from the device.

    • Carefully lift the black connector to release the cameras.

  10. Nextbook 8 Camera Replacement: 10 단계, 이미지 1개 중 1개
    • Pull both camera lenses out of the ribbon connector.

결론

To reassemble your device, follow these instructions in reverse order.

작성자

1다른 기여자 명과 함께

Dylan Wiese

회원 가입일: 03/11/15

1,889 평판

안내서 5개를 작성함

Colorado Springs, Team 5-1, Panko Spring 2015 Colorado Springs, Team 5-1, Panko Spring 2015 회원

UCCS-PANKO-S15S5G1

3 회원들

안내서 10개를 작성함

0가이드 댓글

댓글 쓰기

조회 통계:

지난 24시간: 1

지난 7일: 4

지난 30일: 11

전체 시간: 1,410