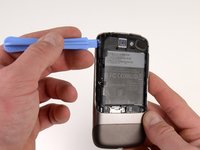
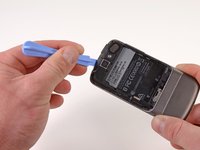
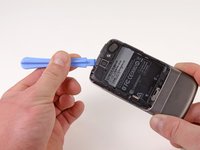
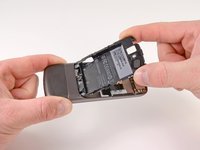
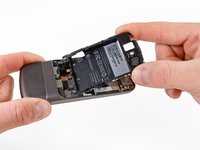
주요 콘텐츠로 건너뛰기

Nexus One Battery Housing Replacement

필요한 것

  1. Nexus One Battery Housing Replacement, Rear Cover: 1 단계, 이미지 2개 중 1개 Nexus One Battery Housing Replacement, Rear Cover: 1 단계, 이미지 2개 중 2개
    • Using two fingers, push up on the rear cover.

  2. Nexus One Battery Housing Replacement: 2 단계, 이미지 1개 중 1개
    • The rear cover slides up and off.

  3. Nexus One Battery Housing Replacement, Battery: 3 단계, 이미지 1개 중 1개
    • Using the plastic opening tools, pry the left bottom corner of the battery up.

  4. Nexus One Battery Housing Replacement: 4 단계, 이미지 1개 중 1개
    • Pull the battery up and out.

  5. Nexus One Battery Housing Replacement, Battery Housing: 5 단계, 이미지 1개 중 1개
    • Remove the two Torx T5 screws.

    • Remove the one Philips #00 screw.

  6. Nexus One Battery Housing Replacement: 6 단계, 이미지 2개 중 1개 Nexus One Battery Housing Replacement: 6 단계, 이미지 2개 중 2개
    • Using the plastic opening tool, pry up the battery housing upwards.

    • Push pry tool down, undoing the plastic tab.

  7. Nexus One Battery Housing Replacement: 7 단계, 이미지 2개 중 1개 Nexus One Battery Housing Replacement: 7 단계, 이미지 2개 중 2개
    • Pry the upper left tab open on the battery housing.

  8. Nexus One Battery Housing Replacement: 8 단계, 이미지 2개 중 1개 Nexus One Battery Housing Replacement: 8 단계, 이미지 2개 중 2개
    • Pry the top tab of the battery housing.

  9. Nexus One Battery Housing Replacement: 9 단계, 이미지 2개 중 1개 Nexus One Battery Housing Replacement: 9 단계, 이미지 2개 중 2개
    • Pry the right side tab of the battery housing.

  10. Nexus One Battery Housing Replacement: 10 단계, 이미지 2개 중 1개 Nexus One Battery Housing Replacement: 10 단계, 이미지 2개 중 2개
    • Pull up on the battery housing.

    • Slide the battery housing out to remove it.

결론

To reassemble your device, follow these instructions in reverse order.

다른 2명이 해당 안내서를 완성하였습니다.

작성자

4다른 기여자 명과 함께

Niklas Johnson

회원 가입일: 01/31/12

1,207 평판

안내서 18개를 작성함

0가이드 댓글

댓글 쓰기

조회 통계:

지난 24시간: 0

지난 7일: 1

지난 30일: 3

전체 시간: 1,667