주요 콘텐츠로 건너뛰기

Nikon 1 J5 LCD Module Replacement

필요한 것

  1. Nikon 1 J5 LCD Module Replacement, Remove Micro SD card and Battery: 1 단계, 이미지 1개 중 1개
    • Remove Micro SD card and Battery

  2. Nikon 1 J5 LCD Module Replacement: 2 단계, 이미지 3개 중 1개 Nikon 1 J5 LCD Module Replacement: 2 단계, 이미지 3개 중 2개 Nikon 1 J5 LCD Module Replacement: 2 단계, 이미지 3개 중 3개
    • Remove 2 screws

    • Open plastic LCD connector cover

    • Lift FPC connector latch

    • Detach LCD FPC

  3. Nikon 1 J5 LCD Module Replacement, Detail of the FPC connector: 3 단계, 이미지 3개 중 1개 Nikon 1 J5 LCD Module Replacement, Detail of the FPC connector: 3 단계, 이미지 3개 중 2개 Nikon 1 J5 LCD Module Replacement, Detail of the FPC connector: 3 단계, 이미지 3개 중 3개
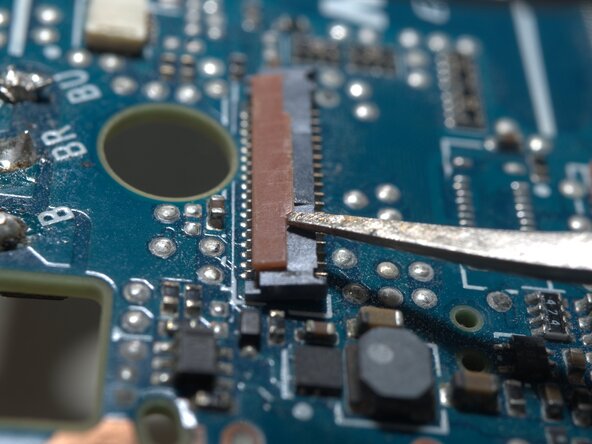
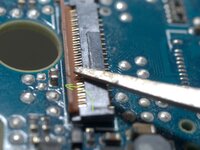
    • The FPC cable is inserted from right side of this photo.

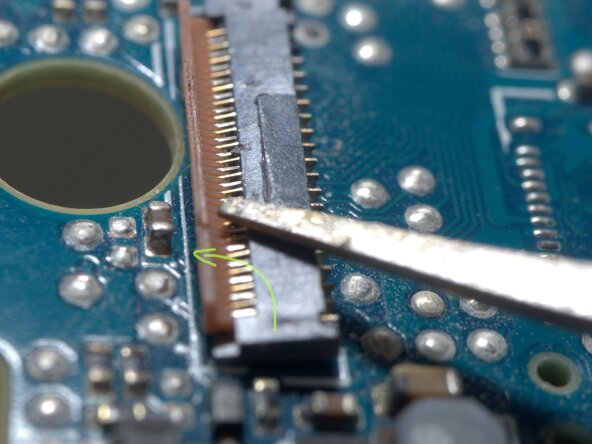
    • Insert a fine tip tweezer or any thin flat tip tool under the latch, and gentally lift it.

    • The latch rotates CCW for about 90 degrees

  4. Nikon 1 J5 LCD Module Replacement: 4 단계, 이미지 3개 중 1개 Nikon 1 J5 LCD Module Replacement: 4 단계, 이미지 3개 중 2개 Nikon 1 J5 LCD Module Replacement: 4 단계, 이미지 3개 중 3개
    • Remove 4 screws

    • Remove LCD module

결론

To reassemble your device, follow these instructions in reverse order.

다른 한 분이 해당 안내서를 완성하였습니다.

작성자

1다른 기여자 명과 함께

Terrance

회원 가입일: 11/17/09

6,765 평판

안내서 18개를 작성함

0가이드 댓글

댓글 쓰기

조회 통계:

지난 24시간: 1

지난 7일: 4

지난 30일: 23

전체 시간: 749