주요 콘텐츠로 건너뛰기

Nikon Coolpix L610 LCD Screen Replacement

필요한 것

  1. Nikon Coolpix L610 LCD Screen Replacement, Plastic Cover: 1 단계, 이미지 1/2 Nikon Coolpix L610 LCD Screen Replacement, Plastic Cover: 1 단계, 이미지 2/2
    • Remove the four (3.20 mm) Phillips #00 screws at the bottom of the device.

  2. Nikon Coolpix L610 LCD Screen Replacement: 2 단계, 이미지 1/1
    • Remove the top (4.10 mm) Phillips #00 screw adjacent to the battery compartment.

    • Remove the bottom (3.20 mm) Phillips #00 screw adjacent to the battery compartment.

  3. Nikon Coolpix L610 LCD Screen Replacement: 3 단계, 이미지 1/1
    • Remove the top (4.20 mm) Phillips #00 screw adjacent to the mic side of the camera and opposite the battery side.

    • Remove the lower (3.20 mm) Phillips #00 screw adjacent to the mic side of the camera and opposite of the battery side.

  4. Nikon Coolpix L610 LCD Screen Replacement: 4 단계, 이미지 1/3 Nikon Coolpix L610 LCD Screen Replacement: 4 단계, 이미지 2/3 Nikon Coolpix L610 LCD Screen Replacement: 4 단계, 이미지 3/3
    • Separate the case using the plastic prying tool. This can be done by placing the tool in the position that is shown and in the position on the left side of the camera.

  5. Nikon Coolpix L610 LCD Screen Replacement, Removing the screen: 5 단계, 이미지 1/1
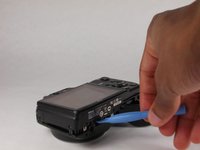
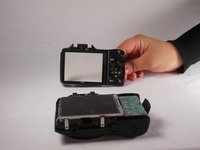
    • Using a prying tool, carefully lift up the LCD screen but do NOT pull it off.

  6. Nikon Coolpix L610 LCD Screen Replacement, Removing the LCD Screen Ribbon: 6 단계, 이미지 1/2 Nikon Coolpix L610 LCD Screen Replacement, Removing the LCD Screen Ribbon: 6 단계, 이미지 2/2
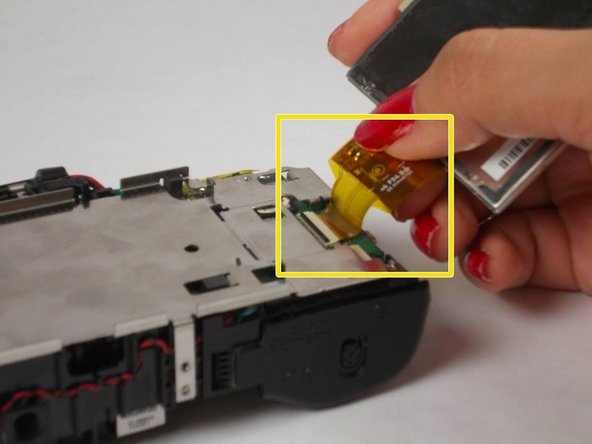
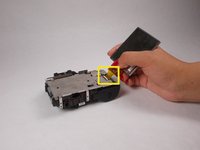
    • While the LCD screen is loose and unattached, there is a latch that is holding the ribbon in place. Slide the latch down and pull the ribbon out.

결론

To reassemble your device, follow these instructions in reverse order.

Jeremy

회원 가입일: 01/21/15

1,027 평판

안내서 5개 작성하였습니다

USF Tampa, Team 9-4, Brown Winter 2015 USF Tampa, Team 9-4, Brown Winter 2015 회원

USFT-BROWN-W15S9G4

4 회원들

안내서 12개 작성하였습니다

댓글 0개

댓글 쓰기

조회 통계:

24 시간 전: 1

7일 전: 2

30일 전: 4

전체 시간: 874