주요 콘텐츠로 건너뛰기

Nikon Coolpix S9050 LCD Screen Replacement

보관된 가이드
해당 안내서는 단지 역사적인 목적으로 보관됩니다. 최신 버전 안내서를 사용하여 수리 하십시오.

필요한 것

  1. Nikon Coolpix S9050 LCD Screen Replacement, LCD Screen Replacement: 1 단계, 이미지 1/3 Nikon Coolpix S9050 LCD Screen Replacement, LCD Screen Replacement: 1 단계, 이미지 2/3 Nikon Coolpix S9050 LCD Screen Replacement, LCD Screen Replacement: 1 단계, 이미지 3/3
    • Flip the camera upside down.

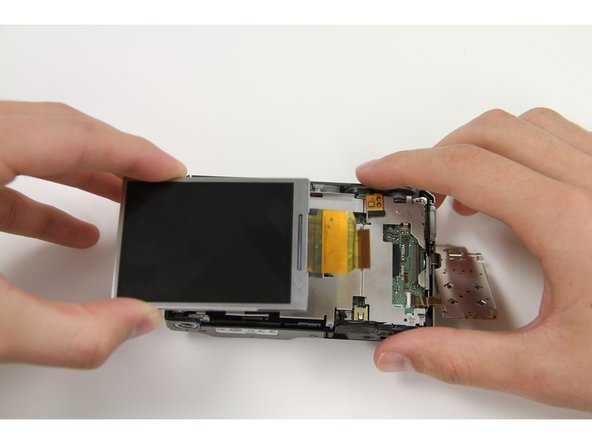
    • Slide the locking mechanism to the left.

    • Push yellow holding pin upward until battery pops up.

    • Pull out battery.

  2. Nikon Coolpix S9050 LCD Screen Replacement: 2 단계, 이미지 1/3 Nikon Coolpix S9050 LCD Screen Replacement: 2 단계, 이미지 2/3 Nikon Coolpix S9050 LCD Screen Replacement: 2 단계, 이미지 3/3
    • Tools Required: PH00 screwdriver

    • Remove the two screws on the left side of the camera.

    • Remove the two screws on the right side of the camera.

    • Remove the four screws from he bottom of the camera.

    • Remove the screw that is located on the inside of the battery chamber.

  3. Nikon Coolpix S9050 LCD Screen Replacement: 3 단계, 이미지 1/1
    • Use a blue pry tool and separate the black back plate from the camera.

    • Once the black plate is separated, carefully pull apart the back plate from the front half of the camera.

    • Make sure all four sides of the back casing are pried from the camera before completely pulling it apart. If not pulled off evenly plastic placement tabs may break.

  4. Nikon Coolpix S9050 LCD Screen Replacement: 4 단계, 이미지 1/2 Nikon Coolpix S9050 LCD Screen Replacement: 4 단계, 이미지 2/2
    • Take the blue pry tool and lift the brown latch on the ZIF connecter that holds the screen tab in place.

    • Once the brown latch on the ZIF connecter is lifted upward, carefully lift the screen and pull away from the camera.

    • The screen and screen tab will detach from the motherboard.

  5. Nikon Coolpix S9050 LCD Screen Replacement: 5 단계, 이미지 1/1
    • Take the new screen and slide the tab in to the ZIF connector that the previous screen was plugged in to.

    • Close the brown latch on the ZIF connector and fit the screen in the original slot.

    • Return the dial flap to its original position.

결론

Follow the steps in reverse order to put the camera back together.

Paige Kloetzer

회원 가입일: 09/24/15

121 평판

안내서 1개 작성함

Texas Tech, Team 22-3, Rauch Fall 2015 Texas Tech, Team 22-3, Rauch Fall 2015 회원

TTU-RAUCH-F15S22G3

3 회원들

안내서 1개 작성하였습니다

댓글 0개

댓글 쓰기

조회 통계:

24 시간 전: 0

7일 전: 0

30일 전: 0

전체 시간: 327