주요 콘텐츠로 건너뛰기

Nintendo 3DS 2015 Motherboard Replacement

필요한 것

  1. Nintendo 3DS 2015 Motherboard Replacement, Battery: 1 단계, 이미지 1/1
    • Unscrew the two 3mm Phillips #0 head screws along the top edge of the device.

    • The screws on the back panel strip easily. Go slowly and press down firmly.

    • The screws on the back panel are held in by locking washers, so they won't come out of the back panel.

  2. Nintendo 3DS 2015 Motherboard Replacement: 2 단계, 이미지 1/2 Nintendo 3DS 2015 Motherboard Replacement: 2 단계, 이미지 2/2
    • Pull the top corner tabs of the front face plate outward and towards you.

    • Pull the faceplate up and out of the slots at the bottom of the device.

    • Set aside the back faceplate.

  3. Nintendo 3DS 2015 Motherboard Replacement: 3 단계, 이미지 1/3 Nintendo 3DS 2015 Motherboard Replacement: 3 단계, 이미지 2/3 Nintendo 3DS 2015 Motherboard Replacement: 3 단계, 이미지 3/3
    • Insert a plastic opening tool into the notch at the top of the battery.

    • Pry the battery up with the plastic opening tool.

  4. Nintendo 3DS 2015 Motherboard Replacement, SD Card Reader: 4 단계, 이미지 1/1
    • Unscrew the three 3mm Y0 screws along the right and bottom of the SD card reader.

    • The bottom of the SD card reader should slightly pop out after removing the screws.

  5. Nintendo 3DS 2015 Motherboard Replacement: 5 단계, 이미지 1/1
    • Pull the SD card reader from the edge with two holes gently to free the tab at the top of the SD card reader.

    • Don't completely pull the SD card out of the device yet. There is a ribbon cable connected under the SD card reader.

    • Reorient the device so that the power jack faces you.

  6. Nintendo 3DS 2015 Motherboard Replacement: 6 단계, 이미지 1/2 Nintendo 3DS 2015 Motherboard Replacement: 6 단계, 이미지 2/2
    • Lift the SD card reader gently.

    • Use a plastic opening tool to pry the SD card ribbon cable off the socket on the motherboard.

    • Lift the SD card reader out off of the lower casing.

  7. Nintendo 3DS 2015 Motherboard Replacement, Lower Case: 7 단계, 이미지 1/3 Nintendo 3DS 2015 Motherboard Replacement, Lower Case: 7 단계, 이미지 2/3 Nintendo 3DS 2015 Motherboard Replacement, Lower Case: 7 단계, 이미지 3/3
    • Reorient the device so that the game slot now faces you.

    • Remove the two rubber bumpers along the top of the device using tweezers.

    • Unscrew the seven 6mm Phillips #00 screws along the top and bottom of the 3DS.

  8. Nintendo 3DS 2015 Motherboard Replacement: 8 단계, 이미지 1/2 Nintendo 3DS 2015 Motherboard Replacement: 8 단계, 이미지 2/2
    • Lift the top edge of the lower case slightly off on the 3DS.

    • Don't pull the lower casing completely off, you may break those connections. There are ribbon cables that must be disconnected first.

    • Pry the ribbon cable socket under the right trigger using a plastic opening tool.

    • Pry the ribbon cable socket under the infrared receiver cover using a plastic opening tool.

  9. Nintendo 3DS 2015 Motherboard Replacement: 9 단계, 이미지 1/3 Nintendo 3DS 2015 Motherboard Replacement: 9 단계, 이미지 2/3 Nintendo 3DS 2015 Motherboard Replacement: 9 단계, 이미지 3/3
    • Open the device slowly from its top edge. Be careful not to tug the ribbon cable connected near the bottom edge of the device.

    • Pry the last ribbon cable attached to the lower case using a plastic opening tool.

  10. Nintendo 3DS 2015 Motherboard Replacement, Circle Pad: 10 단계, 이미지 1/3 Nintendo 3DS 2015 Motherboard Replacement, Circle Pad: 10 단계, 이미지 2/3 Nintendo 3DS 2015 Motherboard Replacement, Circle Pad: 10 단계, 이미지 3/3
    • Locate the joystick assembly near the top right corner of the motherboard.

    • Remove the two 8mm Phillips #00 screws from the back of the joystick.

    • Use the flat end of the spudger to pry off the joystick pad from its plastic housing.

  11. Nintendo 3DS 2015 Motherboard Replacement: 11 단계, 이미지 1/2 Nintendo 3DS 2015 Motherboard Replacement: 11 단계, 이미지 2/2
    • Lift the joystick pad and place it on its back. This will reveal the ribbon cable connected to the joystick pad.

    • Use the flat end of the spudger to pry up the retaining flap for the ribbon cable.

    • Lift the joystick out of the device.

  12. Nintendo 3DS 2015 Motherboard Replacement, Motherboard: 12 단계, 이미지 1/3 Nintendo 3DS 2015 Motherboard Replacement, Motherboard: 12 단계, 이미지 2/3 Nintendo 3DS 2015 Motherboard Replacement, Motherboard: 12 단계, 이미지 3/3
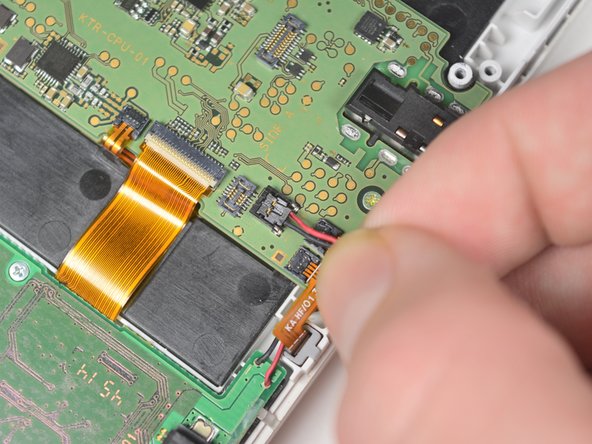
    • Remove the power cable, indicated by the black and red wires, by gently pulling it up and out of the connector.

    • Gently pull the ribbon cables out of the 4 ZIF connectors.

    • Do not lift up on the tabs on these ZIF connectors. Lifting these tabs will break the connectors.

  13. Nintendo 3DS 2015 Motherboard Replacement: 13 단계, 이미지 1/2 Nintendo 3DS 2015 Motherboard Replacement: 13 단계, 이미지 2/2
    • Pull up gently on the blue wifi antenna.

    • Pry the retaining tab on the connector behind the infrared receiver and gently pull the ribbon cable from the connector with tweezers.

  14. Nintendo 3DS 2015 Motherboard Replacement: 14 단계, 이미지 1/3 Nintendo 3DS 2015 Motherboard Replacement: 14 단계, 이미지 2/3 Nintendo 3DS 2015 Motherboard Replacement: 14 단계, 이미지 3/3
    • Lift the retaining tab and remove the large ribbon cable on the left side of the motherboard.

    • Lift the retaining tab and remove the large ribbon cable on the top of the motherboard behind the infrared receiver.

    • Lift the retaining tab and remove the large ribbon cable on the top of the motherboard just above the joysitck housing.

  15. Nintendo 3DS 2015 Motherboard Replacement: 15 단계, 이미지 1/3 Nintendo 3DS 2015 Motherboard Replacement: 15 단계, 이미지 2/3 Nintendo 3DS 2015 Motherboard Replacement: 15 단계, 이미지 3/3
    • Double check that all motherboard connection on the top of the board have been disconnected.

    • Remove the three, 3mm Phillips #00 screws that secure the motherboard to the device housing.

    • Lift the motherboard genlty by the headphone jack.

    • Remove the two ribbons on the back of the device by lifting the retaining tabs on the ZIF connectors.

결론

To reassemble your device, follow these instructions in reverse order.

다른 6명이 해당 안내서를 완성하였습니다.

Tyler Starr

회원 가입일: 10/06/16

1,509 평판

안내서 7개 작성하였습니다

Cal Poly, Team 4-6, Livingston Fall 2016 Cal Poly, Team 4-6, Livingston Fall 2016 회원

CPSU-LIVINGSTON-F16S4G6

4 회원들

안내서 35개 작성하였습니다

댓글 0개

댓글 쓰기

조회 통계:

24 시간 전: 12

7일 전: 55

30일 전: 222

전체 시간: 7,486