주요 콘텐츠로 건너뛰기

Nintendo 3DS Stylus Housing Replacement

필요한 것

  1. Nintendo 3DS Stylus Housing Replacement, Back Cover: 1 단계, 이미지 1/1
    • Unscrew the four Phillips #00 screws along the top of the back cover.

    • The screws are held in place by locking washers, and will not come out of the back cover.

    • The comments section is full of unlucky souls who will tell you that the screws here through step 4 will strip incredibly easily. Press down fairly hard, and go slow.

  2. Nintendo 3DS Stylus Housing Replacement: 2 단계, 이미지 1/2 Nintendo 3DS Stylus Housing Replacement: 2 단계, 이미지 2/2
    • Hold the device in one hand and turn it over.

    • Grab the top edge of the back cover with your opposite hand so that the cover does not fall back into place.

    • Flip the 3DS over again so that the back cover is facing up.

    • Pull the back cover up and away from the rest of the device to remove it.

  3. Nintendo 3DS Stylus Housing Replacement, Battery: 3 단계, 이미지 1/3 Nintendo 3DS Stylus Housing Replacement, Battery: 3 단계, 이미지 2/3 Nintendo 3DS Stylus Housing Replacement, Battery: 3 단계, 이미지 3/3
    • Insert a plastic opening tool into the notch in the lower case above the battery.

    • Pry the battery up with the plastic opening tool.

    • Grab the top edge of the battery and lift it out of the lower case.

  4. Nintendo 3DS Stylus Housing Replacement, Lower Case: 4 단계, 이미지 1/1
    • Remove the nine 6.3 mm black Phillips screws from the lower case.

    • These screws will strip very easily unless you use the correct size bit. Apply pressure to the screws while turning to avoid stripping them.

    • Remove the 2.4 mm silver Phillips screw above the game cartridge slot.

  5. Nintendo 3DS Stylus Housing Replacement: 5 단계, 이미지 1/3 Nintendo 3DS Stylus Housing Replacement: 5 단계, 이미지 2/3 Nintendo 3DS Stylus Housing Replacement: 5 단계, 이미지 3/3
    • Lift the bottom edge of the lower case off the rest of the 3DS.

    • There are still two ribbon cables connecting the mother board to the case, so be sure not to pull the lower case all the way off.

    • Use a plastic opening tool to pry the shoulder button ribbon cables off their sockets on the motherboard.

    • Remove the lower case from the device.

  6. Nintendo 3DS Stylus Housing Replacement, Stylus Housing: 6 단계, 이미지 1/1
    • Remove the stylus from the lower case.

  7. Nintendo 3DS Stylus Housing Replacement: 7 단계, 이미지 1/3 Nintendo 3DS Stylus Housing Replacement: 7 단계, 이미지 2/3 Nintendo 3DS Stylus Housing Replacement: 7 단계, 이미지 3/3
    • Remove the four 2.4 mm Phillips screws that secure the stylus housing to the lower case.

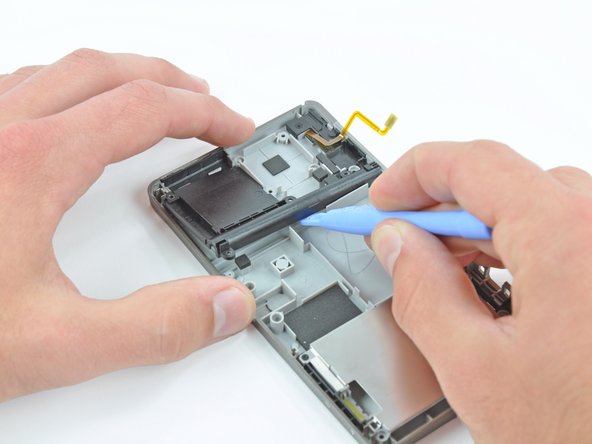
    • Use a plastic opening tool to pry the stylus housing up from the lower case.

    • Grab the stylus housing and remove it from the lower case.

결론

To reassemble your device, follow these instructions in reverse order.

다른 한 분이 해당 안내서를 완성하였습니다.

David Hodson

회원 가입일: 04/13/10

150,467 평판

안내서 127개 작성하였습니다

댓글 0개

댓글 쓰기

조회 통계:

24 시간 전: 2

7일 전: 7

30일 전: 34

전체 시간: 7,171