이 버전에는 잘못된 편집 사항이 있을 수 있습니다. 최신 확인된 스냅샷으로 전환하십시오.
필요한 것
-
이 단계는 번역되지 않았습니다. 번역을 도와주십시오
-
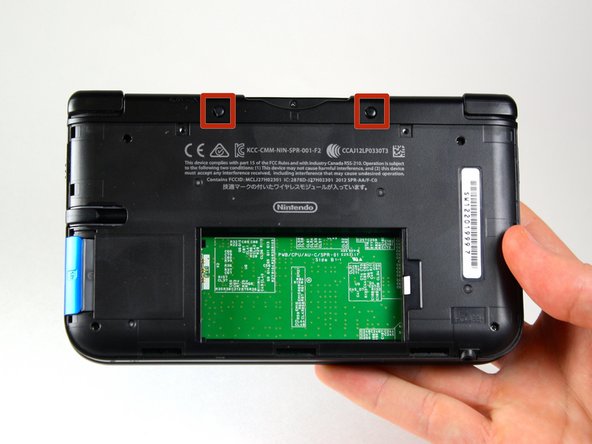
Loosen the two #0 Phillips 4.2 mm-length screws located at the top of the back cover.
-
-
이 단계는 번역되지 않았습니다. 번역을 도와주십시오
-
Hold the device so that the cover is facing up.
-
Using a plastic opening tool, pry off the cover starting at the top right corner.
-
Hold the edge of the cover to ensure it does not reattach.
-
Look for the small section below the stylus compartment. Pry off the cover at that point if it is still attached.
-
Take off the cover of the device and set it aside.
-
-
이 단계는 번역되지 않았습니다. 번역을 도와주십시오
-
Insert the plastic opening tool into the opening located on the right side of the battery.
-
Pry off the battery from the lower casing.
-
Lift the battery out of the case and set aside.
-
-
이 단계는 번역되지 않았습니다. 번역을 도와주십시오
-
Using tweezers pull out the rubber bumpers that are located at the top of the device on either side of the game cartridge compartment.
-
-
-
이 단계는 번역되지 않았습니다. 번역을 도와주십시오
-
Remove the 2.3 mm screw located above the game cartridge slot with a Phillips #00 screwdriver.
-
-
이 단계는 번역되지 않았습니다. 번역을 도와주십시오
-
Make sure the SD card has been removed. With a plastic opening tool pry off the lower case starting at the bottom edge and working around the perimeter.
-
Two ribbon cables connect the case to the circuit board. Be careful to not pull the case too hard and rip the ribbon cables.
-
-
이 단계는 번역되지 않았습니다. 번역을 도와주십시오
-
Remove the ribbon cables located underneath the left and right bumpers by prying up the base of the cables with a plastic opening tool.
-
Completely remove the lower case from the rest of the device and set aside.
-
-
이 단계는 번역되지 않았습니다. 번역을 도와주십시오
-
Position the device such that the game cartridge slot is located at the top.
-
Locate the circle pad on the right side of the device.
-
Remove the two 7.5 mm screws on the upper left and the bottom right corners.
-
-
이 단계는 번역되지 않았습니다. 번역을 도와주십시오
-
Using a plastic opening tool pop off the circle pad joystick.
-
Do not use excessive force with the plastic opening tool. There is a ribbon attaching the circle pad joystick to the motherboard that will remain attached.
-
-
이 단계는 번역되지 않았습니다. 번역을 도와주십시오
-
Using the flat head side of the spudger carefully lift up the retaining flap that attaches the circle pad ribbon to the motherboard.
-
Remove the ribbon and circle pad joystick.
-
다른 96명이 해당 안내서를 완성하였습니다.
댓글 28개
Thank you very much.Perfect repair the circle pad.
The circle pad link:http://www.ebay.com/itm/Genuine-New-Anal...?
mouyi chen - 답글
Great guide, just upgraded my joystick. Bought my replacement from shapeways. The replacement is metal so it won't break like the last one. Also it's a lot more comfortable.
Anyway highly recommend this replacement:
I'm having trouble removing the plastic case in step 7, it seems it refuses to come apart at the SD card part. What should I do? What is holding it down?
Remove the SD card
My son broke the circle pad on his 3DS XL while playing Super Smash Bros.. I purchased 2 circle pads just in-case from http://www.ebay.com/itm/Genuine-New-Anal...
Excellent replacement, just like the original circle pad. The write-up and pics were very helpful. Highly recommend for anyone needing to buy and replace the circle button on a 3DS XL.


