주요 콘텐츠로 건너뛰기

Nintendo 3DS XL IR Board Replacement

필요한 것

  1. Nintendo 3DS XL IR Board Replacement, Battery: 1 단계, 이미지 1/2 Nintendo 3DS XL IR Board Replacement, Battery: 1 단계, 이미지 2/2
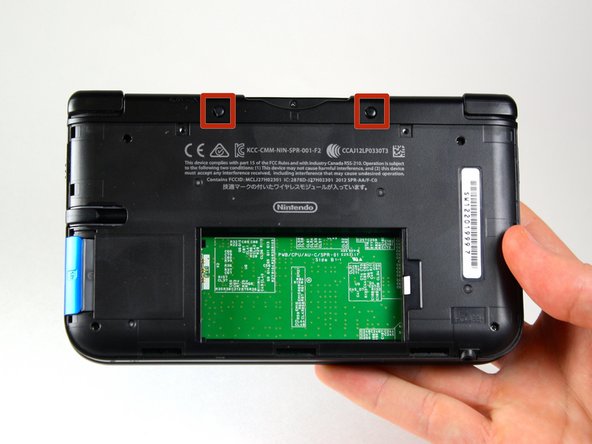
    • Loosen the two #0 Phillips 4.2 mm-length screws located at the top of the back cover.

    • The screws have locking washers that prevent the screws from falling off of the back cover. Leave these locking washers on the screws; it is not necessary to remove the washers for this repair guide.

  2. Nintendo 3DS XL IR Board Replacement: 2 단계, 이미지 1/2 Nintendo 3DS XL IR Board Replacement: 2 단계, 이미지 2/2
    • Hold the device so that the cover is facing up.

    • Using a plastic opening tool, pry off the cover starting at the top right corner.

    • Hold the edge of the cover to ensure it does not reattach.

    • Look for the small section below the stylus compartment. Pry off the cover at that point if it is still attached.

    • Take off the cover of the device and set it aside.

  3. Nintendo 3DS XL IR Board Replacement: 3 단계, 이미지 1/3 Nintendo 3DS XL IR Board Replacement: 3 단계, 이미지 2/3 Nintendo 3DS XL IR Board Replacement: 3 단계, 이미지 3/3
    • Insert the plastic opening tool into the opening located on the right side of the battery.

    • Pry off the battery from the lower casing.

    • Lift the battery out of the case and set aside.

  4. Nintendo 3DS XL IR Board Replacement, Circle Pad Joystick: 4 단계, 이미지 1/2 Nintendo 3DS XL IR Board Replacement, Circle Pad Joystick: 4 단계, 이미지 2/2
    • Using tweezers pull out the rubber bumpers that are located at the top of the device on either side of the game cartridge compartment.

  5. Nintendo 3DS XL IR Board Replacement: 5 단계, 이미지 1/2 Nintendo 3DS XL IR Board Replacement: 5 단계, 이미지 2/2
    • Remove the six 6.2 mm screws using a Phillips #00 screwdriver

  6. Nintendo 3DS XL IR Board Replacement: 6 단계, 이미지 1/1
    • Remove the 2.3 mm screw located above the game cartridge slot with a Phillips #00 screwdriver.

  7. Nintendo 3DS XL IR Board Replacement: 7 단계, 이미지 1/3 Nintendo 3DS XL IR Board Replacement: 7 단계, 이미지 2/3 Nintendo 3DS XL IR Board Replacement: 7 단계, 이미지 3/3
    • Make sure the SD card has been removed. With a plastic opening tool pry off the lower case starting at the bottom edge and working around the perimeter.

    • Two ribbon cables connect the case to the circuit board. Be careful to not pull the case too hard and rip the ribbon cables.

  8. Nintendo 3DS XL IR Board Replacement: 8 단계, 이미지 1/3 Nintendo 3DS XL IR Board Replacement: 8 단계, 이미지 2/3 Nintendo 3DS XL IR Board Replacement: 8 단계, 이미지 3/3
    • Remove the ribbon cables located underneath the left and right bumpers by prying up the base of the cables with a plastic opening tool.

    • Completely remove the lower case from the rest of the device and set aside.

  9. Nintendo 3DS XL IR Board Replacement: 9 단계, 이미지 1/2 Nintendo 3DS XL IR Board Replacement: 9 단계, 이미지 2/2
    • Position the device such that the game cartridge slot is located at the top.

    • Locate the circle pad on the right side of the device.

    • Remove the two 7.5 mm screws on the upper left and the bottom right corners.

  10. Nintendo 3DS XL IR Board Replacement: 10 단계, 이미지 1/2 Nintendo 3DS XL IR Board Replacement: 10 단계, 이미지 2/2
    • Using a plastic opening tool pop off the circle pad joystick.

    • Do not use excessive force with the plastic opening tool. There is a ribbon attaching the circle pad joystick to the motherboard that will remain attached.

    • There is a loose washer located in between the circle pad joystick and the circle pad. Use caution and do not lose this piece.

  11. Nintendo 3DS XL IR Board Replacement: 11 단계, 이미지 1/2 Nintendo 3DS XL IR Board Replacement: 11 단계, 이미지 2/2
    • Using the flat head side of the spudger carefully lift up the retaining flap that attaches the circle pad ribbon to the motherboard.

    • Remove the ribbon and circle pad joystick.

  12. Nintendo 3DS XL IR Board Replacement, IR Board: 12 단계, 이미지 1/2 Nintendo 3DS XL IR Board Replacement, IR Board: 12 단계, 이미지 2/2
    • Position the device such that the game cartridge slot is located at the top.

    • Locate the IR board located on the upper right side of the motherboard.

    • The IR board is installed upside-down in these photos by mistake. Installing it this way will result in your DS failing to start. Note the orientation of your IR board before you remove it, and reinstall it the same way.

    • Remove the IR board with a plastic opening tool by inserting the tool below the IR board and gently prying up.

결론

To reassemble your device, follow these instructions in reverse order.

다른 11명이 해당 안내서를 완성하였습니다.

Charlene Donlon

회원 가입일: 04/08/14

10,215 평판

안내서 8개 작성하였습니다

Cal Poly, Team 9-13, Regan Spring 2014 Cal Poly, Team 9-13, Regan Spring 2014 회원

CPSU-REGAN-S14S9G13

5 회원들

안내서 43개 작성하였습니다

댓글 4개

This guide was really helpful, I had to teardown my 3DS to remove a rice crispy that was stuck in the SD card reader, I don't know how it got there, I wasn't even eating cereals

Tony The Tiger - 답글

was removing the analog stick really necessary?

8bitlooser - 답글

So I have an original 3DS and a 3DS XL the 3DS Xl Works great but the 3DS won't turn on. I believe it is because I t has a missing IR Board. I am hoping to use the one on the 3DS XL. Do you think it will work?they look similar in the pictures..... Anyway I am confused as to why I have to take out the cirlepad??

AppleTopic - 답글

if you are missing ir board the system will not boot?

Kostandinos Minas Talarantas - 답글

댓글 쓰기

조회 통계:

24 시간 전: 2

7일 전: 26

30일 전: 152

전체 시간: 16,555