주요 콘텐츠로 건너뛰기

Nintendo 64 Metal Plate Replacement

필요한 것

  1. Nintendo 64 Metal Plate Replacement, Top Cover: 1 단계, 이미지 1/1
    • Remove the expansion pack cover by pushing in the tab and pulling out.

  2. Nintendo 64 Metal Plate Replacement: 2 단계, 이미지 1/1
    • If your system uses a jumper pack, the same procedure applies to remove it.

    • A small spoon can be used in place of a spudger.

    • Lever the expansion pack out using a metal spudger.

  3. Nintendo 64 Metal Plate Replacement: 3 단계, 이미지 1/1
    • Remove the six screws on the bottom side indicated in the example with a gamebit head or screwdriver.

  4. Nintendo 64 Metal Plate Replacement: 4 단계, 이미지 1/1
    • Remove the two front feet of the N64.

  5. Nintendo 64 Metal Plate Replacement: 5 단계, 이미지 1/1
    • Rotate to top side up and lift off top cover.

  6. Nintendo 64 Metal Plate Replacement, Metal Plate: 6 단계, 이미지 1/2 Nintendo 64 Metal Plate Replacement, Metal Plate: 6 단계, 이미지 2/2
    • Remove the fourteen screws indicated in the example using the larger Phillips screwdriver.

  7. Nintendo 64 Metal Plate Replacement: 7 단계, 이미지 1/2 Nintendo 64 Metal Plate Replacement: 7 단계, 이미지 2/2
    • Remove the metal plate indicated in the example by sliding it back and then lifting it up.

  8. Nintendo 64 Metal Plate Replacement: 8 단계, 이미지 1/1
    • Remove the two screws indicated in the example using the smaller Phillips screwdriver.

  9. Nintendo 64 Metal Plate Replacement: 9 단계, 이미지 1/1
    • Remove the screw to the right of the LED light using the larger Phillips screwdriver.

  10. Nintendo 64 Metal Plate Replacement: 10 단계, 이미지 1/1
    • Remove the small metal bracket from the back of the expansion pack slot.

  11. Nintendo 64 Metal Plate Replacement: 11 단계, 이미지 1/2 Nintendo 64 Metal Plate Replacement: 11 단계, 이미지 2/2
    • Remove the small metal bracket from the front of the expansion pack slot with the metal spudger.

  12. Nintendo 64 Metal Plate Replacement: 12 단계, 이미지 1/2 Nintendo 64 Metal Plate Replacement: 12 단계, 이미지 2/2
    • Remove the small metal bracket behind the expansion slot using the spudger.

  13. Nintendo 64 Metal Plate Replacement: 13 단계, 이미지 1/2 Nintendo 64 Metal Plate Replacement: 13 단계, 이미지 2/2
    • Remove the seven screws indicated in the example using the larger Phillips screwdriver.

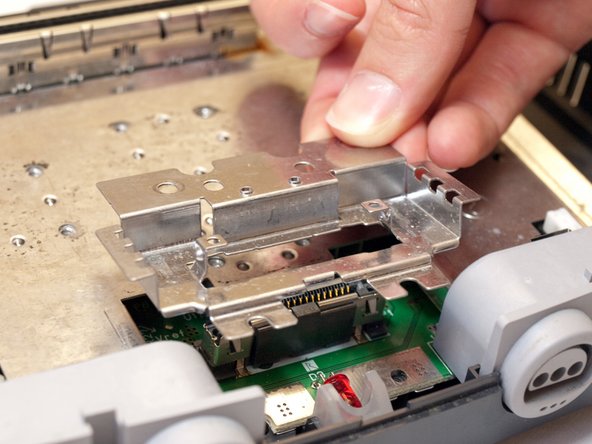
  14. Nintendo 64 Metal Plate Replacement: 14 단계, 이미지 1/1
    • Lift off and remove the metal plate as indicated in the example.

결론

To reassemble your device, follow these instructions in reverse order.

다른 5명이 해당 안내서를 완성하였습니다.

LisaF818

회원 가입일: 11/29/09

143 평판

안내서 1개 작성함

Cal Poly, Team 5-4, Regan Fall 2009 Cal Poly, Team 5-4, Regan Fall 2009 회원

CPSU-REGAN-F09S5G4

7 회원들

안내서 15개 작성하였습니다

댓글 0개

댓글 쓰기

조회 통계:

24 시간 전: 1

7일 전: 6

30일 전: 50

전체 시간: 11,252