주요 콘텐츠로 건너뛰기

Nintendo DS Lite Wi-Fi Board Replacement

필요한 것

  1. Nintendo DS Lite Wi-Fi Board Replacement, Battery: 1 단계, 이미지 1/2 Nintendo DS Lite Wi-Fi Board Replacement, Battery: 1 단계, 이미지 2/2
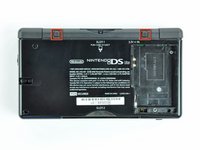
    • Unscrew the Phillips screw securing the battery cover to the lower case.

    • The screw remains captive to the battery cover.

    • Pry the battery cover upward with a spudger or fingernail, and lift out of the lower case.

  2. Nintendo DS Lite Wi-Fi Board Replacement: 2 단계, 이미지 1/1
    • Wedge the edge of a spudger in between the side of the battery and the lower case housing and pry upward to dislodge the battery.

    • Remove the battery from the DS Lite.

  3. Nintendo DS Lite Wi-Fi Board Replacement, Lower Case: 3 단계, 이미지 1/2 Nintendo DS Lite Wi-Fi Board Replacement, Lower Case: 3 단계, 이미지 2/2
    • Use the tip of a spudger to pry both rubber feet off the DS Lite.

  4. Nintendo DS Lite Wi-Fi Board Replacement: 4 단계, 이미지 1/1
    • Remove the following screws securing the lower case to the body of the DS Lite:

    • Two 4.3 mm gold Phillips screws

    • One 3.9 mm black Tri-Wing screw

    • One 3.3 mm silver Phillips screw

    • Three 5.5 mm silver Tri-Wing screws

  5. Nintendo DS Lite Wi-Fi Board Replacement: 5 단계, 이미지 1/3 Nintendo DS Lite Wi-Fi Board Replacement: 5 단계, 이미지 2/3 Nintendo DS Lite Wi-Fi Board Replacement: 5 단계, 이미지 3/3
    • Remove the cover from the Game Pak slot before continuing.

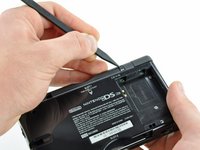
    • Insert the edge of a spudger in between the lower and upper case near the top right corner of the DS Lite.

    • Carefully run the spudger along the right edge of the DS Lite, creating an opening in the process.

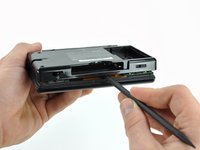
    • Continue running the spudger along the backside of the DS Lite until the majority of the lower case has been separated from the upper case.

  6. Nintendo DS Lite Wi-Fi Board Replacement: 6 단계, 이미지 1/1
    • Lift the lower case away from the rest of the DS Lite.

    • Pull carefully. Some units are sealed with adhesive, and pulling too hard can damage the power switch.

    • When re-assembling, make sure that power switch and volume sliders are properly aligned with the switches on the motherboard.

  7. Nintendo DS Lite Wi-Fi Board Replacement, Trigger Buttons: 7 단계, 이미지 1/2 Nintendo DS Lite Wi-Fi Board Replacement, Trigger Buttons: 7 단계, 이미지 2/2
    • Lift both trigger buttons out of the DS Lite.

    • The trigger buttons are held in very loosely by small metal pegs and springs. Don't lose track of these pieces.

    • The second picture shows the correct configuration of the trigger assembly for reassembly purposes.

  8. Nintendo DS Lite Wi-Fi Board Replacement, Wi-Fi Board: 8 단계, 이미지 1/1
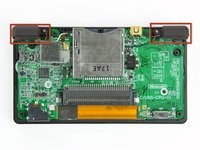
    • Use the flat edge of a spudger to pry the Wi-Fi antenna connector straight up from its socket on the Wi-Fi board.

  9. Nintendo DS Lite Wi-Fi Board Replacement: 9 단계, 이미지 1/1
    • Use the flat edge of a spudger to pry the Wi-Fi board connector straight up from its socket on the motherboard.

  10. Nintendo DS Lite Wi-Fi Board Replacement: 10 단계, 이미지 1/1
    • Use the flat edge of a spudger to separate the right edge of the Wi-Fi board from the motherboard.

    • The Wi-Fi board is secured to the motherboard with a layer of adhesive.

    • Remove the Wi-Fi board from the DS Lite.

결론

To reassemble your device, follow these instructions in reverse order.

다른 8명이 해당 안내서를 완성하였습니다.

Matthew Newsom

회원 가입일: 01/05/10

39,496 평판

안내서 67개 작성하였습니다

댓글 3개

So I came across a "Prison edition" DSLite out of the Kentucky DOC It I was told that the wifi card was disabled but I take it apart and see that it is still there pluged in and everything you don't happen to know how to turn it back on do you it is a gift for my little brother and would like the WiFi to work.

Vincent - 답글

Question anyone knows what the pin layout of the board

Aaron Darren - 답글

Merhaba Nintendo Ds lite da wifi kartı bozuldugunda ekran açılmaması normal mi ds lite a güç geliyor ışıklar yanıyor ama ekran gelmiyor

Boş - 답글

댓글 쓰기

조회 통계:

24 시간 전: 3

7일 전: 37

30일 전: 140

전체 시간: 15,665