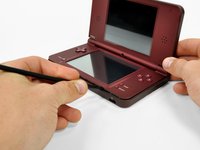
주요 콘텐츠로 건너뛰기

Nintendo DSi XL Motherboard Replacement

필요한 것

  1. Nintendo DSi XL Motherboard Replacement, Battery: 1 단계, 이미지 2개 중 1개 Nintendo DSi XL Motherboard Replacement, Battery: 1 단계, 이미지 2개 중 2개
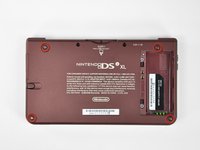
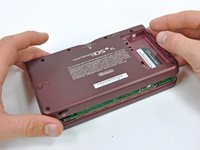
    • Remove the two Phillips screws securing the battery cover to the back of the handheld console.

    • Lift the battery cover off the back of the DSi XL.

  2. Nintendo DSi XL Motherboard Replacement: 2 단계, 이미지 1개 중 1개
    • Lift the battery from the DSi XL.

  3. Nintendo DSi XL Motherboard Replacement, Lower Case: 3 단계, 이미지 3개 중 1개 Nintendo DSi XL Motherboard Replacement, Lower Case: 3 단계, 이미지 3개 중 2개 Nintendo DSi XL Motherboard Replacement, Lower Case: 3 단계, 이미지 3개 중 3개
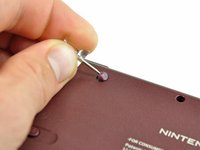
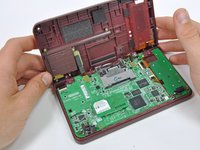
    • Remove the four rubber screw covers on the lower case by prying them up with a push pin.

  4. Nintendo DSi XL Motherboard Replacement: 4 단계, 이미지 1개 중 1개
    • Remove the following seven Phillips screws that secure the lower case to the rest of the DSi XL:

    • Four silver 5.3 mm screws

    • Two black 5.3 mm screws

    • One black 2.5 mm screw

  5. Nintendo DSi XL Motherboard Replacement: 5 단계, 이미지 3개 중 1개 Nintendo DSi XL Motherboard Replacement: 5 단계, 이미지 3개 중 2개 Nintendo DSi XL Motherboard Replacement: 5 단계, 이미지 3개 중 3개
    • Turn the DSi XL over, and open the display.

    • Insert a spudger between the upper and lower case at the bottom left corner of the DSi.

    • Slide the spudger along the bottom edge of the upper case to release the latches securing the upper case to the lower case.

  6. Nintendo DSi XL Motherboard Replacement: 6 단계, 이미지 2개 중 1개 Nintendo DSi XL Motherboard Replacement: 6 단계, 이미지 2개 중 2개
    • Close the display and turn the DSi XL over.

    • Lift the lower case from the front edge.

    • Rotate the lower case away from the DSi.

    • The lower case cannot be completely removed yet, since it is still connected to the motherboard.

  7. Nintendo DSi XL Motherboard Replacement: 7 단계, 이미지 2개 중 1개 Nintendo DSi XL Motherboard Replacement: 7 단계, 이미지 2개 중 2개
    • Using a spudger, pry the SD card/right shoulder button connector off its socket.

    • Pry the volume button/left shoulder button connector off its socket on the motherboard with a spudger.

  8. Nintendo DSi XL Motherboard Replacement, Wi-Fi Board: 8 단계, 이미지 2개 중 1개 Nintendo DSi XL Motherboard Replacement, Wi-Fi Board: 8 단계, 이미지 2개 중 2개
    • Lift the Wi-Fi board up off its socket on the motherboard.

    • Do not attempt to completely remove the Wi-Fi board yet. It is attached to the motherboard by an antenna cable.

  9. Nintendo DSi XL Motherboard Replacement: 9 단계, 이미지 1개 중 1개
    • Use a spudger to pry the Wi-Fi cable off its socket on the underside of the Wi-Fi board.

  10. Nintendo DSi XL Motherboard Replacement, Motherboard: 10 단계, 이미지 1개 중 1개
    • Use a spudger to pry the microphone cable off the motherboard.

    • Pry from underneath the cable.

  11. Nintendo DSi XL Motherboard Replacement: 11 단계, 이미지 2개 중 1개 Nintendo DSi XL Motherboard Replacement: 11 단계, 이미지 2개 중 2개
    • Using the flat end of a spudger, flip up the retaining flap on the camera ribbon ZIF connector.

    • Use the pointed end of a spudger to pull the camera ribbon from the ZIF connector.

  12. Nintendo DSi XL Motherboard Replacement: 12 단계, 이미지 2개 중 1개 Nintendo DSi XL Motherboard Replacement: 12 단계, 이미지 2개 중 2개
    • Using the flat end of a spudger, flip up the retaining flap on the touchscreen cable ZIF connector.

    • With the pointed end of the spudger, pull the touchscreen cable from its connector on the motherboard.

  13. Nintendo DSi XL Motherboard Replacement: 13 단계, 이미지 2개 중 1개 Nintendo DSi XL Motherboard Replacement: 13 단계, 이미지 2개 중 2개
    • Using the flat end of a spudger, flip up the retaining flap on the backlight cable ZIF connector.

    • With the pointed end of the spudger, pull the backlight cable from its connector on the motherboard.

  14. Nintendo DSi XL Motherboard Replacement: 14 단계, 이미지 2개 중 1개 Nintendo DSi XL Motherboard Replacement: 14 단계, 이미지 2개 중 2개
    • Using the flat end of a spudger, flip up the retaining flap on the lower display data cable ZIF connector.

    • With the pointed end of the spudger, pull the lower display data cable from its connector on the motherboard.

  15. Nintendo DSi XL Motherboard Replacement: 15 단계, 이미지 2개 중 1개 Nintendo DSi XL Motherboard Replacement: 15 단계, 이미지 2개 중 2개
    • Using the flat end of a spudger, flip up the retaining flap on the ZIF connector for the D-Pad/power button cable.

    • With the pointed end of the spudger, pull the D-Pad/power button cable from its connector on the motherboard.

  16. Nintendo DSi XL Motherboard Replacement: 16 단계, 이미지 1개 중 1개
    • Using the flat end of the spudger, pry the battery cable up off its socket on the motherboard.

  17. Nintendo DSi XL Motherboard Replacement: 17 단계, 이미지 1개 중 1개
    • Remove the screws securing the motherboard to the upper case:

    • A single 2.5 mm silver Phillips screw

    • Four 3.7 mm black Phillips screws

  18. Nintendo DSi XL Motherboard Replacement: 18 단계, 이미지 1개 중 1개
    • Deroute the microphone and antenna cables through the slot in the motherboard.

  19. Nintendo DSi XL Motherboard Replacement: 19 단계, 이미지 2개 중 1개 Nintendo DSi XL Motherboard Replacement: 19 단계, 이미지 2개 중 2개
    • Rotate the motherboard off the lower case.

    • The motherboard cannot be completely removed yet. It is still attached by the upper LCD's display data ribbon cable.

  20. Nintendo DSi XL Motherboard Replacement: 20 단계, 이미지 2개 중 1개 Nintendo DSi XL Motherboard Replacement: 20 단계, 이미지 2개 중 2개
    • Using the flat end of a spudger, flip up the retaining flap on the upper display data cable ZIF connector.

    • With the pointed end of the spudger, pull the upper display data cable from its connector on the underside of the motherboard.

    • The motherboard is now free from the upper case.

결론

To reassemble your device, follow these instructions in reverse order.

다른 20명이 해당 안내서를 완성하였습니다.

작성자

6다른 기여자 명과 함께

Brett Hartt

회원 가입일: 04/12/10

129,827 평판

안내서 143개를 작성함

iFixit iFixit 회원

Staff

118 회원들

안내서 19,455개를 작성함

댓글 한 개

Just brilliant! Done in one go! Saved £20! Thanks indeed for good people!

Aidas - 답글

댓글 쓰기

조회 통계:

지난 24시간: 7

지난 7일: 54

지난 30일: 207

전체 시간: 35,671