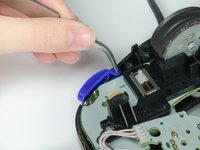
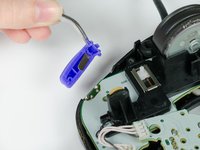
주요 콘텐츠로 건너뛰기

Nintendo GameCube Controller Directional Pad Replacement

필요한 것

  1. Nintendo GameCube Controller Directional Pad Replacement, Back Panel: 1 단계, 이미지 1/1
    • Place the controller (buttons down) on a solid surface.

    • Remove the six 9.2mm Tri-wing Y0 screws that hold the back panel in place.

  2. Nintendo GameCube Controller Directional Pad Replacement: 2 단계, 이미지 1/1
    • Gently lift the back panel up, separating it from the front panel.

    • Some of the buttons may fall out if they are knocked around.

  3. Nintendo GameCube Controller Directional Pad Replacement, Z Button: 3 단계, 이미지 1/2 Nintendo GameCube Controller Directional Pad Replacement, Z Button: 3 단계, 이미지 2/2
    • Grab the Z-button by the peg with tweezers and lift it out of the controller.

    • During re-assembly, make sure the plastic rim and spring fit into the slot provided, or else the case will not shut.

  4. Nintendo GameCube Controller Directional Pad Replacement, Circuit Board: 4 단계, 이미지 1/1
    • Carefully unhook the cable that is looped around the peg.

  5. Nintendo GameCube Controller Directional Pad Replacement: 5 단계, 이미지 1/1
    • Lift the circuit board out of the controller.

    • Do not grab the rumble motor to lift the circuit board as shown in the picture. It will in many cases just remove the rumble motor. Instead, grab the edges of the board.

  6. Nintendo GameCube Controller Directional Pad Replacement, Directional Pad: 6 단계, 이미지 1/1
    • Remove the rubber backing with tweezers.

  7. Nintendo GameCube Controller Directional Pad Replacement: 7 단계, 이미지 1/1
    • Use tweezers to grab the center peg of the directional pad and lift it out of its socket.

결론

To reassemble your device, follow these instructions in reverse order.

다른 5명이 해당 안내서를 완성하였습니다.

Sean Michel

회원 가입일: 01/14/13

2,496 평판

안내서 8개 작성하였습니다

Cal Poly, Team 19-44, Regan Winter 2013 Cal Poly, Team 19-44, Regan Winter 2013 회원

CPSU-REGAN-W13S19G44

4 회원들

안내서 26개 작성하였습니다

댓글 0개

댓글 쓰기

조회 통계:

24 시간 전: 0

7일 전: 8

30일 전: 35

전체 시간: 6,586