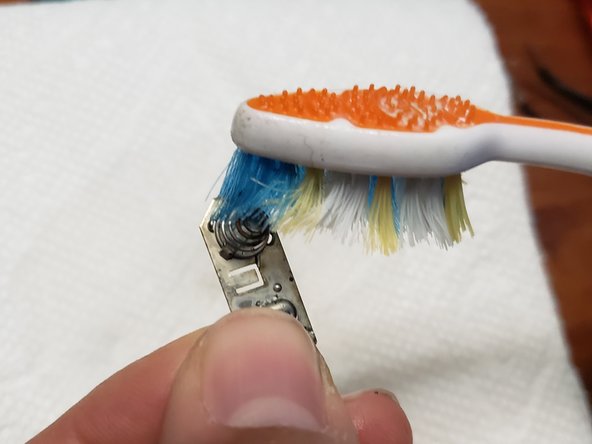
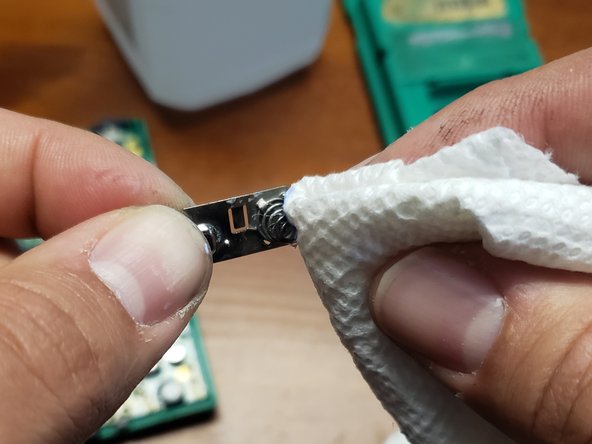
주요 콘텐츠로 건너뛰기

Nintendo Gameboy Pocket Shell-Side Battery Terminal Corrosion Removal

필요한 것

  1. Nintendo Gameboy Pocket Shell-Side Battery Terminal Corrosion Removal, Nintendo Gameboy Pocket Shell-Side Battery Terminal Corrosion Removal: 1 단계, 이미지 1/1
    • Remove the battery cover and batteries.

  2. Nintendo Gameboy Pocket Shell-Side Battery Terminal Corrosion Removal: 2 단계, 이미지 1/1
    • Remove the six 8mm screws using a Y1 Tri-point screwdriver.

    • Place your screws in a small container to keep them safe.

  3. Nintendo Gameboy Pocket Shell-Side Battery Terminal Corrosion Removal: 3 단계, 이미지 1/1
    • Separate the front and back side of the Gameboy by gently pulling them apart.

  4. Nintendo Gameboy Pocket Shell-Side Battery Terminal Corrosion Removal: 4 단계, 이미지 1/1
    • Using a flathead screwdriver (or flat piece of plastic), nudge in the clip holding the shell-side battery terminal in place to release it from the shell.

  5. Nintendo Gameboy Pocket Shell-Side Battery Terminal Corrosion Removal: 5 단계, 이미지 1/2 Nintendo Gameboy Pocket Shell-Side Battery Terminal Corrosion Removal: 5 단계, 이미지 2/2
    • Using a pair of tweezers, remove the battery terminal from the shell.

  6. Nintendo Gameboy Pocket Shell-Side Battery Terminal Corrosion Removal: 6 단계, 이미지 1/2 Nintendo Gameboy Pocket Shell-Side Battery Terminal Corrosion Removal: 6 단계, 이미지 2/2
    • Add isopropyl alcohol to a toothbrush.

    • Spread a paper towel down to keep your workspace clean.

    • Scrub the terminal where the corrosion is to remove as much as possible. If most of the corrosion is removed, skip to step 10.

  7. Nintendo Gameboy Pocket Shell-Side Battery Terminal Corrosion Removal: 7 단계, 이미지 1/1
    • Use the steel wool to remove as much corrosion as possible.

  8. Nintendo Gameboy Pocket Shell-Side Battery Terminal Corrosion Removal: 8 단계, 이미지 1/2 Nintendo Gameboy Pocket Shell-Side Battery Terminal Corrosion Removal: 8 단계, 이미지 2/2
    • Add metal polish to a paper towel.

    • Polish the battery terminal to remove the remainder of the corrosion.

결론

To reassemble your device, follow these instructions in reverse order.

다른 4명이 해당 안내서를 완성하였습니다.

Sarah Travers

회원 가입일: 03/24/21

265 평판

안내서 1개 작성함

UMass Dartmouth, Team S1-G24, Riel Spring 2021 UMass Dartmouth, Team S1-G24, Riel Spring 2021 회원

UMASSD-RIEL-S21S1G24

1 회원

안내서 2개 작성하였습니다

댓글 3개

Thank you for the guide! Resurrected a Gameboy Pocket today that has graphical glitches on the boot screen and sometimes crashed mid-game when a cartridge could load. This process seems to have completely remediated that.

I only needed to complete through step 6 to get clean shiny contacts in my case.

sacratoy - 답글

Much better than the usual battery replacement guides! Most of those are practically useless as they do little more than say, “replace the batteries,” which is pretty much self-evident, and noting, “clean any corrosion,” without explaining how to do that!

Wolf Naegeli - 답글

Is there a corresponding guide for cleaning the sections of the battery terminal which are fixed to the board, i.e. not shell-side?

Samuel Bradley - 답글

댓글 쓰기

조회 통계:

24 시간 전: 6

7일 전: 39

30일 전: 196

전체 시간: 5,447