소개
Most disc read errors (DREs) can be fixed by replacing the laser lens in your Wii's DVD drive.
필요한 것
-
-
Use a metal spudger to remove the white plastic screw covers stuck to the lower case near the front of the Wii.
-
-
-
Remove the two 8.3 mm Tri-Point screws hidden under the covers you just removed.
1/16 x 1 craftsman Phillips mini screwdriver works for this if you don’t have the tri-wing driver
I am using a 18ct empty egg carton to hold the screws/parts removed in the steps.
Larry’s idea about the bins was great and helpful.
Robots is right- you NEED a Y1. Just buy the thing with the drive. I didn’t, tried many other options, none worked. Had to order the thing separately with shipping. Mistake….
David Ryan - 답글
-
-
-
Use a metal spudger to remove the rubber foot stuck to the side of the Wii near the DVD drive opening.
All of the rubber feet on my very old Wii had literally melted into a gooey mess and just needed to be scraper off and cleaned with alcohol.
Bob Robins - 답글
-
-
-
Remove the single 5.9 mm Phillips screw hidden under the foot you just removed.
please help! my lil sis got a disc stuck in my wii while it was off!!! please help fast!!!
Leah Vegan - 답글
does it turn on?
-
-
-
Carefully pull the faceplate away from the front of the Wii.
-
Use a pair of tweezers to disconnect the LED cable's plastic connector from the motherboard.
-
Remove the faceplate.
surprisingly, this was the trickiest step for me. I almost completely mangled the wires when my tweezers slipped as I was attempting to remove the connector.
I removed it with a spudger, gently lift from each side until it pops out.
For those reassembling
line up the pins push it in with your spudger gently until it's in. Then line up the front plate, push gently, confirm everything is where it should be and push firmly, I found it needed a strong push to sit flush with the other body panels.
I ended up using needle nose pliars on this step.
Awesome detailed guide made this very easy, thank you author!
Can someone direct me to what I need to do? My tweezers slipped and I cut one of the wires on the connector. Where can I find a new Y plug for the wii?
This was the hardest part for me. I tried using my fingernails, two different tweezers, and needle nose pliers, but I ended up cutting both the wires. Anyway, I put some electric tape over the exposed wires and just reassembled the system. Funny thing is that the LED still works and I have not noticed any difference. I'm not sure what those wires did, but they seem to not be important.
For people still wondering after all these years, :), The connector is for the blue leds around the dvd when loading and unloading a disk.
Niels -
I also broke off the flimsy wires at the connector. To NOT break the wires, alternate pressing on the right and left sides of the connector with a small flathead screwdriver. Be patient, it will eventually work itself free. There isn't enough to grab onto with the tweezers and you'll only succeed in having them slip off, grab the wires, and yank the wires out.
Good news is that if you do rip out the wires, no worries... I didn't reconnect them and the unit works just fine. I have no idea what those wires are even for. Power LED continues to work no problem.
This guide is really marvellous - works a treat. But I would definitely recommend needle nose pliers for this step rather than tweezers. It's really easy if you use pliers and potentially damaging if not, and you get it wrong. I had one sniff at it with tweezers then immediate nipped out to the garage for my pliers!
Needlenose pliers did the trick for us!
Needlenose pliers did it for us!
You can save yourself some trouble at this point and skip the rest of the disassembly: See that green tab to the left of the sd card slot? THAT’S the wifi board (and that green tab, in hindsight, seems designed to make it accessible without taking apart the whole device, don’t you think?) A little careful spudging, and you’ve got it out, ready to replace! (There’s a guy who shows the process on youtube, if you want to review first)
I got the connector out ok thanks to the suggestions here, but I couldn’t figure out how to reattach it. In the end, I just kind of threw it in and it worked fine.
Very clear instructions - thanks! Faceplate needed replacing after one of my son’s friends accidentally kicked it across the room. $10 bucks to fix, thanks to ebay and these instructions. I’d never heard of a “tri-wing” screw before.
I just left the connector alone and kept it connected while working on it. There is enough wire to allow you to do what you need if you are just careful not to snag it on anything.
I, too, left the connector attached and just took care that the loose faceplate did not stretch the (not crucial) wire when moving rest of the Wii.
This was the trickiest part, I almost broke the wires using tweezers and pliers, so instead use a flat end screwdriver to pry it out, when putting it back in use needlenose pliers to start it then use your fingernail to go the rest of the way.
Anyone know of a method to replace the connector if you end up breaking the wires? Bits of wire are stuck in the white plastic connector, so I'm wondering if I can buy a connector online somewhere without replacing the whole face plate. Thanks :)
Bronze Owl - 답글
I severed both wires. If you want to avoid removing the connector, you can lengthen the two wires by unserpentining them from the wire holder that's in the cover.
Make sure there is no SD card in your unit before pulling this off, otherwise it'll get stuck and you could snap your sd card in half!
-
-
-
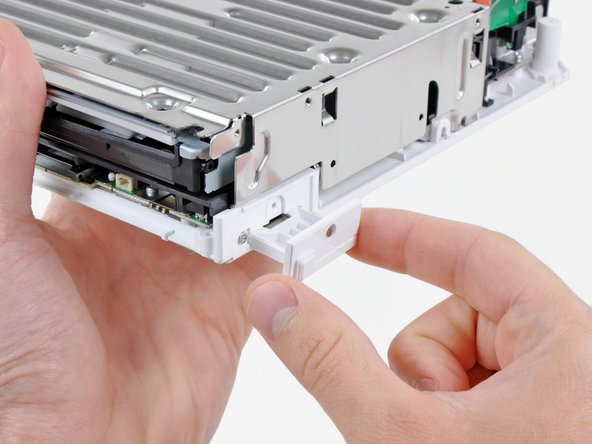
Open the controller port cover until it is perpendicular to the black controller port bezel.
-
Pull the controller port cover straight up to release it from the outer case.
I wasn't able to reassemble the socket covers when I reversed this step..
While disassembling, I did as instructed pulling the covers upwards when they where perpendicular to the black cover plate but Nintendos instructions says to open the covers (so that they are perpendicular to the black cover plate) and then gently push the covers towards the console with your fingers on the outside of the cover opposite side of the hinges so that the cover hinges will pop out and then lift it up..
I'm not sure, but I think ignoring Nintendos instructions caused the hinge sockets to break for me, so replacing the controller/memory card socket covers will not work.
When reassembling, the cover can be placed perpendicular to the black cover plate and rest on the plastic hinge with a few millimeters between the cover and the console, and then they can be pushed down to click in place. But in my case they keep falling all the way down since there's no resistance and nothing to click into.
-
-
-
Remove the two remaining 4.1 mm Phillips screws along the top edge of the black plastic controller port bezel.
-
Lift the bezel from the long edge furthest away from the controller ports and remove it from the Wii.
The 3rd hole is in step 3.
The bezel is the flat black plate. Removing the three screws that secure it allows you to remove it. If your cube is like mine, this plate likes where it lives and, even with the screws removed, managed to stay in situ without anything holding it.
Beware. The edge of the bezel, opposite these screws, has clips. Lift the bezel from the top edge, where the the screws are, to avoid breaking these clips.
-
-
-
Remove the following screws:
-
Two 5 mm Phillips screws
-
One 8.2 mm Tri-Point screw
Instead of the Phillips screw on the left I had a very small one under a cover to the left of that!
-
-
-
Remove the two 8.2 mm Tri-Point screws hidden under the feet you just removed.
had a little trouble with theses screws. they were just barely too deep for my 54pies bit driver kit to reach. I ended up inserting a small wad of paper into the shaft of my driver so the tri-wing bit stuck out far enough to engage the screw. (I used the tweezers to remove the paper when I was done) :)
I can confirm, this works fantasticly!
Thank you
When putting the screws back in hold the tip still with the screw and carefully drop it in.
Thank you rbelknap, this is excellent advice for those using the ifixit branded driver.
You could also use the 4mm nut driver in the iFixit kit to turn the tri-wing driver. This will give you a little more reach.
How is no one talking about the included 4mm nut driver trick at Edward Tucker mentioned?! That is genius! Thanks mate!
Zabuza -
That's the idea that I needed. Agree with Zabuza.
cwdick -
Bingo. All of the other comments were unnecessary.
Because it doesn't come with the screw driver in the kit. Only has the tri wing and the cross tips.
This paper wad trick totally worked for me too!
Standard Tri-Wing bits will NOT fit into the holes. Make sure that you get one of the tool kits from iFixit (I just ordered the Mako Driver/Bit kit with 64 bits ) - the Tri-Wing bits in this kit have a narrow shaft that allows it to reach deep into narrow holes like these on the Wii . (Disclaimer - I have no association with iFixit).
dave whale - 답글
I just sawed off a bit of the shank holder from the iFixit tool, in order for the bit to go deep enough into the case.
The tool still works fine.
The 4mm driver was the exact fix for this problem, no mods necessary
-
-
-
-
Lift the outer case straight up off the body of the Wii.
This step could use at least another picture from the backside so it's clearer what comes up and what stays down.
I used a spudger around the edges of the outer case to gently ease it upward since I could not lift it out with my fingers. Then it came right out.
Good tip. Having, in the past, broken pieces that required a little persuasion, I attempted to "lift" the outer case, but it wouldn't budge. Using the spudger to persuade it worked like a charm. Also added this suggestion to Step 18 "Lift the drive shield."
hey marko that really helped me thanks\. als if you need help figuring which side is up, its the one with the nintendo engraving on it
Aryan Garg - 답글
A fan filter fell out at this step how do you put it back?
Edit: I figured it out it was from the side intake vent. Just line up the two notches with the pegs in the case to hold it in place
This is an awful guide
-
-
-
Remove the small Phillips screw securing the battery door to the bottom panel.
-
Pull the battery door out of the Wii.
The screw is a PH0000 (quadruple zero) requiring an exceptionally small Phillips screwdriver to remove. If this is your first time in here in a while, this may also be a great time to change the CR2032 battery.
I was able to use the ph0 no problem.
I used a 00 with no problem.
julie -
What does this battery do? I never knew there was a battery inside of the WIi.
thje battery is used to maintain timwe and date etc
my wii survived 15 years already with the same battery
-
-
-
Remove the 8.2 mm Tri-Point screw that was hidden beneath the battery door.
The other drive cage hole is screwed in step 11, continue to reassemble.
-
-
-
Remove the two 8.2 mm Tri-Point screws securing the DVD drive shield near the controller ports.
-
-
-
Lift the DVD drive shield upward and remove it from the Wii.
Be careful not to cut your fingers on the sharp edges of this metal shield. My daughter actually scraped enough skin to cause blood to drip off her finger. Then we noticed her skin stuck to the metal edge. Yuk.
True story I did it to myself lol
If the drive shield needs a little extra persuasion, us a spudger around its perimeter. Also helps prevent cuts when force meets resistance on this metal shield.
There are spring steel tabs on both sides.
-
-
-
Remove the four 9 mm #1 Phillips screws securing the DVD drive to the bottom panel.
The two left hand screws were very difficult to relocate during reassembly. I was coaching my 8 year old through this, and this was probably the only step that he couldn't do. We dropped these screws several times, and used magnets to retrieve. Miniature needle-nose pliers gripping the 'washer' surface of the screw were too wide. We managed to purchase the 'button head' of these screws with the needle-nose and drop the screws into their hole, and push with the phillips until secure. I would like to hear how others install these screws, please.
I had the same problem as you and eventually found an easy way round it. I wrote this to be added to the instructions but it was rejected: "Once the DVD drive has been removed, remove the 4 rubber washers from the screws removed earlier and insert them into your new DVD drive. Because two of the screws are difficult to reach, it is best to insert these two screws into the washers and then slide them into place ready for securing to the base plate".
The rubber washer holds the two screws roughly in position, you can then reach them with your screwdriver through the two holes (about an inch away) and finish tightening them up.
Gary -
Helpful tip: Use a magnetized screwdriver for the 2 screws nearest the DVD face because they are set in deep sockets
During reassembly, it can be tricky to position the recessed screws. To temporarily magnetize your screwdriver, rub the tip against a magnet for 5-10 seconds. (A refrigerator magnet will do.) You should then be able to put the screw on the tip and gently lower it into position.
Thanks - the refrigerator magnet trick worked for me,
Another method for getting the front screws back in is to insert a small pair of tweezers through the DVD slot to guide the screw in. I just dropped the screw in between the tweezers which held the screw just above the hole. Then I was able to use the phillips screwdriver to guide the screw into the hole and screw it in. Done in just a few seconds.
Another option would be to stick a dab of hot glue on the screw to your screwdriver and then when the screw has been driven home either the glue stays on the driver and is easily removed or it stays on the screw and you just pull it off with tweezers or needle nose pliers.
If you are disassembling your Wii because, say, a two-year-old has shovelled pennies into it (yes, that was me) you will also need to partially disassemble the drive itself, which is not covered in this guide. Luckily it's really easy. Unscrew the 4-5 larger Philips/cross head screws on the top of the frame (NOT any of the smaller darker ones) around the edges, and the frame on top of the drive will lift right off. Be careful as there is cabling running to it, so don't yank it or pull it too far off. You will now be able to get any coins or other foreign objects out.
I didn't have a magnetic screwdriver, so I applied a tiny amount of fabric glue to the head of each screw, waited a minute for it to start to harden, inserted my non-mag screwdriver into the screw head, and the screw stuck to the screwdriver long enough to insert it into the hole.
Lee Crooks - 답글
Be advised that the posts that these screws go into are very fragile and may even break. Make sure to get the little plastic pieces out if you over tighten them or they are just brittle and broken to begin with. The screws seem to be long enough to work if you do break the posts off completely.
Be careful with these screws - they seem to be quite malleable and easy to strip.
Electronik - 답글
I guess this is a warning applicable to anything that has to do with plastics, but this step in particular: Be extra careful not to overtighten these screws when reassembling the unit because the plastic sockets will easily break/shatter..
-
-
-
Lift the side of the DVD drive opposite the controller ports enough to access the cables on its bottom face.
-
Carefully pull the DVD drive power cable out from under the plastic shroud near the heat sink.
When reversing these steps to reassemble the Wii, at this point it is possible to do a quick test before screwing the drive to the case. This will save you a lot of time if something is wrong.
Don't touch anything you don't have to while the case is off.
Carefully plug the power cable into the back of the Wii, then use a screwdriver to gently press the white button next to the glowing yellow LED on the front. You should hear the DVD drive power up and whir. Then press the white button again, wait for the yellow light to come back, and unplug the Wii.
If you didn't hear the drive start up, most likely one of the two ribbons isn't connected to the drive correctly. Doublecheck the previous 3 steps.
-
-
-
Pull the DVD drive power cable away from its socket on the DVD drive.
When reversing this step, be careful re-inserting the connector. The pins are very delicate and if you aren't at the proper angle, you can bend them and ruin the drive.
jisakoff42 - 답글
The exact thing happened to me just now; I reinserted it at a (very slight) angle, and bent one of the pins at the end of the socket. Luckily, I was able to straighten it back up with a sewing needle. I made sure the spacing was consistent with the rest of the pins, and that I reinserted the connector as straight as I could, so it doesn’t happen again.
-
-
-
Use your fingernail to flip up the retaining flap on the DVD drive ribbon cable socket.
-
Pull the DVD drive ribbon cable out of its socket.
-
Remove the DVD drive from the Wii.
When reversing this step, make sure the ribbon is all the way in. For some reason I found positioning it with my replacement drive was much harder than with my old drive. The gentlest tug after lowering the brown clip would show that the ribbon was not actually being held tightly. I thought for a while that the clip itself was broken, but eventually I got it to hold the ribbon correctly.
Be careful with this step. I too had difficulty re-inserting the ribbon. I even popped off the brown clip and thought I broke it. Thankfully it snapped back into place.
It is difficult to tell, but be aware that the brown piece is the retaining flap, not the light piece , which is the actual socket.
Careful! When reinstalling, I think I bent and broke the ribbon. The Wii doesn't respond upon power up - I think because it doesn't see the drive.
-
-
-
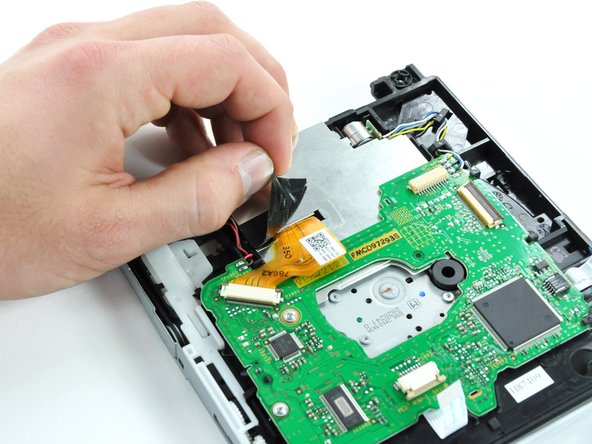
Pull the disc detector ribbon cable straight out of its connector with a pair of tweezers.
-
-
-
Disconnect the lens ribbon cable by first pushing the two locking tabs of the ZIF connector towards the ribbon cable with the tip of a spudger.
-
Use a pair of tweezers to pull the lens ribbon cable straight out of its connector.
-
-
-
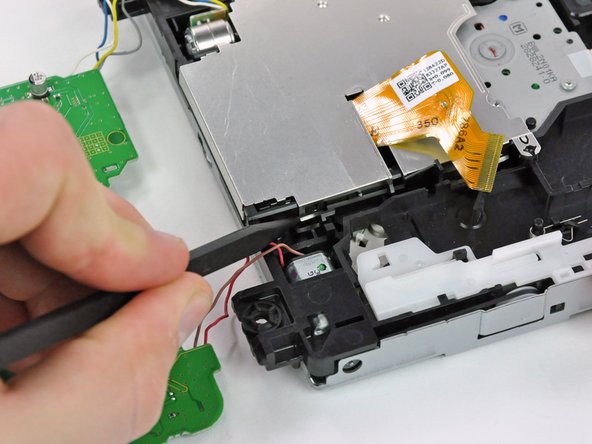
Insert the tip of a spudger into the hole that is closer to the red and pink wires that connect to the DVD drive board.
-
Rotate the spudger to pry the first tab out of its hole on the DVD drive housing.
Regarding Step 32 and 33 - I did this a little differently, and didn't need to bend (plastic deformation) the tin. Complete Step 31, but instead of 'bending' the clips, you release them and pop the tin up over the plastic 'barb' to release the EMI shield. Then, then repeat Step 31 (popping the tin clips off of the barb) for the two tabs on the opposite side (screw side) of the EMI shield. The EMI shield can then be withdrawn, e.g. released to the bottom of the picture in steps 32 and 33, without bending the tin as advised in step 32 and 33. The only mildly tricky part was releasing the clip from the barb near the (blue/yellow/grey/white) wires connecting the laser stepping motor - I used a fine flat screwdriver.
Agree with dyanetti; the two end tabs in step 32-33 are not intended to be bent. Should release all four of the clips on the sides of the plate first, then it will rotate up and the end pins will just slide out (and in when reversing the process for reassembly).
If you take the top off the dvd drive, these tabs are easy to unlatch from the other side.
-
-
-
While holding the DVD drive with one hand, grasp the DVD drive lens retaining pin (closest to the screw that was just removed) with a pair of needle nose pliers.
-
Slide the retaining pin out towards the edge of the DVD drive housing.
-
Once the pin moves easily, grab it with your fingers and pull it out of the DVD drive housing completely.
There is a small piece of black plastic next to the last screw which was removed. Lifting this up a millimeter or two will release the retaining pin so that it can be moved out easily.
What to do when these Clips Break?
Careful! It’s so easy to break that black plastic piece. Notice that it’s only connected at one end and hinges very easily causing a stress fracture. Whether you lift it from the side or go in through the end hole, minimize the number of times you hinge it.
I found that vinyl tape-wrapped bent-nose pliers worked well to grip the rod.
-
-
-
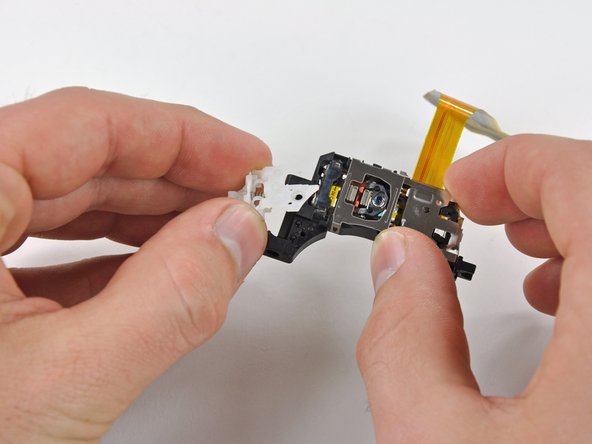
Remove the 4.2 mm Phillips screw that secures the white plastic bracket to the lens assembly.
-
Lift the bracket off the lens assembly.
agree with Chris V you have to de-solder the solder dot on ribbon just make a straight vertical line compare it to the replacement laser this should be step 39 because if you don't do this the laser lens will not be able to read properly
keytechllc - 답글
Had the same issue. I wasted a couple hours troubleshooting the new laser before figuring out that I needed to de-solder the solder blob shorting the 2 signal lines.
Any tips on removing the screw from the white plastic bracket that needs to connect to the new part? It is not loosening on the old one at all. New mini-philips on order to see if they will fit better and hold but I don't think this is going to come free. Does anyone know where a new white plastic bracket can be ordered?
Correctly sized philips was all it took. Came off right away. So all set to put it back together tonight.
eljuline -
I too wasted time with this repair until I saw these comments. Completely reassembled, tested, then repeated the whole process again to check all the connections. When I finally found these comments I attempted to remove the solder but ended up with a flakey - partially working wii. I assume I damaged the ribbon cable in the process.
Ultimately I spent another $20 and bought a new DVD unit ($5 more than the replacement lens) and has my wii working in 15 minutes. I wish I had seen these notes first - I wouldn’t have wasted my time trying to replace the lens. Please, please, please update this guide and save the community a lot of trouble!
Does anyone know where too by white plastic bracket thing
-


To reassemble your device, follow these instructions in reverse order.
To reassemble your device, follow these instructions in reverse order.
다른 137명이 해당 안내서를 완성하였습니다.

댓글 25개
Many thanks for the excellent guide - my wii is working again!
This is one of the best set of instructions I have ever used. Easy to follow steps with accurate illustrations. Very well done, I don't know how you could make it any better! A++,
Very useful and detailed.
Dare I try this on my own?
Hola el lente de mi wii no intenta leer, al introducir un dvd el lente da un golpe y luego tres golpes mas, no suena como si intentara leer el disco, de echo tampoco se oye girar al disco, Quisiera saber si este problema es por el laser dañado o si se daño el motor que hace girar el dvd. Mi correo es david19_4@hotmail.com si pudiera ayudarme le agradeceria, puede responderme en ingles yo puedo traducirlo. Gracias
★☆★ Top Marks ★☆★ for a well thought out and fantastically illustrated procedure.
My 7 year old son and I worked as a team and it worked like a dream.
The only thing is, that we didn’t originally desolder the bridge on the new lens cable, so we had to work back through to step 22. However, this only took us 20 minutes extra :)
Many, many thanks to Mark and your 7 contributors. ★☆★ Nice Work ★☆★
Ted George - 답글
This is one of the most detail oriented tutorial I’ve ever seen. On Step 11, the screws were also color coded to avoid confusion. Great work!
I was able to follow this tutorial and replace the lens module with ease. The Wii system is now able to read the DVDs. Now, however, I have an issue. The Wii console is making a huge din after the replacement. Does anyone this issue? What do I need to do to fix the issue?
Thanks again for a great tutorial!
affansayed - 답글
How can I tell if my lens is broken and if it’s in a bad (reversible) condition?
My two year old stuck playing cards into the disc slot causing no disc to be read. I purchased the Apollo Precision Tool Kit for Phone and Computer Repair, it contained everything I needed to get the job done. I only had to complete through step 19 to push the cards out. Took about 2 hours to complete the project.
This was a really good guide, I got my Wii working again and I am happy.
Best disassembly instructions ever!!!
Thanks for the great instructions, we had no problems getting our Wii working again!
This is an excellent guide. Thanks for putting it together!
this is a lifesaver for my wii!
will try this when I get the materials that I need. But so far, this looks pretty promising.
Die Abdeckungen sind geklebt, stecken also nicht.
Ludger - 답글
Don’t mistakenly remove the rubber case feet
Bob Trout - 답글
I just did. That picture could be better.
B G -
Thanks I almost removed the rubber feet
Lushane - 답글
If you’re wondering what to use for this, the main blade of a pocket knife from the corner of the plastic works well.
Cameron Holman - 답글
As you remove the hardware in each step, place them together on a sheet of paper and circle them with the step number.
Tom J - 답글