주요 콘텐츠로 건너뛰기
수리 커뮤니티 가입 - 계정 만들기

Nokia 2115i Motherboard Replacement

필요한 것

  1. Nokia 2115i Motherboard Replacement, Nokia 2115i Battery: 1 단계, 이미지 3개 중 1개 Nokia 2115i Motherboard Replacement, Nokia 2115i Battery: 1 단계, 이미지 3개 중 2개 Nokia 2115i Motherboard Replacement, Nokia 2115i Battery: 1 단계, 이미지 3개 중 3개
    • To prevent shock, press down on the power button located on the top of the phone until the phone shuts off.

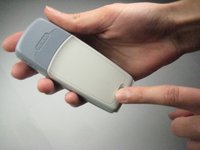
    • Press down on the small gray button located on the back of the phone.

    • Slide the back plate down and off.

  2. Nokia 2115i Motherboard Replacement: 2 단계, 이미지 2개 중 1개 Nokia 2115i Motherboard Replacement: 2 단계, 이미지 2개 중 2개
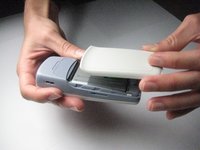
    • To remove the battery, begin by holding the phone sideways.

    • Then, insert your thumb in the groove below the battery and push the battery up and out.

  3. Nokia 2115i Motherboard Replacement, Faceplate: 3 단계, 이미지 3개 중 1개 Nokia 2115i Motherboard Replacement, Faceplate: 3 단계, 이미지 3개 중 2개 Nokia 2115i Motherboard Replacement, Faceplate: 3 단계, 이미지 3개 중 3개
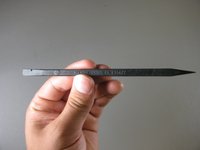
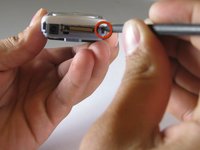
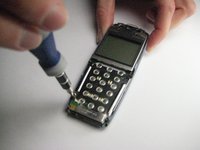
    • Locate the spudger. A photo of the correct spudger is provided to the left.

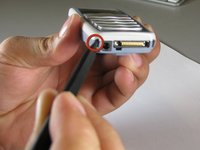
    • Turn the front of the phone to face you. Find the two small square holes on the bottom left and right sides of the faceplate.

    • Insert the spudger into each square hole and push up to detach the face plate.

  4. Nokia 2115i Motherboard Replacement, Removing the Keypad: 4 단계, 이미지 2개 중 1개 Nokia 2115i Motherboard Replacement, Removing the Keypad: 4 단계, 이미지 2개 중 2개
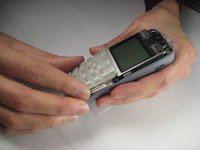
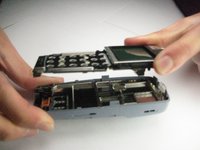
    • Note: The keypad will be loose and may fall off during this step.

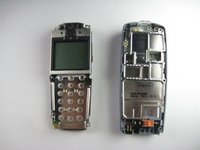
    • Pull the face plate up and off of the phone.

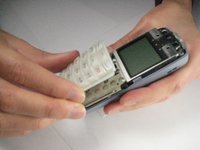
    • To remove the keypad, simply lift it off the phone.

  5. Nokia 2115i Motherboard Replacement, Removing the Motherboard: 5 단계, 이미지 2개 중 1개 Nokia 2115i Motherboard Replacement, Removing the Motherboard: 5 단계, 이미지 2개 중 2개
    이 단계에 사용된 도구:
    Tweezers
    $4.99
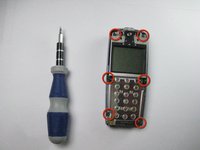
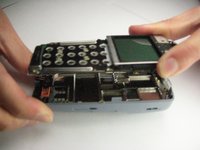
    • Locate the 6 screws on the metallic sheet that previously held the keypad. (This sheet, shown in the pictures, is the top side of the motherboard).

    • Note: 2 of the screws are on the bottom corners, 2 are on the right and left edges of the phone below the screen, and 2 are on the very top corners of the phone, above the screen.

    • Warning: The middle two screws are attached to the base of the phone with two black plastic rings. Use tweezers to remove the screws carefully to avoid breaking the plastic rings

    • Use a size T6 Torx screwdriver to remove each of these 6 screws.

  6. Nokia 2115i Motherboard Replacement: 6 단계, 이미지 3개 중 1개 Nokia 2115i Motherboard Replacement: 6 단계, 이미지 3개 중 2개 Nokia 2115i Motherboard Replacement: 6 단계, 이미지 3개 중 3개
    • To remove the motherboard, lift it up and off the phone.

    • Note: The screen will still be attached to the motherboard.

결론

To reassemble your device, follow these instructions in reverse order.

작성자

6다른 기여자 명과 함께

Shane

회원 가입일: 09/30/10

80 평판

안내서 6개를 작성함

Cal Poly, Team 14-38, Forte Fall 2010 Cal Poly, Team 14-38, Forte Fall 2010 회원

CPSU-FORTE-F10S14G38

5 회원들

안내서 6개를 작성함

0가이드 댓글

댓글 쓰기

조회 통계:

지난 24시간: 1

지난 7일: 13

지난 30일: 35

전체 시간: 3,149