주요 콘텐츠로 건너뛰기

Nokia 6030 Charger Connector/Jack Replacement

필요한 것

  1. Nokia 6030 Charger Connector/Jack Replacement, Battery: 1 단계, 이미지 1/3 Nokia 6030 Charger Connector/Jack Replacement, Battery: 1 단계, 이미지 2/3 Nokia 6030 Charger Connector/Jack Replacement, Battery: 1 단계, 이미지 3/3
    • Press down on the grip on the back of the phone and slide the rear housing down towards the bottom of the phone.

  2. Nokia 6030 Charger Connector/Jack Replacement: 2 단계, 이미지 1/3 Nokia 6030 Charger Connector/Jack Replacement: 2 단계, 이미지 2/3 Nokia 6030 Charger Connector/Jack Replacement: 2 단계, 이미지 3/3
    • Use your finger to gently pull the bottom of the battery up by using the slip found at the bottom of the phone.

    • Lift out battery and remove.

  3. Nokia 6030 Charger Connector/Jack Replacement, SIM Card: 3 단계, 이미지 1/3 Nokia 6030 Charger Connector/Jack Replacement, SIM Card: 3 단계, 이미지 2/3 Nokia 6030 Charger Connector/Jack Replacement, SIM Card: 3 단계, 이미지 3/3
    • Use your finger to lift the metal cage up.

    • Remove SIM card.

  4. Nokia 6030 Charger Connector/Jack Replacement: 4 단계, 이미지 1/1
    • Use your finger to close the metal cage.

  5. Nokia 6030 Charger Connector/Jack Replacement, Front Cover: 5 단계, 이미지 1/3 Nokia 6030 Charger Connector/Jack Replacement, Front Cover: 5 단계, 이미지 2/3 Nokia 6030 Charger Connector/Jack Replacement, Front Cover: 5 단계, 이미지 3/3
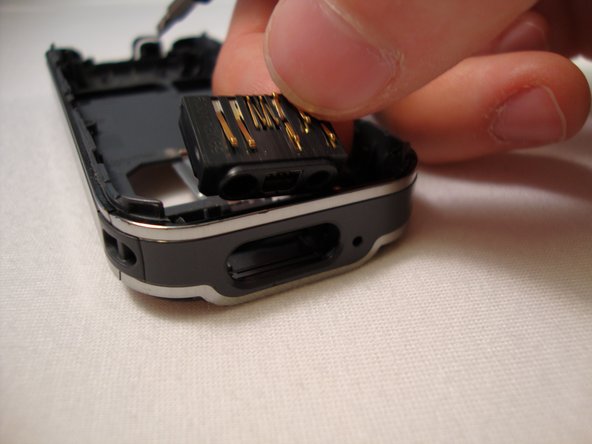
    • Insert your two fingers under the two tabs found at the top of the phone underneath the black casing, then pull the casing up and slide it out slowly.

  6. Nokia 6030 Charger Connector/Jack Replacement: 6 단계, 이미지 1/2 Nokia 6030 Charger Connector/Jack Replacement: 6 단계, 이미지 2/2
    • After removing the top cover, turn the phone over so the screen is facing upwards.

  7. Nokia 6030 Charger Connector/Jack Replacement: 7 단계, 이미지 1/3 Nokia 6030 Charger Connector/Jack Replacement: 7 단계, 이미지 2/3 Nokia 6030 Charger Connector/Jack Replacement: 7 단계, 이미지 3/3
    • Use your fingers to slowly lift the screen back towards the bottom of the phone using the arrows found at the top of the phone.

  8. Nokia 6030 Charger Connector/Jack Replacement, Charger Connector/Jack: 8 단계, 이미지 1/3 Nokia 6030 Charger Connector/Jack Replacement, Charger Connector/Jack: 8 단계, 이미지 2/3 Nokia 6030 Charger Connector/Jack Replacement, Charger Connector/Jack: 8 단계, 이미지 3/3
    • Remove the six screws with a T-6 Torx screwdriver.

  9. Nokia 6030 Charger Connector/Jack Replacement: 9 단계, 이미지 1/3 Nokia 6030 Charger Connector/Jack Replacement: 9 단계, 이미지 2/3 Nokia 6030 Charger Connector/Jack Replacement: 9 단계, 이미지 3/3
    • Lift the logic board and screen from the top.

    • Be careful of loose parts.

  10. Nokia 6030 Charger Connector/Jack Replacement: 10 단계, 이미지 1/3 Nokia 6030 Charger Connector/Jack Replacement: 10 단계, 이미지 2/3 Nokia 6030 Charger Connector/Jack Replacement: 10 단계, 이미지 3/3
    • Insert the screwdriver below the charger connector and press down to pry out.

    • The charger connector should pop out with a slight push inwards with your thumb.

결론

To reassemble your device, follow these instructions in reverse order.

다른 한 분이 해당 안내서를 완성하였습니다.

Spencer Woodworth

회원 가입일: 04/14/10

316 평판

안내서 9개 작성하였습니다

Cal Poly, Team 23-63, Johann Spring 2010 Cal Poly, Team 23-63, Johann Spring 2010 회원

CPSU-JOHANN-S10S23G63

3 회원들

안내서 17개 작성하였습니다

댓글 0개

댓글 쓰기

조회 통계:

24 시간 전: 0

7일 전: 2

30일 전: 5

전체 시간: 4,777