이 버전에는 잘못된 편집 사항이 있을 수 있습니다. 최신 확인된 스냅샷으로 전환하십시오.
필요한 것
-
이 단계는 번역되지 않았습니다. 번역을 도와주십시오
-
Turn off the phone.
-
Check if there is a microSD card in the slot behind the door on the side. If so, remove it by first pushing it in, then pulling it out.
-
Position the phone so that the back side is in view.
-
-
이 단계는 번역되지 않았습니다. 번역을 도와주십시오
-
Remove the back battery cover.
-
Apply pressure on the cover while simultaneously sliding the cover downward.
-
-
이 단계는 번역되지 않았습니다. 번역을 도와주십시오
-
Insert the iPod opening tool between the base of the phone and the phone battery.
-
Position the phone so that the battery won't fall out of the phone.
-
Carefully lift the battery out of the phone.
-
-
이 단계는 번역되지 않았습니다. 번역을 도와주십시오
-
Turn the phone so that the back of the phone is facing forward.
-
The picture to the left shows the location of the plastic tabs that attach to the upper cover of the phone.
-
-
이 단계는 번역되지 않았습니다. 번역을 도와주십시오
-
Place the iPod opening tool under the tabs near the top of the phone.
-
Slide the iPod Opening Tool upwards.
-
This will pop the tabs and release the upper part of the phone.
-
-
-
이 단계는 번역되지 않았습니다. 번역을 도와주십시오
-
Place the iPod opening tool at the top area of the bottom section of the phone (indicated in picture).
-
Lift the iPod opening tool to pop open the clips.
-
This will release the upper back cover of the phone.
-
-
이 단계는 번역되지 않았습니다. 번역을 도와주십시오
-
Push upward on the top back cover using two thumbs.
-
This will remove the top back cover from the phone.
-
-
이 단계는 번역되지 않았습니다. 번역을 도와주십시오
-
Turn the phone over.
-
Gently pull apart the phone.
-
Start at the bottom of the phone and pull outward.
-
There are plastic catches on the middle of each side. These should pop free as you pull.
-
-
이 단계는 번역되지 않았습니다. 번역을 도와주십시오
-
The phone should now be in two different sections.
-
1) The logic board and the back cover
-
2) The keypad and the rest of the phone
-
-
이 단계는 번역되지 않았습니다. 번역을 도와주십시오
-
Turn the phone so that the back section is facing forward.
-
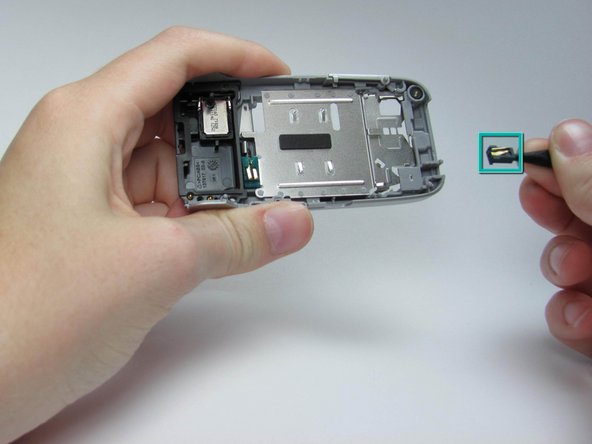
Locate the black headphone port at the bottom of the phone.
-
-
이 단계는 번역되지 않았습니다. 번역을 도와주십시오
-
Grip the headphone port with the tweezers.
-
Lift the headphone port out of the phone using the tweezers.
-


팀

Cal Poly, Team 26-30, Regan Spring 2010 Cal Poly, Team 26-30, Regan Spring 2010 회원
CPSU-REGAN-S10S26G30
4 회원들
안내서 17개 작성하였습니다