주요 콘텐츠로 건너뛰기

Nokia Classic 2600c-2b Display Screen Replacement

필요한 것

  1. Nokia Classic 2600c-2b Display Screen Replacement, Replacing Display Screen: 1 단계, 이미지 2개 중 1개 Nokia Classic 2600c-2b Display Screen Replacement, Replacing Display Screen: 1 단계, 이미지 2개 중 2개
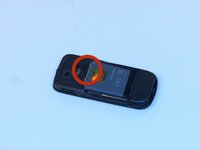
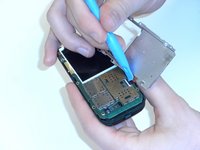
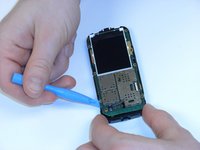
    • Press down on the button located at the bottom of the phone, using the center ridge as a guide.

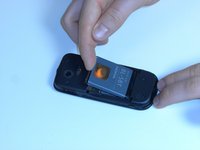
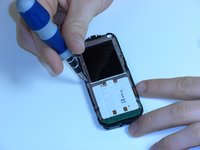
    • Pull the phone apart from the bottom, keeping the button pressed down.

    • CAUTION! The plastic opening tool may be used to gain leverage. Some force is required to open.

  2. Nokia Classic 2600c-2b Display Screen Replacement: 2 단계, 이미지 1개 중 1개
    • Remove the back cover to expose the battery.

  3. Nokia Classic 2600c-2b Display Screen Replacement: 3 단계, 이미지 2개 중 1개 Nokia Classic 2600c-2b Display Screen Replacement: 3 단계, 이미지 2개 중 2개
    • Place a finger or plastic opening tool in the gap between the battery and the phone.

    • Gently lift the battery out.

  4. Nokia Classic 2600c-2b Display Screen Replacement: 4 단계, 이미지 2개 중 1개 Nokia Classic 2600c-2b Display Screen Replacement: 4 단계, 이미지 2개 중 2개
    • Locate the plastic latches on the left and right sides of the phone.

    • Insert the plastic opening tool or a fingernail into each latch and pry them open individually.

    • CAUTION! Some force is required.

  5. Nokia Classic 2600c-2b Display Screen Replacement: 5 단계, 이미지 1개 중 1개
    • Remove the faceplate with the number pad attached.

  6. Nokia Classic 2600c-2b Display Screen Replacement: 6 단계, 이미지 1개 중 1개
    • Turn the faceplate so the number pad faces downward.

    • Lift the number pad out of the faceplate.

  7. Nokia Classic 2600c-2b Display Screen Replacement: 7 단계, 이미지 2개 중 1개 Nokia Classic 2600c-2b Display Screen Replacement: 7 단계, 이미지 2개 중 2개
    • Locate the six screws positions along the edges of the motherboard.

    • Unscrew the six screws using the Torx 5 screwdriver (see Introduction for description of a Torx 5 screwdriver).

    • CAUTION! Place the screws in a secure location.

  8. Nokia Classic 2600c-2b Display Screen Replacement: 8 단계, 이미지 2개 중 1개 Nokia Classic 2600c-2b Display Screen Replacement: 8 단계, 이미지 2개 중 2개
    • Locate the orange ribbon tape connecting the metal display plate to the motherboard.

    • Lift the black latch attaching the tape to the motherboard.

    • Gently pull the tape out of the latch slot to remove the metal display.

  9. Nokia Classic 2600c-2b Display Screen Replacement: 9 단계, 이미지 2개 중 1개 Nokia Classic 2600c-2b Display Screen Replacement: 9 단계, 이미지 2개 중 2개
    • Using the plastic opening tool, gently pry off the motherboard from the plastic shell.

    • CAUTION! When pulling the motherboard out, be careful not to damage the battery under the lower left hand corner of the motherboard.

  10. Nokia Classic 2600c-2b Display Screen Replacement: 10 단계, 이미지 1개 중 1개
    • Gently pull the orange ribbon tape up to remove the display.

    • Replace display screen.

    • Follow the instructions in reverse order to reassemble the phone.

결론

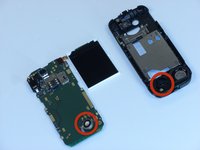
To reassemble your device, follow these instructions in reverse order.

다른 3명이 해당 안내서를 완성하였습니다.

작성자

3다른 기여자 명과 함께

Ian VanZandt

회원 가입일: 02/14/12

699 평판

안내서 5개를 작성함

James Madison, Team 3-1, Klein Spring 2012 James Madison, Team 3-1, Klein Spring 2012 회원

JMU-KLEIN-S12S3G1

3 회원들

안내서 9개를 작성함

3가이드 댓글

Pretty accurate, nice guide! Easily repaired and it works!

Dominik Fryč - 답글

Where can I find the screen?

jackie fincher -

Perfect guide! But Where can i get original components??

Navin Singh - 답글

댓글 쓰기

조회 통계:

지난 24시간: 0

지난 7일: 1

지난 30일: 17

전체 시간: 1,148