주요 콘텐츠로 건너뛰기

Nokia Lumia 900 Speaker Replacement

필요한 것

  1. Nokia Lumia 900 Speaker Replacement, Screen: 1 단계, 이미지 1/2 Nokia Lumia 900 Speaker Replacement, Screen: 1 단계, 이미지 2/2
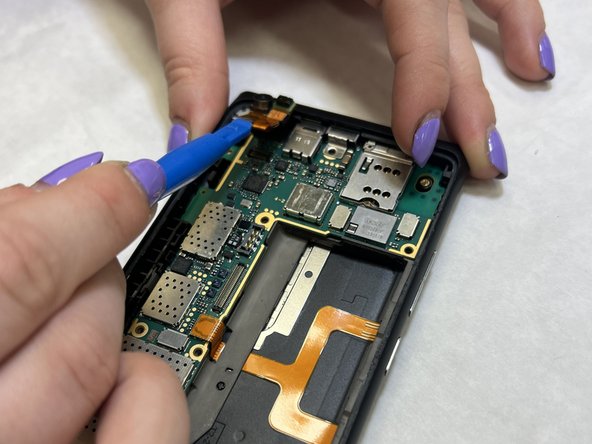
    • Insert the pointed end of the spudger into the sim card port indicated by the picture. Then proceed to remove the sim card port entirely.

  2. Nokia Lumia 900 Speaker Replacement: 2 단계, 이미지 1/2 Nokia Lumia 900 Speaker Replacement: 2 단계, 이미지 2/2
    • Use tweezers to remove the small rod in the port indicated in the picture.

  3. Nokia Lumia 900 Speaker Replacement: 3 단계, 이미지 1/2 Nokia Lumia 900 Speaker Replacement: 3 단계, 이미지 2/2
    • Separate the screen from the motherboard by prying it open with the spudger along with pulling upwards with the suction cup.

  4. Nokia Lumia 900 Speaker Replacement: 4 단계, 이미지 1/2 Nokia Lumia 900 Speaker Replacement: 4 단계, 이미지 2/2
    • Gently pull apart the screen from the motherboard, with only the ribbons connected from the motherboard to the screen.

  5. Nokia Lumia 900 Speaker Replacement: 5 단계, 이미지 1/1
    • Disconnect the No-fuss cables from the motherboard by gently prying them up using the flat end of the black stick spudger. Make sure not to bend or crease the cable.

    • Remove the screen.

  6. Nokia Lumia 900 Speaker Replacement, Front Camera: 6 단계, 이미지 1/2 Nokia Lumia 900 Speaker Replacement, Front Camera: 6 단계, 이미지 2/2
    • Use the iFixit iOpener or another heat source to gently heat the top left corner until the adhesive under the camera softens.

    • Use the plastic opening tools to carefully lift the front camera from the motherboard.

  7. Nokia Lumia 900 Speaker Replacement, Battery: 7 단계, 이미지 1/2 Nokia Lumia 900 Speaker Replacement, Battery: 7 단계, 이미지 2/2
    • Use the flat end of a spudger to carefully disconnect the ribbon cable.

    • Make sure not to bend or crease the cable.

  8. Nokia Lumia 900 Speaker Replacement: 8 단계, 이미지 1/2 Nokia Lumia 900 Speaker Replacement: 8 단계, 이미지 2/2
    • Use the flat end of a spudger to remove the battery.

    • The battery may be glued down. This will be evident if the battery is difficult to lift. Use the iFixit iOpener to heat the back of the phone allowing the glue to heat and become more pliable before trying to lift the battery again. This may take several minutes.

  9. Nokia Lumia 900 Speaker Replacement, Speaker: 9 단계, 이미지 1/2 Nokia Lumia 900 Speaker Replacement, Speaker: 9 단계, 이미지 2/2
    • Use the plastic opening tool to lift the orange ribbon cable from the motherboard.

  10. Nokia Lumia 900 Speaker Replacement: 10 단계, 이미지 1/2 Nokia Lumia 900 Speaker Replacement: 10 단계, 이미지 2/2
    • Use the plastic opening tool to lift the motherboard out of the casing.

    • It is recommended that you wedge the opening tool in the crevice between the motherboard and casing in the top righthand corner of the device.

  11. Nokia Lumia 900 Speaker Replacement: 11 단계, 이미지 1/1
    • Use the flat end of a spudger to lift the LED out of the casing.

  12. Nokia Lumia 900 Speaker Replacement: 12 단계, 이미지 1/2 Nokia Lumia 900 Speaker Replacement: 12 단계, 이미지 2/2
    • Use the flat end of a spudger to lift the metal backplate from the casing.

    • Be sure not to lose the buttons.

  13. Nokia Lumia 900 Speaker Replacement: 13 단계, 이미지 1/2 Nokia Lumia 900 Speaker Replacement: 13 단계, 이미지 2/2
    • Wedge the pointed end of the spudger into the gaps in the antenna housing and pull the antenna housing away from the casing walls.

  14. Nokia Lumia 900 Speaker Replacement: 14 단계, 이미지 1/2 Nokia Lumia 900 Speaker Replacement: 14 단계, 이미지 2/2
    • Insert the pointed end of the spudger into the hole and slide the speaker housing out from the casing.

결론

To reassemble your device, follow these instructions in reverse order.

Kourtney Collier

회원 가입일: 03/31/22

289 평판

안내서 3개 작성하였습니다

IUPUI, Team 3-2, Harley Spring 2022 IUPUI, Team 3-2, Harley Spring 2022 회원

IUPUI-HARLEY-S22S3G2

3 회원들

안내서 6개 작성하였습니다

댓글 0개

댓글 쓰기

조회 통계:

24 시간 전: 0

7일 전: 3

30일 전: 7

전체 시간: 103