주요 콘텐츠로 건너뛰기
수리 커뮤니티 가입 - 계정 만들기

OLPC XO-4 Touch Screen Replacement

필요한 것

  1. OLPC XO-4 Touch Screen Replacement, Battery: 1 단계, 이미지 1개 중 1개
    • Turn the laptop upside-down, with the handle facing away from you.

    댓글 쓰기

  2. OLPC XO-4 Touch Screen Replacement: 2 단계, 이미지 2개 중 1개 OLPC XO-4 Touch Screen Replacement: 2 단계, 이미지 2개 중 2개
    • Pull the lock tabs towards the green outer edges of the laptop.

    • Hold the left lock tab in the unlock position until the battery is completely removed in the next step.

    댓글 쓰기

  3. OLPC XO-4 Touch Screen Replacement: 3 단계, 이미지 2개 중 1개 OLPC XO-4 Touch Screen Replacement: 3 단계, 이미지 2개 중 2개
    • Lift up on the middle of the battery to remove it from the device.

    댓글 쓰기

  4. OLPC XO-4 Touch Screen Replacement, Screen Frame: 4 단계, 이미지 3개 중 1개 OLPC XO-4 Touch Screen Replacement, Screen Frame: 4 단계, 이미지 3개 중 2개 OLPC XO-4 Touch Screen Replacement, Screen Frame: 4 단계, 이미지 3개 중 3개
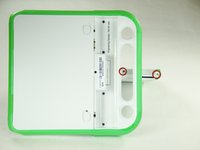
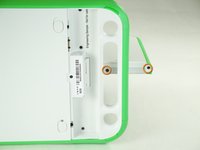
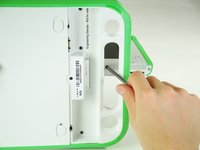
    • Remove the two 4mm Phillips #1 screws underneath the screen on the right-hand side.

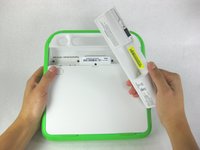
    • Rotate the screen 180° and remove the other two screws.

    • You will have to put your screwdriver through the handle in order to reach the middle screw for both sides.

    댓글 쓰기

  5. OLPC XO-4 Touch Screen Replacement: 5 단계, 이미지 3개 중 1개 OLPC XO-4 Touch Screen Replacement: 5 단계, 이미지 3개 중 2개 OLPC XO-4 Touch Screen Replacement: 5 단계, 이미지 3개 중 3개
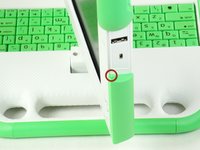
    • Remove the green side panel by pressing down on the small green button on the top and sliding the panel up.

    • Repeat the step above for the panel on the other side.

    댓글 쓰기

  6. OLPC XO-4 Touch Screen Replacement: 6 단계, 이미지 1개 중 1개
    • Be careful not to pull the bottom too far out because a ribbon cable is under the frame and can easily break.

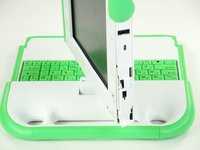
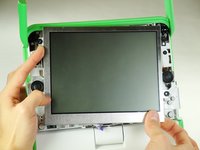
    • Gently lift up the lower part of the frame and pull it down to free the screen frame.

    댓글 쓰기

  7. OLPC XO-4 Touch Screen Replacement: 7 단계, 이미지 2개 중 1개 OLPC XO-4 Touch Screen Replacement: 7 단계, 이미지 2개 중 2개
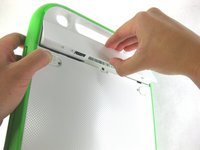
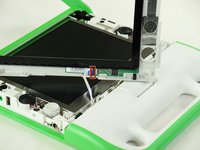
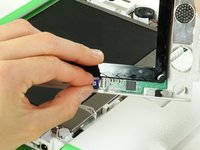
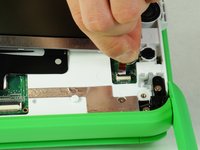
    • Lift the black connector and pull the ribbon cable out by the purple tab, freeing the frame.

    댓글 쓰기

  8. OLPC XO-4 Touch Screen Replacement, Screen: 8 단계, 이미지 1개 중 1개
    • Remove the four 7.62mm screws using a Phillips #1 screwdriver.

    댓글 쓰기

  9. OLPC XO-4 Touch Screen Replacement: 9 단계, 이미지 2개 중 1개 OLPC XO-4 Touch Screen Replacement: 9 단계, 이미지 2개 중 2개
    • Be careful not to pull the screen out too far. There are two ribbon cables attached to the screen, and they can easily break.

    • Carefully lift the screen out.

    댓글 쓰기

  10. OLPC XO-4 Touch Screen Replacement: 10 단계, 이미지 3개 중 1개 OLPC XO-4 Touch Screen Replacement: 10 단계, 이미지 3개 중 2개 OLPC XO-4 Touch Screen Replacement: 10 단계, 이미지 3개 중 3개
    • Notice that the laptop in this picture has been turned 180° with the antennas now below the screen.

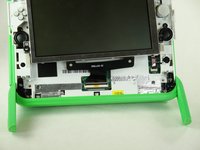
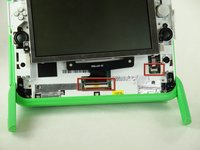
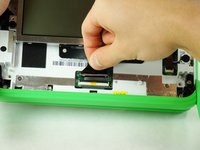
    • For each ribbon cable, lift up the black connector and gently pull the ribbon cables out by the plastic tabs.

    댓글 쓰기

  11. OLPC XO-4 Touch Screen Replacement: 11 단계, 이미지 1개 중 1개
    • Remove the screen from the laptop.

    댓글 쓰기

결론

To reassemble your device, follow these instructions in reverse order.

취소: 해당 안내서를 완성하지 않았습니다.

다른 2명이 해당 안내서를 완성하였습니다.

작성자

7다른 기여자 명과 함께

Zach Yasuda

회원 가입일: 01/24/13

173 평판

안내서 2개를 작성함

Cal Poly, Team 3-29, Amido Winter 2013 Cal Poly, Team 3-29, Amido Winter 2013 회원

CPSU-AMIDO-W13S3G29

4 회원들

안내서 20개를 작성함

0가이드 댓글

댓글 쓰기

조회 통계:

지난 24시간: 0

지난 7일: 9

지난 30일: 35

전체 시간: 1,833