주요 콘텐츠로 건너뛰기

이 안내서에는 최근 변경 사항이 더 있습니다. 최신 비검증 버전으로 전환하십시오.

Olympus C-765 LCD Screen Replacement

필요한 것

  1. Olympus C-765 LCD Screen Replacement, LCD Screen: 1 단계, 이미지 1/3 Olympus C-765 LCD Screen Replacement, LCD Screen: 1 단계, 이미지 2/3 Olympus C-765 LCD Screen Replacement, LCD Screen: 1 단계, 이미지 3/3
    • Remove all the screws holding the back plate in place.

    • Unscrew the 4mm screw that is directly to the right of the viewfinder.

    • On the base:

    • Unscrew 3mm screw in the top left corner

    • Unscrew 4-3mm screws under the battery cover

    • Unscrew 1-3mm screw on the right side panel.

    • Unscrew 2-2mm screws on the left side panel.

    • The bullets on this step apply to all 3 pictures included it this step.

  2. Olympus C-765 LCD Screen Replacement: 2 단계, 이미지 1/2 Olympus C-765 LCD Screen Replacement: 2 단계, 이미지 2/2
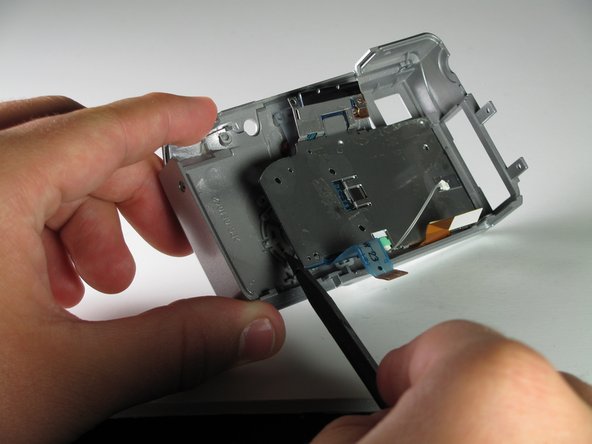
    • Now we remove the back panel completely.

    • 2 ribbon cables can be gently rocked out of their sockets

    • Use metal tweezers to grasp and pull the white cable out of its clip

  3. Olympus C-765 LCD Screen Replacement: 3 단계, 이미지 1/3 Olympus C-765 LCD Screen Replacement: 3 단계, 이미지 2/3 Olympus C-765 LCD Screen Replacement: 3 단계, 이미지 3/3
    • Peel the black tape off of the back surface of the LCD

    • Unscrew 4-3mm screws, on the LCD bracket

    • Unscrew 2-2mm screws from the top of the bracket

    • Lastly using a spudger, pop the LCD out of the camera back plate.

    • When the bracket comes off, be aware that the buttons from the top section will fall out of place if the plate is inverted.

결론

To reassemble your device, follow these instructions in reverse order.

다른 2명이 해당 안내서를 완성하였습니다.

Mason Morgan

회원 가입일: 04/05/11

115 평판

안내서 6개 작성하였습니다

Cal Poly, Team 12-33, Maness Spring 2011 Cal Poly, Team 12-33, Maness Spring 2011 회원

CPSU-MANESS-S11S12G33

3 회원들

안내서 7개 작성하였습니다

댓글 0개

댓글 쓰기

조회 통계:

24 시간 전: 0

7일 전: 0

30일 전: 3

전체 시간: 2,869