주요 콘텐츠로 건너뛰기

OnePlus 5 Back Cover Replacement

필요한 것

  1. OnePlus 5 Back Cover Replacement, SIM Card Tray: 1 단계, 이미지 1/3 OnePlus 5 Back Cover Replacement, SIM Card Tray: 1 단계, 이미지 2/3 OnePlus 5 Back Cover Replacement, SIM Card Tray: 1 단계, 이미지 3/3
    • Insert a SIM card eject tool, bit, or a straightened paperclip into the small hole below the SIM card tray, located near the rear cameras on the edge of the phone.

    • Press firmly to eject the tray.

    • During reassembly, be sure to properly orient the SIM tray you you insert it.

  2. OnePlus 5 Back Cover Replacement, Back Cover: 2 단계, 이미지 1/1
    • Remove the two 2.6 mm T2 screws straddling the USB-C port on the bottom edge of the phone.

  3. OnePlus 5 Back Cover Replacement: 3 단계, 이미지 1/3 OnePlus 5 Back Cover Replacement: 3 단계, 이미지 2/3 OnePlus 5 Back Cover Replacement: 3 단계, 이미지 3/3
    • There is a high risk of damaging the display panel if this opening procedure is improperly followed.

    • The following four steps show how to pry the rear case from the plastic frame. Read through the steps first before attempting the procedure.

    • There are two different seams between the body and the screen of the phone:

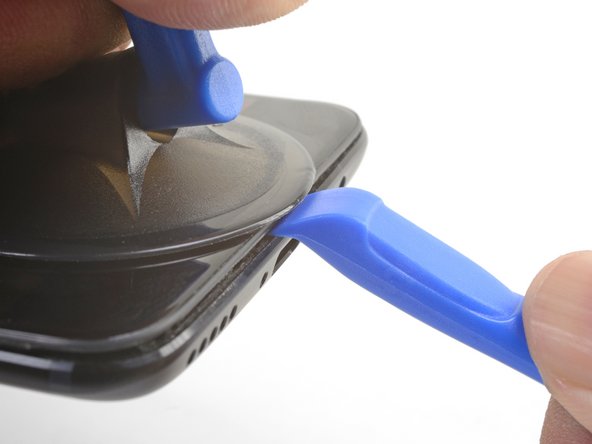
    • Display panel seam: This seam is part of the display assembly. Do not pry at this seam, or you will separate and damage the display panel.

    • Frame seam: This is where the plastic frame meets the back cover. Only pry at this seam.

    • There are twelve clips that hold the frame against the rear case. Be aware of their location as you pry the back cover off in the following steps.

  4. OnePlus 5 Back Cover Replacement: 4 단계, 이미지 1/2 OnePlus 5 Back Cover Replacement: 4 단계, 이미지 2/2
    • As you work, try not to accidentally power on the phone. If you do, turn the phone off before resuming disassembly.

    • Place a suction cup near the bottom edge of the display.

    • Pull on the suction cup with strong steady force.

    • Press the edge of an opening tool straight into the frame seam near the suction cup until the edge wedges between the plastic frame and the back cover's lip.

    • Due to tight tolerances, this will take substantial force. Using a new opening tool with an unmarred edge will help with this step.

  5. OnePlus 5 Back Cover Replacement: 5 단계, 이미지 1/3 OnePlus 5 Back Cover Replacement: 5 단계, 이미지 2/3 OnePlus 5 Back Cover Replacement: 5 단계, 이미지 3/3
    • Once the opening tool's edge is wedged in position, carefully slide the tool along the bottom edge of the phone.

    • Carefully guide the opening tool around the left corner of the phone while keeping the tool's edge within the seam.

  6. OnePlus 5 Back Cover Replacement: 6 단계, 이미지 1/2 OnePlus 5 Back Cover Replacement: 6 단계, 이미지 2/2
    • Lever the opening tool to release the first clip from the frame.

  7. OnePlus 5 Back Cover Replacement: 7 단계, 이미지 1/3 OnePlus 5 Back Cover Replacement: 7 단계, 이미지 2/3 OnePlus 5 Back Cover Replacement: 7 단계, 이미지 3/3
    • Continue sliding the opening tool along the long edge, releasing the clips along the way.

    • The last clip in the top-left corner near the front-facing camera is recessed and can be difficult to release. Take your time and use the flat end of a spudger or an opening pick to help.

  8. OnePlus 5 Back Cover Replacement: 8 단계, 이미지 1/1
    • With the bottom and left edge of the phone freed, gently wiggle the frame to release the top and right edge clips.

    • The frame is still connected to the back cover by a long flex cable. Do not remove the back cover.

    • During reassembly, pause here to test your phone's functionality before securing the back cover.

    • To reinstall the back cover:

    • Align the top edge of the frame to the back cover and ensure that the top clips slip into place.

    • Squeeze along the long edges of the phone to snap the remaining clips into place.

  9. OnePlus 5 Back Cover Replacement: 9 단계, 이미지 1/3 OnePlus 5 Back Cover Replacement: 9 단계, 이미지 2/3 OnePlus 5 Back Cover Replacement: 9 단계, 이미지 3/3
    • With all the clips released, flip the phone over so that the display is face-down.

    • Swing the back cover around and rest it on top of the exposed frame.

    • Be careful not to stress the flex cable connecting the back cover and the frame.

  10. OnePlus 5 Back Cover Replacement: 10 단계, 이미지 1/2 OnePlus 5 Back Cover Replacement: 10 단계, 이미지 2/2
    • Remove the 2.6 mm Phillips screw holding the cable bracket above the battery in place.

    • Lift up and remove the cable bracket.

    • To reinstall the bracket, position one end into place, and bend the bracket slightly to spring the other end into place.

  11. OnePlus 5 Back Cover Replacement: 11 단계, 이미지 1/2 OnePlus 5 Back Cover Replacement: 11 단계, 이미지 2/2
    • Use the point of a spudger to pry up and disconnect the back cover flex cable from its socket.

    • To re-attach press connectors like this one, carefully align and press down on one side until it clicks into place, then repeat on the other side. Do not press down on the middle. If the connector is misaligned, the pins can bend, causing permanent damage.

  12. OnePlus 5 Back Cover Replacement: 12 단계, 이미지 1/1
    • Remove the back cover.

결론

To reassemble your device, follow these instructions in reverse order.

Repair didn’t go as planned? Check out our OnePlus 5 Answers community for troubleshooting help.

다른 10명이 해당 안내서를 완성하였습니다.

Arthur Shi

회원 가입일: 01/03/18

252,690 평판

안내서 526개 작성하였습니다

iFixit iFixit 회원

Staff

135 회원들

안내서 16,817개 작성하였습니다

댓글 한 개

This is a useless guide, I need help with replacing the backcover entirely to a new backcover, I need to remove and attach components from the old backcover to the new one.

Niko - 답글

댓글 쓰기

조회 통계:

24 시간 전: 2

7일 전: 12

30일 전: 46

전체 시간: 5,144