소개
Use this guide to replace a broken rear glass panel on your OnePlus 8T.
You’ll need replacement adhesive to reattach components when reassembling the device.
필요한 것
-
-
Switch off your phone.
-
Heat an iOpener to loosen the adhesive beneath the rear glass. Apply the iOpener for at least two minutes. You might want to repeat this step several times during the rear glass removal.
-
-
-
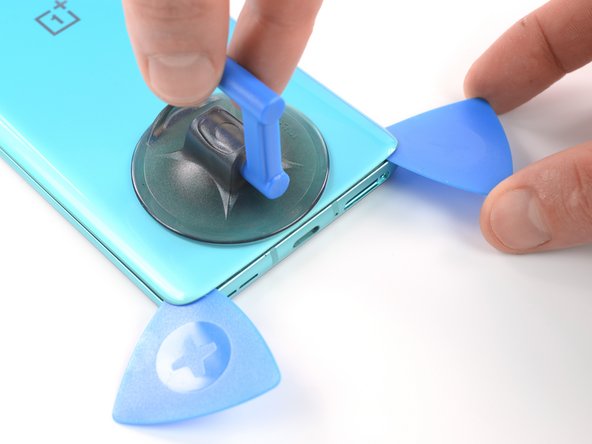
Apply a suction cup to the back of the phone, as close as possible to the center of the bottom edge.
-
Pull on the suction cup to create a gap between the rear glass and the frame.
-
Insert the tip of an opening pick into the gap and slide it to the bottom left corner.
-
Leave the opening pick in its place to prevent the adhesive from resealing.
-
-
-
Insert a second opening under the bottom left corner.
-
Slide the opening pick along the bottom edge to the bottom right corner.
-
Leave the pick in its place to prevent the adhesive from resealing.
-
-
-
-
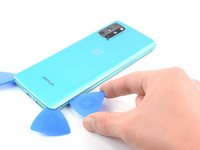
Insert a third opening pick under the bottom right corner.
-
Slide the opening pick along the right edge to the top right corner.
-
Leave the opening picks in their place to prevent the adhesive from resealing.
-
-
-
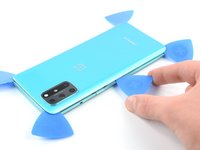
Insert a fourth opening pick under the top right corner.
-
Slide it along the top edge to the top left corner to cut the adhesive.
-
Leave the opening pick in its place to prevent the adhesive from resealing.
-
-
-
Insert a fifth opening pick under the top left corner.
-
Slide the opening pick along the left edge to the bottom left corner to cut the remaining adhesive.
-


Secure the new rear glass cover with pre-cut adhesive or double-sided adhesive tape.
To reassemble your device, follow these instructions in reverse order. Apply new adhesive where necessary after cleaning the relevant areas with isopropyl alcohol (>90%).
Repair didn’t go as planned? Try some basic troubleshooting, or ask our Answers community for help.
다른 9명이 해당 안내서를 완성하였습니다.


3가이드 댓글
Deze handleiding stopt bij het verwijderen van de oude achterkant, het plaatsen van de nieuwe wordt hier niet behandeld.
Hoe lijm je de nieuwe achterkant weer vast? Moet je daarvoor speciale lijm gebruiken of wordt dit bij de nieuwe achterkant geleverd?
Moet je dit ook weer verwarmen of is het voldoende om druk te geven met een paar boeken?
Der Kleber wird in der Regel mit der neuen Rückseite mitgeliefert. Dieser muss nicht erhitzt werden, um zu kleben. Nach dem Austausch des Rückglases, kann die Beschwerung durch ein paar schwere Bücher helfen, die Rückseite gut und fest anzukleben.
Moritz S -