주요 콘텐츠로 건너뛰기

Opening Procedure

단지 전제 조건
이 안내서는 다른 가이드의 선행 작업으로 사용하기 위한 것입니다. 그 자체로는 불완전합니다.

필요한 것

  1. Opening Procedure, Remove the pentalobe screws: 1 단계, 이미지 1/2 Opening Procedure, Remove the pentalobe screws: 1 단계, 이미지 2/2
    • Before you begin, discharge your iPhone battery below 25%. A charged lithium-ion battery can catch fire and/or explode if accidentally punctured.

    • Power off your iPhone before beginning disassembly.

    • Remove the two 6.7 mm-long pentalobe screws at the bottom edge of the iPhone.

    • Opening the iPhone's display will compromise its waterproof seals. Have replacement seals ready before you proceed past this step, or take care to avoid liquid exposure if you reassemble your iPhone without replacing the seals.

  2. Opening Procedure, Tape over any cracks: 2 단계, 이미지 1/3 Opening Procedure, Tape over any cracks: 2 단계, 이미지 2/3 Opening Procedure, Tape over any cracks: 2 단계, 이미지 3/3
    • If your iPhone has a cracked screen, keep further breakage contained and prevent bodily harm during your repair by taping over the glass.

    • Lay overlapping strips of packing tape over the iPhone's display until the whole face is covered.

    • This will keep glass shards contained and provide structural integrity when prying and lifting the display.

    • Wear safety glasses to protect your eyes from any glass shaken free during the repair.

    • If the broken glass makes it difficult to get a suction cup to stick in the next few steps, try folding a strong piece of tape (such as duct tape) into a handle and lifting the display with that instead.

  3. Opening Procedure, Heat the lower edge of the phone: 3 단계, 이미지 1/1
    • Heating the lower edge of the iPhone helps soften the adhesive securing the display, making it easier to open.

    • Use a hairdryer or heat gun or prepare an iOpener and apply it to the lower edge of the iPhone for about a minute.

  4. Opening Procedure, Apply suction cup(s): 4 단계, 이미지 1/2 Opening Procedure, Apply suction cup(s): 4 단계, 이미지 2/2
    • The next two steps demonstrate the iSclack, a handy tool that we recommend for anyone doing frequent repairs. If you aren't using the iSclack, skip down two steps for an alternate method.

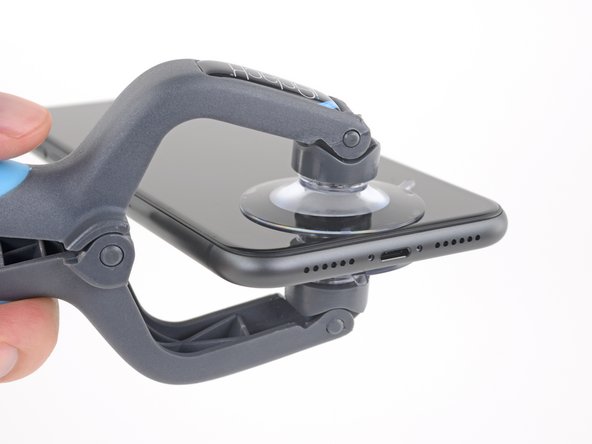
    • If the plastic depth gauge is attached at the center of the iSclack, remove it now—it's not needed for larger iPhones like the iPhone 11.

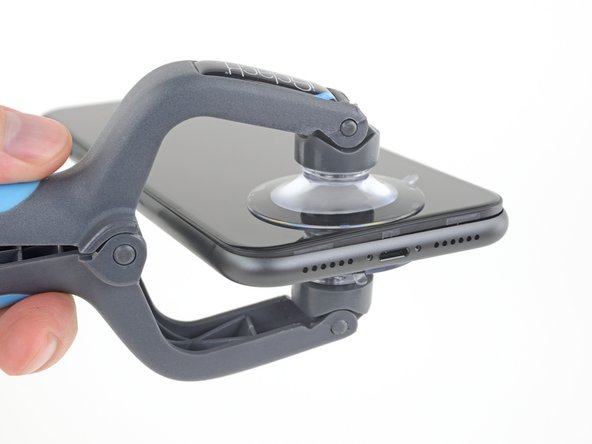
    • Position the suction cups near the bottom edge of the iPhone—one on the front, and one on the back.

    • Press both suction cups firmly into place.

    • If your display or back glass is badly cracked, covering it with a layer of clear packing tape may help the suction cups adhere. The iSclack also includes two pieces of tape for this purpose.

  5. Opening Procedure: 5 단계, 이미지 1/3 Opening Procedure: 5 단계, 이미지 2/3 Opening Procedure: 5 단계, 이미지 3/3
    • Hold onto your iPhone securely and close the handle of the iSclack to slightly separate the screen from the rear case of the phone.

    • Don't try to completely separate the screen; a small opening along the bottom edge is all you need.

    • Insert an opening pick into the gap under the display on the lower edge of the iPhone.

    • Skip the next two steps.

  6. Opening Procedure: 6 단계, 이미지 1/2 Opening Procedure: 6 단계, 이미지 2/2
    • If you're using a single suction handle, apply it to the bottom edge of the phone, while avoiding the curved portion of the glass.

    • If your display is badly cracked, covering it with a layer of clear packing tape may help the suction cup to stick. Alternatively, you can use very sticky tape instead of the suction cup. Or if all else fails, you can superglue the suction cup to the broken screen.

  7. Opening Procedure, Lift the display slightly: 7 단계, 이미지 1/3 Opening Procedure, Lift the display slightly: 7 단계, 이미지 2/3 Opening Procedure, Lift the display slightly: 7 단계, 이미지 3/3
    • Pull up on the suction cup with firm, constant pressure to create a slight gap between the front panel and rear case.

    • Insert an opening pick into the gap.

    • The watertight adhesive holding the display in place is very strong; creating this initial gap takes a significant amount of force. If you're having a hard time opening a gap, apply more heat, and gently rock the screen up and down to weaken the adhesive until you create enough of a gap to insert your tool.

  8. Opening Procedure, Separate the screen adhesive: 8 단계, 이미지 1/3 Opening Procedure, Separate the screen adhesive: 8 단계, 이미지 2/3 Opening Procedure, Separate the screen adhesive: 8 단계, 이미지 3/3
    • Slide the opening pick around the lower left corner and up the left edge of the iPhone, slicing through the adhesive holding the display in place.

    • Don't insert the opening pick too far into the iPhone, or you may cause damage to internal components.

  9. Opening Procedure: 9 단계, 이미지 1/3 Opening Procedure: 9 단계, 이미지 2/3 Opening Procedure: 9 단계, 이미지 3/3
    • Re-insert your pick at the bottom edge of the iPhone, and slide it up the right side to continue separating the adhesive.

    • Don't insert the pick very far, or you may damage the display cables along this side of the iPhone. Insert it only a few millimeters, or about the width of the display bezel.

  10. Opening Procedure: 10 단계, 이미지 1/3 Opening Procedure: 10 단계, 이미지 2/3 Opening Procedure: 10 단계, 이미지 3/3
    • The top edge of the display is secured with both glue and clips.

    • Gently pull the right edge of the display down slightly (in the direction of the Lightning port).

    • Insert your pick into the top-right corner of the phone.

  11. Opening Procedure: 11 단계, 이미지 1/2 Opening Procedure: 11 단계, 이미지 2/2
    • Continue pulling the display down (toward the Lightning port) as needed in order to make a gap large enough for the pick.

    • Slide the pick to the top left corner and cut any remaining adhesive securing the display.

    • Again, don't insert the pick more than a few millimeters—about the width of the display bezel—or you may damage the Face ID sensor array.

  12. Opening Procedure, Remove the suction cup(s): 12 단계, 이미지 1/1
    • Pull the small nub on the suction cup to detach it from the front panel.

    • If you used an iSclack and it's still affixed to the iPhone, remove it now.

  13. Opening Procedure, Open the iPhone: 13 단계, 이미지 1/3 Opening Procedure, Open the iPhone: 13 단계, 이미지 2/3 Opening Procedure, Open the iPhone: 13 단계, 이미지 3/3
    • Open the iPhone by swinging the display up from the left side, like the back cover of a book.

    • Don't try to fully separate the display yet, as several fragile ribbon cables still connect it to the iPhone's logic board.

    • Prop the display up against something sturdy.

    • During reassembly, lay the display in position, align the clips along the top edge, and carefully press the top edge into place before snapping the rest of the display down. If it doesn't click easily into place, check the condition of the clips around the perimeter of the display and make sure they aren't bent.

결론

To reassemble your device, follow these instructions in reverse order.

Jeff Suovanen

회원 가입일: 08/06/13

427,847 평판

안내서 259개 작성하였습니다

iFixit iFixit 회원

Staff

135 회원들

안내서 16,732개 작성하였습니다

댓글 0개

댓글 쓰기

조회 통계:

24 시간 전: 0

7일 전: 0

30일 전: 0

전체 시간: 184