주요 콘텐츠로 건너뛰기

PDP Victrix Pro BFG Battery and Trigger Replacement

필요한 것

  1. PDP Victrix Pro BFG Battery and Trigger Replacement, Battery and Trigger: 1 단계, 이미지 1/1
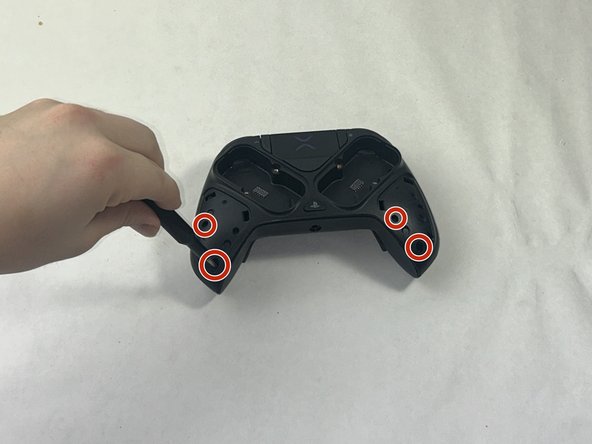
    • Use the purple Module Swap Tool that comes with the device to remove the 4 hex screws.

    • Remove the joystick/button modules from the controller.

  2. PDP Victrix Pro BFG Battery and Trigger Replacement: 2 단계, 이미지 1/1
    • Remove the two screws from the module compartments.

  3. PDP Victrix Pro BFG Battery and Trigger Replacement: 3 단계, 이미지 1/2 PDP Victrix Pro BFG Battery and Trigger Replacement: 3 단계, 이미지 2/2
    • Using the iFixit opening tool, gently pry open the two side grips.

    • Using the screwdriver tool with a head of around 2 mm, remove the screws located in the bottom outside corners.

  4. PDP Victrix Pro BFG Battery and Trigger Replacement: 4 단계, 이미지 1/1
    • Flip the controller to the other side so the label on the bottom is facing upwards.

    • On the label, there is a circular icon; this shows the location of a single screw.

    • Using the same screwdriver head setting from the previous step, remove the screw.

  5. PDP Victrix Pro BFG Battery and Trigger Replacement: 5 단계, 이미지 1/1
    • Flip the controller so the charging port of the controller is facing you.

    • Using a spudger, carefully pry open the front component.

  6. PDP Victrix Pro BFG Battery and Trigger Replacement: 6 단계, 이미지 1/1
    • Flip the controller so it is upside-down, but the charging port is still facing you.

    • In the center of the now exposed part, there will be a hidden silver screw.

    • Use the flexible piece attached to the screwdriver to remove this screw.

    • Now that everything is loosened, gently pry open the controller along the grooves.

  7. PDP Victrix Pro BFG Battery and Trigger Replacement: 7 단계, 이미지 1/1
    • Using the screwdriver tool with a smaller head, remove the three screws from each trigger.

    • Remove the triggers.

  8. PDP Victrix Pro BFG Battery and Trigger Replacement: 8 단계, 이미지 1/1
    • Using the screwdriver, remove the two screws in the bottom two corners.

    • Using the halberd spudger, carefully pry the circuit board open.

  9. PDP Victrix Pro BFG Battery and Trigger Replacement: 9 단계, 이미지 1/1
    • To remove the batteries, use a pair of tweezers to carefully unplug the batteries from the circuit board.

결론

To reassemble your device, follow these instructions in reverse order.

ryanmorabito

회원 가입일: 03/20/24

169 평판

안내서 1개 작성함

UMass Dartmouth, Team 1-1, Santin Spring 2024 UMass Dartmouth, Team 1-1, Santin Spring 2024 회원

UMASSD-SANTIN-S24S1G1

3 회원들

안내서 3개 작성하였습니다

댓글 0개

댓글 쓰기

조회 통계:

24 시간 전: 2

7일 전: 21

30일 전: 47

전체 시간: 54