주요 콘텐츠로 건너뛰기

PSP 2000 Analog Stick, D-pad and Action Keys Replacement

필요한 것

  1. PSP 2000 Analog Stick, D-pad and Action Keys Replacement, Battery: 1 단계, 이미지 1/3 PSP 2000 Analog Stick, D-pad and Action Keys Replacement, Battery: 1 단계, 이미지 2/3 PSP 2000 Analog Stick, D-pad and Action Keys Replacement, Battery: 1 단계, 이미지 3/3
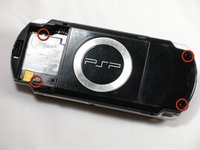
    • Place PSP face down, so that the UMD Drive is facing upwards.

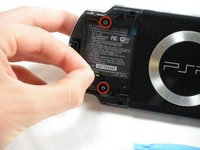
    • Locate the battery door and open.

    • Remove the battery from inside.

  2. PSP 2000 Analog Stick, D-pad and Action Keys Replacement, Front Casing: 2 단계, 이미지 1/1
    • This step requires the removal of the warranty sticker. Removing the sticker will void the warranty. According to the FTC removing this will not void your warranty.

    • Locate the sticker in the battery compartment labeled: "En: Warranty Void if Seal Damaged."

    • Remove the sticker using the PSP Opening Tools.

    • Under the sticker is a 5mm Phillips screw needed in the next step.

  3. PSP 2000 Analog Stick, D-pad and Action Keys Replacement: 3 단계, 이미지 1/2 PSP 2000 Analog Stick, D-pad and Action Keys Replacement: 3 단계, 이미지 2/2
    • Remove four 5 mm Phillips from the case.

    • If the screws stick in the case, you can use a magnetized screwdriver to draw them out.

  4. PSP 2000 Analog Stick, D-pad and Action Keys Replacement: 4 단계, 이미지 1/2 PSP 2000 Analog Stick, D-pad and Action Keys Replacement: 4 단계, 이미지 2/2
    • Remove the following screws from around the bezel:

    • Two 4 mm Phillips

    • One 5 mm Phillips

    • The two shorter 4 mm screws are on the top of the PSP; the longer 5 mm screw is on the bottom.

  5. PSP 2000 Analog Stick, D-pad and Action Keys Replacement: 5 단계, 이미지 1/2 PSP 2000 Analog Stick, D-pad and Action Keys Replacement: 5 단계, 이미지 2/2
    • Gently pry the front bezel away from the casing using a PSP opening tool.

    • Start on the right hand side of the PSP bezel, and carefully work the tool around the side.

    • If you want to clean the control buttons or D-pad, you can easily pop them out once the faceplate is off and wipe them clean.

  6. PSP 2000 Analog Stick, D-pad and Action Keys Replacement, Analog Stick, D-pad and Action Keys: 6 단계, 이미지 1/3 PSP 2000 Analog Stick, D-pad and Action Keys Replacement, Analog Stick, D-pad and Action Keys: 6 단계, 이미지 2/3 PSP 2000 Analog Stick, D-pad and Action Keys Replacement, Analog Stick, D-pad and Action Keys: 6 단계, 이미지 3/3
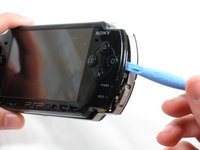
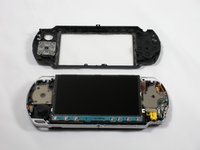
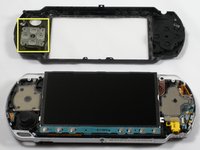
    • With the PSP's faceplate removed, position the PSP so that the analogue stick is easily attainable.

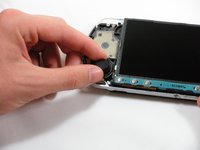
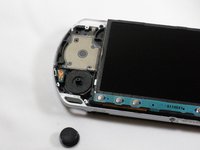
    • Gently pull up on the analogue stick. It should just pop off from the rest of the device.

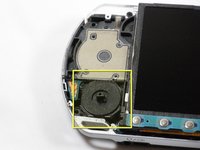
    • In order to clean it correctly, take a cotton swab w/ rubbing alcohol and clean the base of the analogue stick.

    • The connection point on the PSP should be done as well (where the analogue stick meets the PSP).

  7. PSP 2000 Analog Stick, D-pad and Action Keys Replacement: 7 단계, 이미지 1/3 PSP 2000 Analog Stick, D-pad and Action Keys Replacement: 7 단계, 이미지 2/3 PSP 2000 Analog Stick, D-pad and Action Keys Replacement: 7 단계, 이미지 3/3
    • Once the analogue stick has been cleaned, you may wipe the connection points of the D-pad and Action Keys from the PSP to the faceplate.

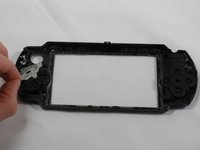
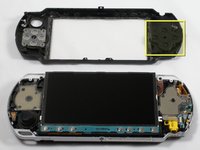
    • Next, with the faceplate turned upside down, locate the clear/white rubber backing of the D-pad to the left of the display window.

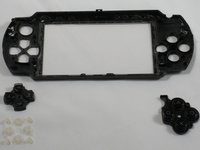
    • Gently peel back and proceed to remove the directional buttons from the faceplate.

    • Now is the time to clean the rubber backing and D-pad with rubbing alcohol, being sure to remove as much dirt and dust as possible.

  8. PSP 2000 Analog Stick, D-pad and Action Keys Replacement: 8 단계, 이미지 1/2 PSP 2000 Analog Stick, D-pad and Action Keys Replacement: 8 단계, 이미지 2/2
    • This process can also be done to the Action Keys (x, square, triangle, circle).

    • Locate the black rubber backing on the right of the display window and gently remove.

    • Again take a clean cotton swab with rubbing alcohol and clean away all dirt at dust.

    • Now might also be a good time to just clean the surface of the home bar and inspect the home keys if they have dust as well.

결론

To reassemble your device, follow these instructions in reverse order.

다른 27명이 해당 안내서를 완성하였습니다.

pepe32290

회원 가입일: 10/19/09

1,573 평판

안내서 4개 작성하였습니다

Cal Poly, Team 6-3, Maness Fall 2009 Cal Poly, Team 6-3, Maness Fall 2009 회원

CPSU-MANESS-F09S6G3

5 회원들

안내서 35개 작성하였습니다

댓글 5개

Hi would you pls help check the screw spec ? thanks!

Jacky - 답글

I found <a href=http://www.buyincoins.com>a nice site, where can buy good products, buyincoins</a>- a professional electronics online website, <a href=http://www.buyincoins.com>what let you buy from China directly </a>without any shipping fee. There are Computer Accessories, iPod, iPhone Accessories, HDMI Video Cable, Laser Pointer, Card Reader, Headphone, Silicone Case and more Cool Gadgets.

sophiefish -

I found <a href=http://www.buyincoins.com>a nice site, where can buy good products, buyincoins</a>- a professional electronics online website, <a href=http://www.buyincoins.com>what let you buy from China directly </a>without any shipping fee. There are Computer Accessories, iPod, iPhone Accessories, HDMI Video Cable, LaserPointer, Card Reader, Headphone, Silicone Case and more Cool Gadgets.

sophiefish -

Thanks! very helpful. I use it to clean the “X” button because don’t work. However, still doesnt work i believe is another issue.

Anyway this guide helped me a lot.

Alex - 답글

HEY i helped traduce this guide into spanish at 100% and other of your guides in the traduction panel. I dont know if you need to accept them, i just let you know that there are at 100% thanks for the guide.

Alex - 답글

댓글 쓰기

조회 통계:

24 시간 전: 11

7일 전: 80

30일 전: 381

전체 시간: 60,216