주요 콘텐츠로 건너뛰기

PSP 300x D-Pad Replacement

필요한 것

  1. PSP 300x D-Pad Replacement, Battery: 1 단계, 이미지 3개 중 1개 PSP 300x D-Pad Replacement, Battery: 1 단계, 이미지 3개 중 2개 PSP 300x D-Pad Replacement, Battery: 1 단계, 이미지 3개 중 3개
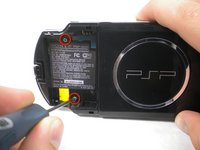
    • Place the PSP face down and locate the battery cover on the left side of the device.

    • Lift and remove the battery cover to reveal the battery.

    • Remove the battery.

  2. PSP 300x D-Pad Replacement, Front Casing: 2 단계, 이미지 1개 중 1개
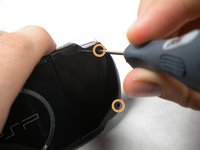
    • Peel back the warranty sticker that is behind the battery with a spudger or your fingernail.

  3. PSP 300x D-Pad Replacement: 3 단계, 이미지 2개 중 1개 PSP 300x D-Pad Replacement: 3 단계, 이미지 2개 중 2개
    • Unscrew all four screws from the back of the PSP with the Phillips #00 Screwdriver.

    • Two are located behind the battery's warranty sticker.

    • Two are located on the right side of the PSP.

  4. PSP 300x D-Pad Replacement: 4 단계, 이미지 1개 중 1개
    • Next, unscrew the two screws located at the top of the PSP.

  5. PSP 300x D-Pad Replacement: 5 단계, 이미지 1개 중 1개
    • Then, remove the single screw from the bottom edge of the PSP (which is positioned next to the barcode).

  6. PSP 300x D-Pad Replacement: 6 단계, 이미지 2개 중 1개 PSP 300x D-Pad Replacement: 6 단계, 이미지 2개 중 2개
    • Slide the spudger in between the outer casing of the PSP, beginning at the "R" shoulder button, and gently pry off the casing.


    • Remove the front casing completely.

  7. PSP 300x D-Pad Replacement, D-Pad: 7 단계, 이미지 2개 중 1개 PSP 300x D-Pad Replacement, D-Pad: 7 단계, 이미지 2개 중 2개
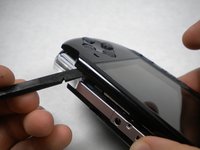
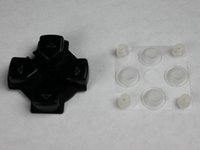
    • Peal up the rubber pad that is securing the D-pad buttons to the backside of the front casing.

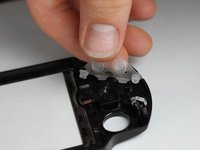
    • Remove the D-pad and the rubber piece.

결론

To reassemble your device, follow these instructions in reverse order.

다른 5명이 해당 안내서를 완성하였습니다.

작성자

6다른 기여자 명과 함께

mbnewsom

회원 가입일: 10/28/09

3,265 평판

안내서 11개를 작성함

댓글 한 개

Is it for 2000?

Kaio Igor - 답글

댓글 쓰기

조회 통계:

지난 24시간: 6

지난 7일: 56

지난 30일: 136

전체 시간: 10,674