주요 콘텐츠로 건너뛰기

PSP 300xc Front Case Replacement

필요한 것

  1. PSP 300xc Front Case Replacement, Battery: 1 단계, 이미지 1/2 PSP 300xc Front Case Replacement, Battery: 1 단계, 이미지 2/2
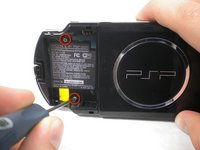
    • Press the button securing the battery door to the PSP 300xc, and lift the battery door off.

    • Lift the battery out of the PSP.

  2. PSP 300xc Front Case Replacement, Front Case: 2 단계, 이미지 1/1
    • Use a spudger or your fingernail to remove the warranty sticker stuck to the inside of the battery tray

  3. PSP 300xc Front Case Replacement: 3 단계, 이미지 1/2 PSP 300xc Front Case Replacement: 3 단계, 이미지 2/2
    • Remove four Phillips screws from the back of the PSP.

  4. PSP 300xc Front Case Replacement: 4 단계, 이미지 1/1
    • Remove two Phillips screws from the top of the PSP.

  5. PSP 300xc Front Case Replacement: 5 단계, 이미지 1/1
    • Remove a single screw from the bottom edge of the PSP.

  6. PSP 300xc Front Case Replacement: 6 단계, 이미지 1/2 PSP 300xc Front Case Replacement: 6 단계, 이미지 2/2
    • Insert a spudger between the front case and PSP, and slide the spudger along the perimeter of the front case to remove it.

결론

To reassemble your device, follow these instructions in reverse order.

다른 3명이 해당 안내서를 완성하였습니다.

Matthew Newsom

회원 가입일: 01/05/10

39,452 평판

안내서 67개 작성하였습니다

댓글 0개

댓글 쓰기

조회 통계:

24 시간 전: 1

7일 전: 8

30일 전: 42

전체 시간: 3,378