주요 콘텐츠로 건너뛰기

PSP Go Analog Joystick Replacement

필요한 것

  1. PSP Go Analog Joystick Replacement, Back Cover: 1 단계, 이미지 1/2 PSP Go Analog Joystick Replacement, Back Cover: 1 단계, 이미지 2/2
    • Unscrew the four Phillips screws on the back of the PSP Go.

    • Rotate the PSP so you can see the top of the device.

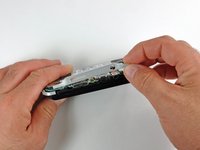
    • Unscrew the two Phillips screws next to the volume buttons.

  2. PSP Go Analog Joystick Replacement: 2 단계, 이미지 1/2 PSP Go Analog Joystick Replacement: 2 단계, 이미지 2/2
    • Use a plastic opening tool around the perimeter of the back cover to loosen it on all sides.

    • Open the back cover by gently lifting the right side, and rotating it to the left side (as if you were opening a book).

    • Be careful not to rotate the back cover from the bottom, as you will break the plastic screw holes on top of the device.

  3. PSP Go Analog Joystick Replacement, Top Cover: 3 단계, 이미지 1/1
    • Pull the top cover upwards gently from its housing.

  4. PSP Go Analog Joystick Replacement, Bottom Plate: 4 단계, 이미지 1/2 PSP Go Analog Joystick Replacement, Bottom Plate: 4 단계, 이미지 2/2
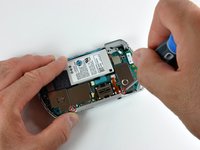
    • Remove the two Phillips screws holding the bottom plate.

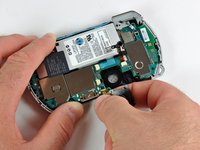
    • Gently lift the bottom plate away from the device.

  5. PSP Go Analog Joystick Replacement, Analog Joystick: 5 단계, 이미지 1/1
    • Use a #00 Phillips screwdriver to remove both screws holding the analog joystick in place.

  6. PSP Go Analog Joystick Replacement: 6 단계, 이미지 1/2 PSP Go Analog Joystick Replacement: 6 단계, 이미지 2/2
    • Use a plastic opening tool to gently flip up the analog joystick's cable connector.

    • Use your fingers or tweezers to gently pull out the analog joystick cable from its connector.

결론

To reassemble your device, follow these instructions in reverse order.

다른 4명이 해당 안내서를 완성하였습니다.

Miroslav Djuric

158,300 평판

안내서 144개 작성하였습니다

댓글 0개

댓글 쓰기

조회 통계:

24 시간 전: 0

7일 전: 8

30일 전: 84

전체 시간: 21,855