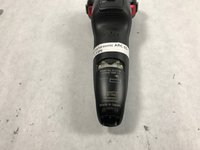
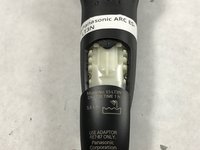
주요 콘텐츠로 건너뛰기

Panasonic ARC ES-LT3N Back Casing Replacement

단지 전제 조건
이 안내서는 다른 안내서의 선행 작업으로 사용하기 위한 것입니다. 그 자체로는 불완전합니다.

필요한 것

  1. Panasonic ARC ES-LT3N Back Casing Replacement, Back Casing: 1 단계, 이미지 2개 중 1개 Panasonic ARC ES-LT3N Back Casing Replacement, Back Casing: 1 단계, 이미지 2개 중 2개
    • Flip the razor over so the back is facing you.

  2. Panasonic ARC ES-LT3N Back Casing Replacement: 2 단계, 이미지 2개 중 1개 Panasonic ARC ES-LT3N Back Casing Replacement: 2 단계, 이미지 2개 중 2개
    • Using a Phillips #00 screwdriver, remove the 6 mm screw just above the charger port.

  3. Panasonic ARC ES-LT3N Back Casing Replacement: 3 단계, 이미지 2개 중 1개 Panasonic ARC ES-LT3N Back Casing Replacement: 3 단계, 이미지 2개 중 2개
    • Slide the plastic cover at the bottom of the razor downward to remove.

  4. Panasonic ARC ES-LT3N Back Casing Replacement: 4 단계, 이미지 2개 중 1개 Panasonic ARC ES-LT3N Back Casing Replacement: 4 단계, 이미지 2개 중 2개
    • Lift up the rear casing from the bottom of the razor.

    • This may require you to gently pry it apart with you fingers.

    • Lift up the rear casing from the sides of the razor.

    • Pull rear casing up and off razor.

    • Be careful not to break any plastic!

결론

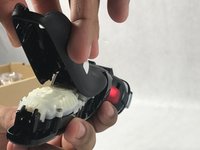
To reassemble your device, follow these instructions in reverse order.

작성자

2다른 기여자 명과 함께

Andrew Trainor

회원 가입일: 03/05/17

648 평판

안내서 5개를 작성함

UMass Dartmouth, Team S8-G3, Catania Spring 2017 UMass Dartmouth, Team S8-G3, Catania Spring 2017 회원

UMASSD-CATANIA-S17S8G3

3 회원들

안내서 10개를 작성함

댓글 0개

댓글 쓰기

조회 통계:

지난 24시간: 0

지난 7일: 0

지난 30일: 0

전체 시간: 46