주요 콘텐츠로 건너뛰기

Panasonic LUMIX DMC-LX100 LCD Screen Replacement

필요한 것

  1. Panasonic LUMIX DMC-LX100 LCD Screen Replacement, Battery: 1 단계, 이미지 1/3 Panasonic LUMIX DMC-LX100 LCD Screen Replacement, Battery: 1 단계, 이미지 2/3 Panasonic LUMIX DMC-LX100 LCD Screen Replacement, Battery: 1 단계, 이미지 3/3
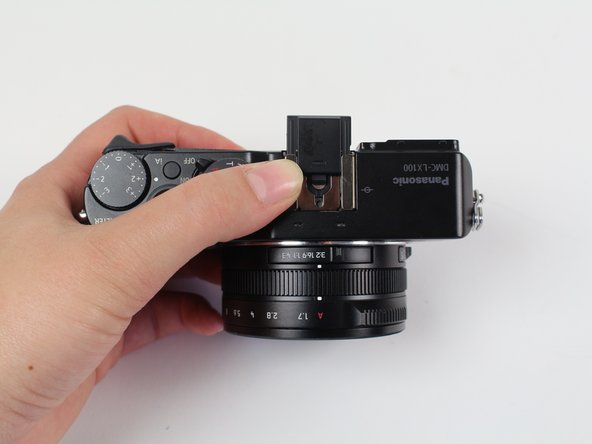
    • Looking at the bottom of the camera, slide the OPEN/LOCK switch to the left into the OPEN position.

    • The battery housing door should swing open.

  2. Panasonic LUMIX DMC-LX100 LCD Screen Replacement: 2 단계, 이미지 1/2 Panasonic LUMIX DMC-LX100 LCD Screen Replacement: 2 단계, 이미지 2/2
    • Flip the inside switch up to release the battery.

  3. Panasonic LUMIX DMC-LX100 LCD Screen Replacement: 3 단계, 이미지 1/1
    • Grip the edge of the battery and pull it out.

    • Use a LUMIX Panasonic DMW-BLE9PP Battery Pack for replacement.

  4. Panasonic LUMIX DMC-LX100 LCD Screen Replacement, LCD Screen: 4 단계, 이미지 1/3 Panasonic LUMIX DMC-LX100 LCD Screen Replacement, LCD Screen: 4 단계, 이미지 2/3 Panasonic LUMIX DMC-LX100 LCD Screen Replacement, LCD Screen: 4 단계, 이미지 3/3
    • Some of these screws may have adhesive to keep the camera from being taken apart so push hard with the screwdriver and turn slowly to avoid stripping screws.

    • Use a Phillips #000 screwdriver to remove the five 4.5 mm screws located on the bottom of the camera and the top one on the left side, with the lens facing you.

    • Use a Phillips #000 screwdriver to remove the two 3.5 mm screws, one below the lens and one on the left side.

    • Use a Phillips #000 screwdriver to remove the 7.1 mm screw from the right side of the camera.

  5. Panasonic LUMIX DMC-LX100 LCD Screen Replacement: 5 단계, 이미지 1/1
    • The viewfinder in this picture is taken off of the camera to more easily see where the screw is located. It is not actually removed from the camera.

    • Use a Phillips #000 screwdriver to remove the 2.5 mm screw underneath the viewfinder.

    • Pull the black plastic piece off of the viewfinder.

  6. Panasonic LUMIX DMC-LX100 LCD Screen Replacement: 6 단계, 이미지 1/3 Panasonic LUMIX DMC-LX100 LCD Screen Replacement: 6 단계, 이미지 2/3 Panasonic LUMIX DMC-LX100 LCD Screen Replacement: 6 단계, 이미지 3/3
    • Slide out the black plastic piece that acts as a placeholder for an attachable lens on the top of the camera.

    • Remove the small metal insert that rests beneath the black plastic piece by pulling outward, away from the lens side of the camera.

    • You may need a spudger or prying device to remove the metal piece by lifting the back end up.

  7. Panasonic LUMIX DMC-LX100 LCD Screen Replacement: 7 단계, 이미지 1/1
    • Some of these screws may have adhesive to keep the camera from being taken apart so push hard with the screwdriver and turn slowly to avoid stripping screws.

    • Use a Phillips #000 screwdriver to remove all four of the 7.1mm screws that are under the metal piece.

  8. Panasonic LUMIX DMC-LX100 LCD Screen Replacement: 8 단계, 이미지 1/1
    • There may be adhesive holding the back on, so pry carefully to not break any of the ribbon cables underneath.

    • Pry off the back of the camera using a spudger starting from the top right side of the LCD screen.

  9. Panasonic LUMIX DMC-LX100 LCD Screen Replacement: 9 단계, 이미지 1/1
    • Use a Phillips #000 screwdriver to remove the 7.5mm screw on the top right of the back of the camera that holds the metal backing in place.

  10. Panasonic LUMIX DMC-LX100 LCD Screen Replacement: 10 단계, 이미지 1/3 Panasonic LUMIX DMC-LX100 LCD Screen Replacement: 10 단계, 이미지 2/3 Panasonic LUMIX DMC-LX100 LCD Screen Replacement: 10 단계, 이미지 3/3
    • Lift the LCD screen away from the device.

    • Pry off the silver metal backing with a spudger.

    • Pull out the ribbon cable that attaches the LCD screen to the motherboard.

    • If need be, use a plastic spudger to pry the ribbon cable out of its socket.

    • Remove the LCD screen.

결론

To reassemble your device, follow these instructions in reverse order.

다른 8명이 해당 안내서를 완성하였습니다.

Annie Borland

회원 가입일: 01/11/16

236 평판

안내서 1개 작성함

Cal Poly, Team 70-4, Forte Winter 2016 Cal Poly, Team 70-4, Forte Winter 2016 회원

CPSU-FORTE-W16S70G4

4 회원들

안내서 9개 작성하였습니다

댓글 8개

Fantastic guide, what a help. Follow the caution details about stripping screws. I found that a #00 screwdriver worked better in some places than the #000. The screw in step 9 holds onto the back of the cameras frame in step 8 on my camera, so you might have to peel back the rubber thumb grip to get at it before you start prying the back case off so you don't bend or break the case. Other than that if I had to do it again it probably would take less than 20 minutes.Iit took me about an hour after stripping a couple screws with my #000 and looking for another screwdriver. Also a spudger isn't necessary, I used a guitar pick and a tooth pick to accomplish the same thing.

gunsr4kids - 답글

Hello-Can you describe the reference ,part number,of the LCD to order one ?thanks

pouliquen - 답글

Same questions as pouliquen, where to find a new LCD and part number ? thanks for help :)

Nicolas Tozman - 답글

Brilliant guide! I had the same problem as gunsr4kids. The screw in step 9 was actually holding the frame in place. I had to lift up the thumb rubber on the left side (there is adhesive on the back) to reveal the screw. Don't pull the rubber to hard

Johannes Cramer - 답글

The part number is DC9301

Johannes Cramer - 답글

댓글 쓰기

조회 통계:

24 시간 전: 3

7일 전: 19

30일 전: 68

전체 시간: 5,682