주요 콘텐츠로 건너뛰기

이 안내서에는 최근 변경 사항이 더 있습니다. 최신 비검증 버전으로 전환하십시오.

Panasonic Lumix DMC-F7 Replacing the Front Case Replacement

필요한 것

  1. Panasonic Lumix DMC-F7 Replacing the Front Case Replacement, Battery: 1 단계, 이미지 1/1
    • Slide the lock switch to the right so that it is in the unlocked position.

    • Use your finger to slide the battery hatch in the direction of the downward arrow so that the hatch is open.

    • Both battery and memory card should now be visible.

  2. Panasonic Lumix DMC-F7 Replacing the Front Case Replacement: 2 단계, 이미지 1/1
    • Open the battery hatch and then the black cover to expose the battery compartment.

    • The camera used to create these repair guides did not have a battery and memory card.

    • Remove the battery.

    • When installing the new battery, ensure it is in the same orientation as before.

  3. Panasonic Lumix DMC-F7 Replacing the Front Case Replacement, Back Case: 3 단계, 이미지 1/1
    • Using the Phillips #00 screwdriver, remove the two 2.8 mm screws located under the hatch.

  4. Panasonic Lumix DMC-F7 Replacing the Front Case Replacement: 4 단계, 이미지 1/1
    • Use the Phillips #00 screwdriver to remove the three 2.8 mm screws on the bottom of the camera.

  5. Panasonic Lumix DMC-F7 Replacing the Front Case Replacement: 5 단계, 이미지 1/1
    • Use the Phillips #00 screwdriver to remove the two 2.8 mm screws on the side of the camera.

  6. Panasonic Lumix DMC-F7 Replacing the Front Case Replacement: 6 단계, 이미지 1/2 Panasonic Lumix DMC-F7 Replacing the Front Case Replacement: 6 단계, 이미지 2/2
    • Use a spudger to pry open the case at all sides.

  7. Panasonic Lumix DMC-F7 Replacing the Front Case Replacement: 7 단계, 이미지 1/2 Panasonic Lumix DMC-F7 Replacing the Front Case Replacement: 7 단계, 이미지 2/2
    • Be careful not to damage the ribbon cable when opening. Ensure it is still attached.

    • Use your fingers to carefully remove the back casing from the front of the camera.

  8. Panasonic Lumix DMC-F7 Replacing the Front Case Replacement: 8 단계, 이미지 1/1
    • Place the camera on a flat surface with the front side facing down.

    • Use the spudger to flip up the retaining flap and slide the ribbon cable out of the connector.

    • Hold down on the camera's metal casing with one hand. Using your other hand, remove the back case from the rest of the camera.

  9. Panasonic Lumix DMC-F7 Replacing the Front Case Replacement, Replacing the Front Case: 9 단계, 이미지 1/1
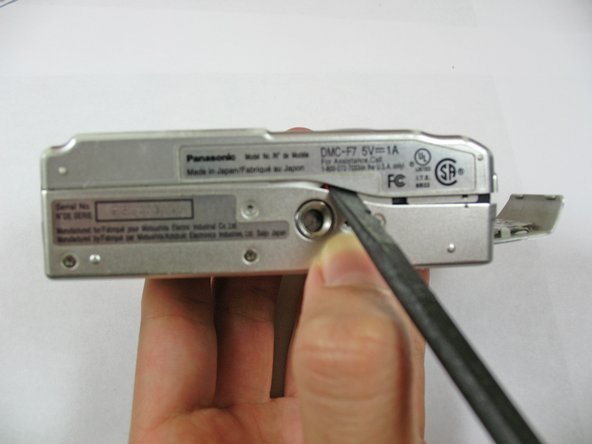
    • Remove the two remaining 2.8 mm Phillips screws on the bottom of the camera.

    • The other three screws shown in picture were removed to take off the back case.

  10. Panasonic Lumix DMC-F7 Replacing the Front Case Replacement: 10 단계, 이미지 1/3 Panasonic Lumix DMC-F7 Replacing the Front Case Replacement: 10 단계, 이미지 2/3 Panasonic Lumix DMC-F7 Replacing the Front Case Replacement: 10 단계, 이미지 3/3
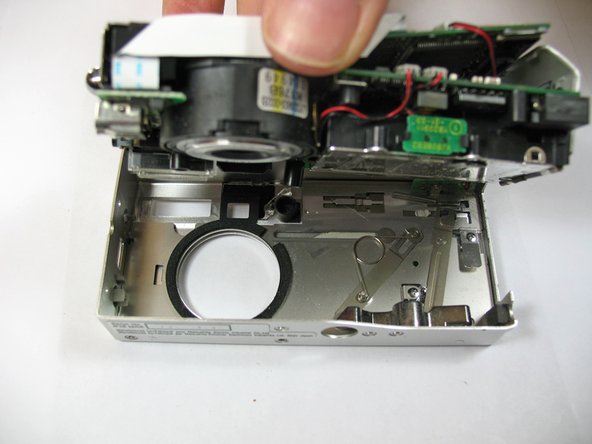
    • Using Spudger tool, pry the front case from the camera's components.

    • Use your fingers to carefully pull the back case from the front case.

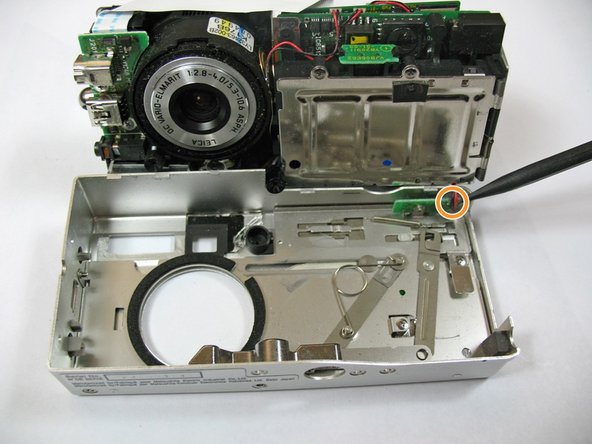
    • Cut the black and red wires connecting front case to the body of the camera.

    • Be careful to ensure that nothing gets caught, and separate the front case from the camera.

    • To put the new front case back on, solder the wires of the new front case to the components of the camera.

결론

To reassemble your device, follow these instructions in reverse order.

다른 한 분이 해당 안내서를 완성하였습니다.

Alex Penman

회원 가입일: 01/28/11

463 평판

안내서 4개 작성하였습니다

Cal Poly, Team 7-35, Regan Winter 2011 Cal Poly, Team 7-35, Regan Winter 2011 회원

CPSU-REGAN-W11S7G35

4 회원들

안내서 10개 작성하였습니다

댓글 0개

댓글 쓰기

조회 통계:

24 시간 전: 0

7일 전: 0

30일 전: 3

전체 시간: 808