주요 콘텐츠로 건너뛰기

Panasonic Lumix DMC-FH20 Lens Replacement

필요한 것

  1. Panasonic Lumix DMC-FH20 Lens Replacement, Lens: 1 단계, 이미지 1/3 Panasonic Lumix DMC-FH20 Lens Replacement, Lens: 1 단계, 이미지 2/3 Panasonic Lumix DMC-FH20 Lens Replacement, Lens: 1 단계, 이미지 3/3
    • Remove all screws (Phillips #000 head) from the sides and bottom of the camera.

  2. Panasonic Lumix DMC-FH20 Lens Replacement: 2 단계, 이미지 1/2 Panasonic Lumix DMC-FH20 Lens Replacement: 2 단계, 이미지 2/2
    • Remove the back panel. This might require some extra force. If you still can't get the panel off, try to use a plastic opening tool.

  3. Panasonic Lumix DMC-FH20 Lens Replacement: 3 단계, 이미지 1/2 Panasonic Lumix DMC-FH20 Lens Replacement: 3 단계, 이미지 2/2
    • Remove the circuit board. You should be able to do this with your fingers. Just grab it and pull upwards. If it does not come, use a plastic opening tool to help.

  4. Panasonic Lumix DMC-FH20 Lens Replacement: 4 단계, 이미지 1/2 Panasonic Lumix DMC-FH20 Lens Replacement: 4 단계, 이미지 2/2
    • Remove the white plastic cover. This may take some extra force. You will want to try to remove from the bottom side first and peel up.

    • Then, where the silver switch is located, it will slide directly out at the top.

  5. Panasonic Lumix DMC-FH20 Lens Replacement: 5 단계, 이미지 1/3 Panasonic Lumix DMC-FH20 Lens Replacement: 5 단계, 이미지 2/3 Panasonic Lumix DMC-FH20 Lens Replacement: 5 단계, 이미지 3/3
    • Unscrew one screw (Phillips #000 head)

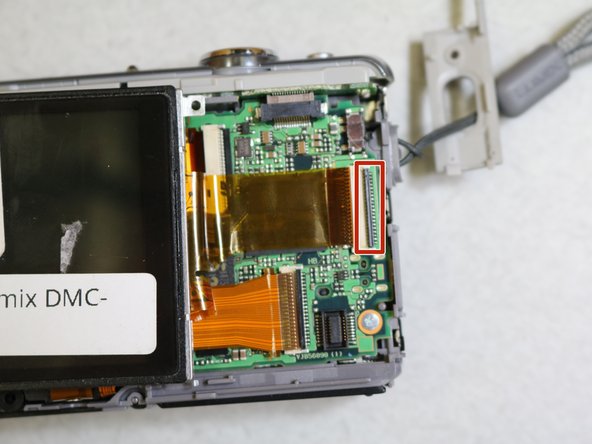
    • Remove the screen. You will want to use a plastic opening tool to complete this step. Pop the thin black piece of plastic upwards with the opening tool to unlock the plastic film ribbon.

    • Once unlocked, you will be able to pull the ribbon out and remove the screen completely.

  6. Panasonic Lumix DMC-FH20 Lens Replacement: 6 단계, 이미지 1/3 Panasonic Lumix DMC-FH20 Lens Replacement: 6 단계, 이미지 2/3 Panasonic Lumix DMC-FH20 Lens Replacement: 6 단계, 이미지 3/3
    • Remove the grey panel.

    • You will need to unscrew three screws (Phillips #000 head) in order to remove the panel.

  7. Panasonic Lumix DMC-FH20 Lens Replacement: 7 단계, 이미지 1/3 Panasonic Lumix DMC-FH20 Lens Replacement: 7 단계, 이미지 2/3 Panasonic Lumix DMC-FH20 Lens Replacement: 7 단계, 이미지 3/3
    • Pop the two thin black pieces of plastic upwards with the opening tool to unlock the plastic film ribbons.

    • Once unlocked, you will need to unscrew six more screws (Phillips #000 head) to completely detach the lens from the rest of the camera.

  8. Panasonic Lumix DMC-FH20 Lens Replacement: 8 단계, 이미지 1/2 Panasonic Lumix DMC-FH20 Lens Replacement: 8 단계, 이미지 2/2
    • Remove the lens from the camera carefully. You can do this simply by grabbing it with your fingers and pulling out gently.

결론

To reassemble your device, follow these instructions in reverse order.

다른 한 분이 해당 안내서를 완성하였습니다.

Arianna Boushell

회원 가입일: 01/24/17

626 평판

안내서 5개 작성하였습니다

Cal Poly, Team 10-7, Banghart Winter 2017 Cal Poly, Team 10-7, Banghart Winter 2017 회원

CPSU-BANGHART-W17S10G7

3 회원들

안내서 10개 작성하였습니다

댓글 0개

댓글 쓰기

조회 통계:

24 시간 전: 1

7일 전: 2

30일 전: 12

전체 시간: 842