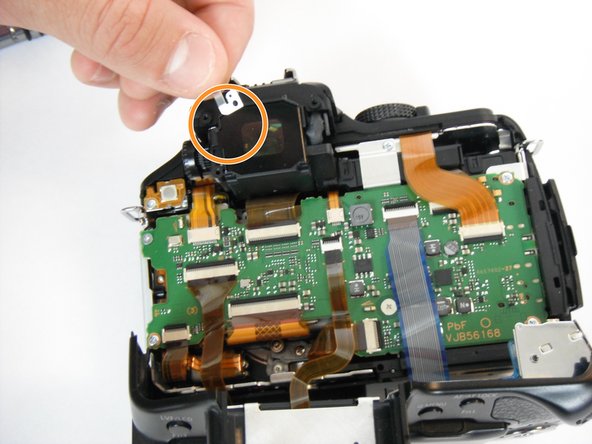
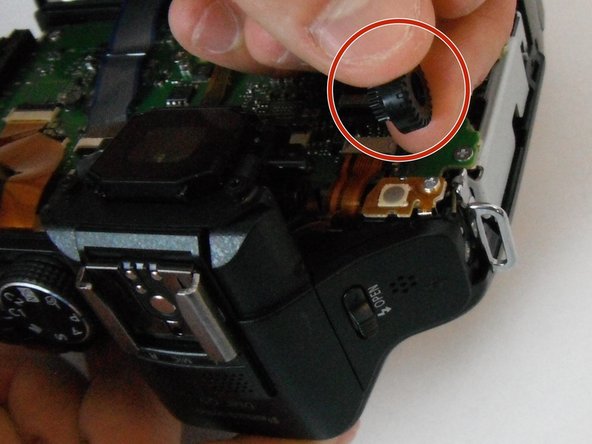
주요 콘텐츠로 건너뛰기

Panasonic Lumix DMC-G5 Diopter Adjustment Dial Replacement

필요한 것

  1. Panasonic Lumix DMC-G5 Diopter Adjustment Dial Replacement, Diopter Adjustment Dial: 1 단계, 이미지 1/3 Panasonic Lumix DMC-G5 Diopter Adjustment Dial Replacement, Diopter Adjustment Dial: 1 단계, 이미지 2/3 Panasonic Lumix DMC-G5 Diopter Adjustment Dial Replacement, Diopter Adjustment Dial: 1 단계, 이미지 3/3
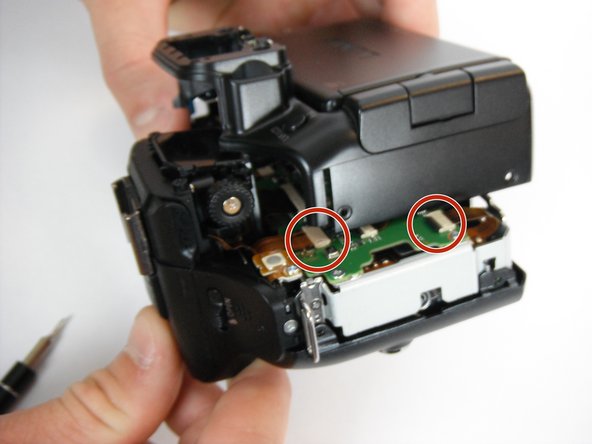
    • Remove the four 4.6mm J000 Phillips screws from the sides and two 3.2mm J000 Phillips screws along the bottom.

  2. Panasonic Lumix DMC-G5 Diopter Adjustment Dial Replacement: 2 단계, 이미지 1/3 Panasonic Lumix DMC-G5 Diopter Adjustment Dial Replacement: 2 단계, 이미지 2/3 Panasonic Lumix DMC-G5 Diopter Adjustment Dial Replacement: 2 단계, 이미지 3/3
    • Remove the two 3.2mm J000 Phillips screws located on the bottom edge of the viewfinder cover.

    • Carefully remove the viewfinder cover.

    • Remove the two 4.4mm J000 Phillips screws located near the top edge of the viewfinder.

  3. Panasonic Lumix DMC-G5 Diopter Adjustment Dial Replacement: 3 단계, 이미지 1/3 Panasonic Lumix DMC-G5 Diopter Adjustment Dial Replacement: 3 단계, 이미지 2/3 Panasonic Lumix DMC-G5 Diopter Adjustment Dial Replacement: 3 단계, 이미지 3/3
    • Slide the Wide Plastic Opening Tool upwards along the underside of the rear casing.

    • Be careful not to disconnect the filament connections. Reinserting them can be difficult.

    • Slowly lower the casing into the position shown.

  4. Panasonic Lumix DMC-G5 Diopter Adjustment Dial Replacement: 4 단계, 이미지 1/2 Panasonic Lumix DMC-G5 Diopter Adjustment Dial Replacement: 4 단계, 이미지 2/2
    • Use the Screwdriver J000 Phillips Head to remove the screw located at the lower-left corner of the face of the viewfinder glass.

    • Carefully lift the L-shaped clicker underneath the previously removed screw.

  5. Panasonic Lumix DMC-G5 Diopter Adjustment Dial Replacement: 5 단계, 이미지 1/2 Panasonic Lumix DMC-G5 Diopter Adjustment Dial Replacement: 5 단계, 이미지 2/2
    • Slide the faulty diopter adjustment dial off the rod.

    • Replace the diopter dial with a 1-cm wheel.

결론

To reassemble your device, follow these instructions in reverse order.

다른 한 분이 해당 안내서를 완성하였습니다.

Gabriel Gonzalez Jr

회원 가입일: 02/14/17

325 평판

안내서 3개 작성하였습니다

USF Tampa, Team 1-3, Kass Spring 2017 USF Tampa, Team 1-3, Kass Spring 2017 회원

USFT-KASS-S17S1G3

4 회원들

안내서 6개 작성하였습니다

댓글 0개

댓글 쓰기

조회 통계:

24 시간 전: 0

7일 전: 3

30일 전: 9

전체 시간: 1,017