주요 콘텐츠로 건너뛰기

Panasonic Lumix DMC-ZS1 Door Replacement

필요한 것

  1. Panasonic Lumix DMC-ZS1 Door Replacement, Exterior Screw removal: 1 단계, 이미지 1/3 Panasonic Lumix DMC-ZS1 Door Replacement, Exterior Screw removal: 1 단계, 이미지 2/3 Panasonic Lumix DMC-ZS1 Door Replacement, Exterior Screw removal: 1 단계, 이미지 3/3
    • Remove the battery and memory card from the unit

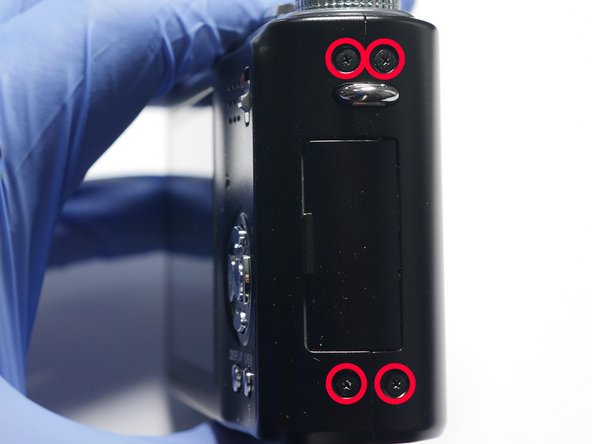
    • Remove 6 (0.3mm) screws from the sides of the unit

    • Remove 5 (0.3mm) screws from the bottom of the unit

  2. Panasonic Lumix DMC-ZS1 Door Replacement: 2 단계, 이미지 1/2 Panasonic Lumix DMC-ZS1 Door Replacement: 2 단계, 이미지 2/2
    • Lift up slightly the rear cover.

    • Do not remove rear cover yet. It is still attached to the Main PCB.

    • Flip up the cable clamps using a spudger or other device. Careful not to break the clamps. Release flex cables and remove back cover.

  3. Panasonic Lumix DMC-ZS1 Door Replacement: 3 단계, 이미지 1/3 Panasonic Lumix DMC-ZS1 Door Replacement: 3 단계, 이미지 2/3 Panasonic Lumix DMC-ZS1 Door Replacement: 3 단계, 이미지 3/3
    • Release the 3 metal clips from the rear cover and remove the LCD

  4. Panasonic Lumix DMC-ZS1 Door Replacement, Door: 4 단계, 이미지 1/3 Panasonic Lumix DMC-ZS1 Door Replacement, Door: 4 단계, 이미지 2/3 Panasonic Lumix DMC-ZS1 Door Replacement, Door: 4 단계, 이미지 3/3
    • Complete the following review guide: LCD removal

    • Remove the front cover

    • Use tweezers or a thin object to push door pin thru enough to grab from the other side.

    • Keep door closed during this procedure so you will not loose the spring.

  5. Panasonic Lumix DMC-ZS1 Door Replacement: 5 단계, 이미지 1/3 Panasonic Lumix DMC-ZS1 Door Replacement: 5 단계, 이미지 2/3 Panasonic Lumix DMC-ZS1 Door Replacement: 5 단계, 이미지 3/3
    • Try to keep the door closed during this procedure.

    • Pull out door pin using needle nose pliers or other tool.

    • Notice spring positioning. This will help you re-install your replacement door

    • If you are having trouble installing, try to keep the spring in place by using a small piece of tape.

    • Replacement Door

결론

To reassemble your device, follow these instructions in reverse order.

다른 한 분이 해당 안내서를 완성하였습니다.

Sales Cameraparts4you

회원 가입일: 07/01/16

3,150 평판

안내서 20개 작성하였습니다

댓글 0개

댓글 쓰기

조회 통계:

24 시간 전: 0

7일 전: 0

30일 전: 1

전체 시간: 141