주요 콘텐츠로 건너뛰기

Pentax PZ-10 Button Replacement

필요한 것

  1. Pentax PZ-10 Button Replacement, Top Cover: 1 단계, 이미지 1/1
    • The top cover is one piece encasing the top of the device except the shutter release button and flash.

  2. Pentax PZ-10 Button Replacement, Removing Upper Right Housing Screw: 2 단계, 이미지 1/2 Pentax PZ-10 Button Replacement, Removing Upper Right Housing Screw: 2 단계, 이미지 2/2
    • With the camera lens face down, locate the screw under the overhanging piece of the top casing on the right side of the back panel.

    • Using the J0 screwdriver, remove the 6.3 mm screw.

  3. Pentax PZ-10 Button Replacement, Removing Screw in Battery Compartment: 3 단계, 이미지 1/2 Pentax PZ-10 Button Replacement, Removing Screw in Battery Compartment: 3 단계, 이미지 2/2
    • Locate the next screw by holding the camera upside down with the battery compartment empty and face up.

    • Remove the 6.3 mm screw using a J0 screwdriver.

  4. Pentax PZ-10 Button Replacement, Removing Screw Under Flash Bulb: 4 단계, 이미지 1/2 Pentax PZ-10 Button Replacement, Removing Screw Under Flash Bulb: 4 단계, 이미지 2/2
    • The next screw is found in the overhanging piece just above the lens.

    • With the top of the camera facing down, remove the 3.4 mm screw with a J0 screwdriver.

  5. Pentax PZ-10 Button Replacement, Pulling Off the Top Cover: 5 단계, 이미지 1/2 Pentax PZ-10 Button Replacement, Pulling Off the Top Cover: 5 단계, 이미지 2/2
    • Gently pull off the top cover with your hands by pulling on the tab on the left of the camera.

  6. Pentax PZ-10 Button Replacement, Locate Rubber Tabs: 6 단계, 이미지 1/2 Pentax PZ-10 Button Replacement, Locate Rubber Tabs: 6 단계, 이미지 2/2
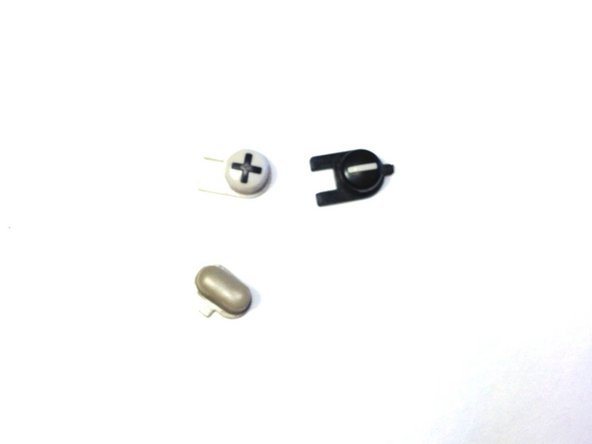
    • Gently remove the beige rubber tabs from under the casing by pulling each down using tweezers.

  7. Pentax PZ-10 Button Replacement: 7 단계, 이미지 1/1
    • Remove the 3 buttons by pushing them from under the casing out through the top.

    • Each button is slotted differently, so pay attention to the orientation of each piece.

  8. Pentax PZ-10 Button Replacement, Buttons: 8 단계, 이미지 1/1
    • The buttons are now free to be replaced or cleaned.

결론

To reassemble your device, follow these instructions in reverse order.

Jonathan Diaz

회원 가입일: 04/20/15

213 평판

안내서 2개 작성하였습니다

댓글 0개

댓글 쓰기

조회 통계:

24 시간 전: 0

7일 전: 0

30일 전: 5

전체 시간: 512