주요 콘텐츠로 건너뛰기

Philips DPM8000 Housing & Display Replacement

단지 전제 조건
이 안내서는 다른 가이드의 선행 작업으로 사용하기 위한 것입니다. 그 자체로는 불완전합니다.

필요한 것

  1. Philips DPM8000 Housing & Display Replacement, Anti-Static Wrist Strap: 1 단계, 이미지 1/1
    이 단계에 사용된 도구:
    Anti-Static Wrist Strap
    $7.95
    구매
    • Before you start disassembling your device make sure that it is turned off.

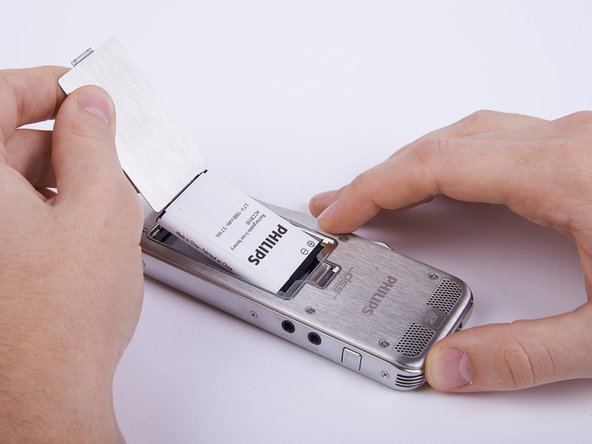
    • Put on the Anti-Static Wrist Strap and clamp the end of the band to an unpainted spot of a radiator.

  2. Philips DPM8000 Housing & Display Replacement, Battery Lid: 2 단계, 이미지 1/2 Philips DPM8000 Housing & Display Replacement, Battery Lid: 2 단계, 이미지 2/2
    • Remove the battery lid

  3. Philips DPM8000 Housing & Display Replacement, Battery: 3 단계, 이미지 1/2 Philips DPM8000 Housing & Display Replacement, Battery: 3 단계, 이미지 2/2
    • Remove the battery.

    • The battery lid is designed to function as an instrument for this task.

  4. Philips DPM8000 Housing & Display Replacement, Upper Ornamental Part: 4 단계, 이미지 1/3 Philips DPM8000 Housing & Display Replacement, Upper Ornamental Part: 4 단계, 이미지 2/3 Philips DPM8000 Housing & Display Replacement, Upper Ornamental Part: 4 단계, 이미지 3/3
    • Unscrew the six Torx #4 (5,3 mm) screws from both sides of the device

    • Collect the removed screws in a bowl or something comparable, otherwise they might get lost.

  5. Philips DPM8000 Housing & Display Replacement: 5 단계, 이미지 1/3 Philips DPM8000 Housing & Display Replacement: 5 단계, 이미지 2/3 Philips DPM8000 Housing & Display Replacement: 5 단계, 이미지 3/3
    • Remove the upper ornamental part from the housing.

    • If your fingernails are not long enough you can use a plastic opening tool.

    • When reassembling the device be aware that the six shackles on the sides of the upper ornamental part need to be placed inside the frame.

  6. Philips DPM8000 Housing & Display Replacement, Housing/Display: 6 단계, 이미지 1/2 Philips DPM8000 Housing & Display Replacement, Housing/Display: 6 단계, 이미지 2/2
    • Lift up the housing.

    • The display as well as the speaker are connected to the motherboard. Therefore you need to be careful not to harm those connections.

  7. Philips DPM8000 Housing & Display Replacement: 7 단계, 이미지 1/2 Philips DPM8000 Housing & Display Replacement: 7 단계, 이미지 2/2
    • Unlock the connection between display and motherboard by pushing open the brown cleat.

    • It is recommended to use a spudger or a comparable tool for this step.

    • If the connection is not completely open, one of the involved components could easily be harmed.

  8. Philips DPM8000 Housing & Display Replacement: 8 단계, 이미지 1/2 Philips DPM8000 Housing & Display Replacement: 8 단계, 이미지 2/2
    • Separate the connection by pulling out the display cable.

    • If the cable does not come out easily, the connection is probably still locked.

    • When reconnecting the display to the motherboard don't forget to lock the connection, otherwise it will eventually come loose and you will have to redo the first eight steps of this guide.

결론

Arbeite die Schritte in umgekehrter Reihenfolge ab, um dein Gerät wieder zusammenzubauen.

Andreas Holl

회원 가입일: 11/05/15

731 평판

안내서 6개 작성하였습니다

Technische Universität Wien Technische Universität Wien 회원

Community

2 회원들

안내서 6개 작성하였습니다

댓글 0개

댓글 쓰기

조회 통계:

24 시간 전: 0

7일 전: 0

30일 전: 0

전체 시간: 88