주요 콘텐츠로 건너뛰기

Philips Emerson CoughAssist CA Series Disassembly

의료 장비
iFixit과 이 수리 안내서는 의료 기기 제조업체가 보증하지 않으며 제휴 관계가 없습니다.

필요한 것

  1. Philips Emerson CoughAssist CA Series Disassembly, Philips Emerson CoughAssist CA Series Disassembly: 1 단계, 이미지 1/1
    • First, remove the two 16mm pan head screws (1) directly under the front panel of the ventilator. (Page 3).

    • Next, remove the two 16mm flat head screws (3) from the back panel of the ventilator. (Page 3).

    • Lift off the top cover (2) of the device. (Page 3).

  2. Philips Emerson CoughAssist CA Series Disassembly: 4 단계, 이미지 1/2 Philips Emerson CoughAssist CA Series Disassembly: 4 단계, 이미지 2/2
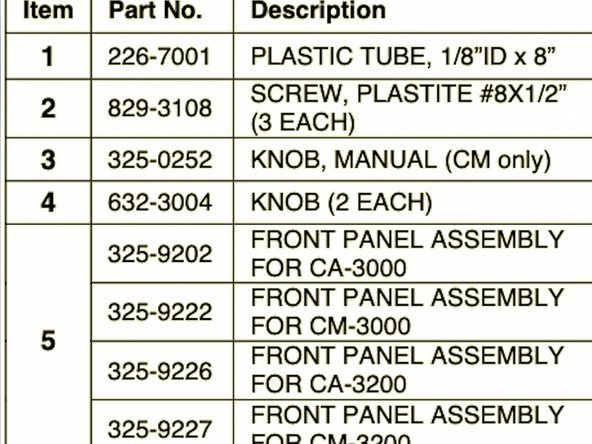
    • Now remove the "Inhale flow" control knob (4) and "Inhale pressure" knob (4), by loosening the setscrew on each before pulling off. If you have a CM model, carefully remove the Manual Control Lever (3) by prying it off with the screwdriver. (Page 3).

  3. Philips Emerson CoughAssist CA Series Disassembly: 5 단계, 이미지 1/1
    • Unscrew the three 12.7mm plastite screws ( 2) holding the panel assembly to the lower housing. A long Phillips screwdriver is very helpful for access to the three screws. (Page 3)

    • The front control panel (5) should now be loose. Carefully slide it forwards to remove. (Page 4).

결론

To reassemble your device, follow these instructions in reverse order.

Zachary Stednitz

회원 가입일: 04/07/20

292 평판

안내서 2개 작성하였습니다

Cal Poly, Team S11-G18, Paton Spring 2020 Cal Poly, Team S11-G18, Paton Spring 2020 회원

CPSU-PATON-S20S11G18

3 회원들

안내서 3개 작성하였습니다

댓글 0개

댓글 쓰기

조회 통계:

24 시간 전: 1

7일 전: 8

30일 전: 11

전체 시간: 237