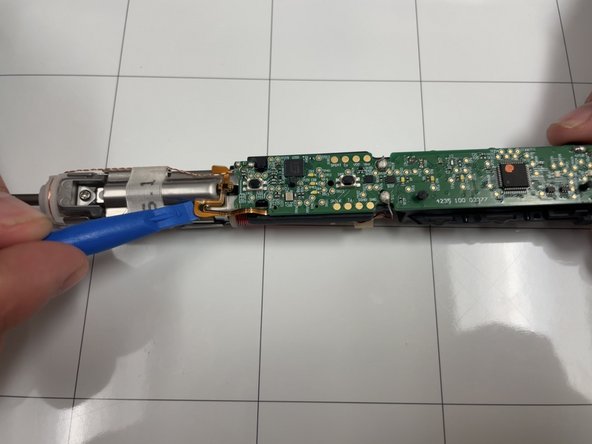
주요 콘텐츠로 건너뛰기

Philips Sonicare ProtectiveClean 6500 Motor Replacement

필요한 것

  1. Philips Sonicare ProtectiveClean 6500 Motor Replacement, Internal Assembly: 1 단계, 이미지 1/3 Philips Sonicare ProtectiveClean 6500 Motor Replacement, Internal Assembly: 1 단계, 이미지 2/3 Philips Sonicare ProtectiveClean 6500 Motor Replacement, Internal Assembly: 1 단계, 이미지 3/3
    • Pry the bottom cap away from the toothbrush body.

    • Pry the bottom cap away from the toothbrush body until it releases.

    • Remove the bottom cap by hand.

  2. Philips Sonicare ProtectiveClean 6500 Motor Replacement: 2 단계, 이미지 1/2 Philips Sonicare ProtectiveClean 6500 Motor Replacement: 2 단계, 이미지 2/2
    • Use a metal spudger to release the two retaining clips inside the device.

    • The clips release when pried inward.

  3. Philips Sonicare ProtectiveClean 6500 Motor Replacement: 3 단계, 이미지 1/2 Philips Sonicare ProtectiveClean 6500 Motor Replacement: 3 단계, 이미지 2/2
    • Slide the internal assembly out of the chassis.

  4. Philips Sonicare ProtectiveClean 6500 Motor Replacement, Motor: 4 단계, 이미지 1/2 Philips Sonicare ProtectiveClean 6500 Motor Replacement, Motor: 4 단계, 이미지 2/2
    • Use an opening tool to gently pry the ribbon cable away from metal motor chassis.

  5. Philips Sonicare ProtectiveClean 6500 Motor Replacement: 5 단계, 이미지 1/2 Philips Sonicare ProtectiveClean 6500 Motor Replacement: 5 단계, 이미지 2/2
    • Locate the twisted copper wires feeding from the top of the motor to the upper corner of motherboard.

    • Desolder the contact points.

    • Soldering can cause burns and fires. Always solder in a well-ventilated workspace.

  6. Philips Sonicare ProtectiveClean 6500 Motor Replacement: 6 단계, 이미지 1/2 Philips Sonicare ProtectiveClean 6500 Motor Replacement: 6 단계, 이미지 2/2
    • Desolder the two connections.

  7. Philips Sonicare ProtectiveClean 6500 Motor Replacement: 7 단계, 이미지 1/2 Philips Sonicare ProtectiveClean 6500 Motor Replacement: 7 단계, 이미지 2/2
    • Turn the assembly over and remove the Phillips screw.

  8. Philips Sonicare ProtectiveClean 6500 Motor Replacement: 8 단계, 이미지 1/3 Philips Sonicare ProtectiveClean 6500 Motor Replacement: 8 단계, 이미지 2/3 Philips Sonicare ProtectiveClean 6500 Motor Replacement: 8 단계, 이미지 3/3
    • Pull the motherboard and motor gently away from the motor chassis.

  9. Philips Sonicare ProtectiveClean 6500 Motor Replacement: 9 단계, 이미지 1/2 Philips Sonicare ProtectiveClean 6500 Motor Replacement: 9 단계, 이미지 2/2
    • Use a pointed tool to push in the tabs on either side of the white assembly .

    • Pull the wire carrier off of motor chassis.

    • Swap it to the new motor chassis.

결론

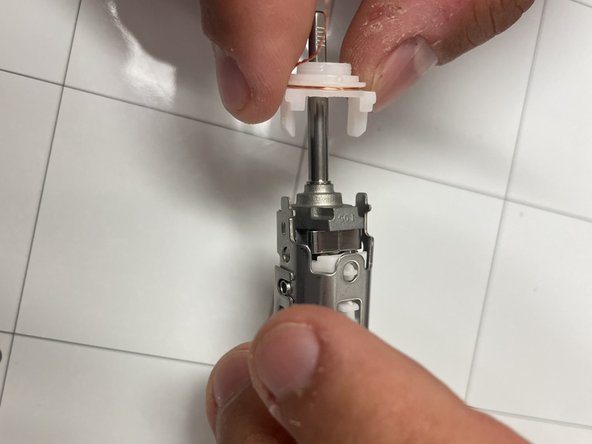
To reassemble your device, follow these instructions in reverse order.

Liam Casto

회원 가입일: 04/01/24

354 평판

안내서 3개 작성하였습니다

IUPUI, Team 1-4, Harley Spring 2024 IUPUI, Team 1-4, Harley Spring 2024 회원

IUPUI-HARLEY-S24S1G4

3 회원들

안내서 3개 작성하였습니다

댓글 0개

댓글 쓰기

조회 통계:

24 시간 전: 0

7일 전: 4

30일 전: 28

전체 시간: 62