이 버전에는 잘못된 편집 사항이 있을 수 있습니다. 최신 확인된 스냅샷으로 전환하십시오.
필요한 것
-
이 단계는 번역되지 않았습니다. 번역을 도와주십시오
-
Disconnect all cables from the console and flip the unit over to reveal its base.
-
-
이 단계는 번역되지 않았습니다. 번역을 도와주십시오
-
Locate the 6 feet on the base of the unit. Pry them off using a spudger to reveal the screws.
-
-
이 단계는 번역되지 않았습니다. 번역을 도와주십시오
-
Remove all six 4.0 mm screws from the base of the unit using a #1 Phillips screwdriver.
-
-
이 단계는 번역되지 않았습니다. 번역을 도와주십시오
-
Starting at the corner at which the power and Ethernet ports are located, pry open the outer shell using a spudger and continue around the entire unit.
-
-
-
이 단계는 번역되지 않았습니다. 번역을 도와주십시오
-
Remove the 2 philips screws
-
Remove the brackets on both sides with your tweezers.
-
-
이 단계는 번역되지 않았습니다. 번역을 도와주십시오
-
If you got the same results as in the 1st photo, then proceed.
-
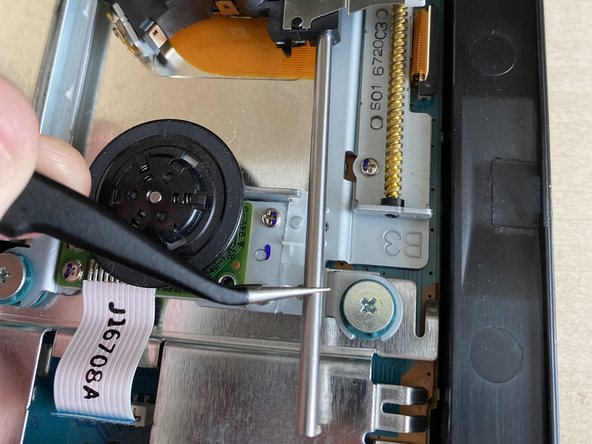
Take the silver rail and push it out *carefully* from the track.
-
Take the silver rail with your tweezers and pull it towards yourself to take it out. Be carefull, as it still attached to the laser, just guide it slowly towards yourself.
-
-
이 단계는 번역되지 않았습니다. 번역을 도와주십시오
-
Take the laser with your hand, and till it like in the photo (to the back).
-
Open the ZIF connector. Be carefull not to break it, it can break easily. If you replace the laser, it won't matter, you can even practice how to open it and close it.
-
Take out the ribbon cable and remove the laser.
-
-
이 단계는 번역되지 않았습니다. 번역을 도와주십시오
-
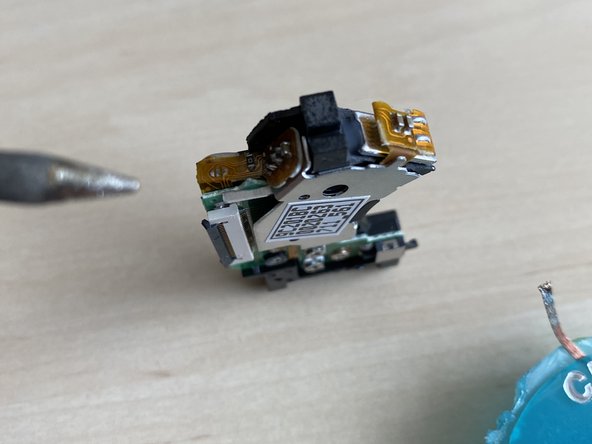
Remove the anti-static security. Use some copper wick to remove the solder.
-
When it looks like in the 3rd photo, you are good to.
-
-
이 단계는 번역되지 않았습니다. 번역을 도와주십시오
-
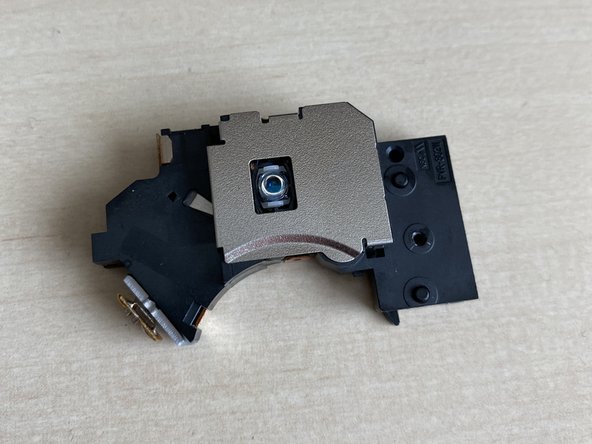
Remove the single philips screw.
-
Transfer the holder to the new laser and fasten it again with the philips screw.
-
-
이 단계는 번역되지 않았습니다. 번역을 도와주십시오
-
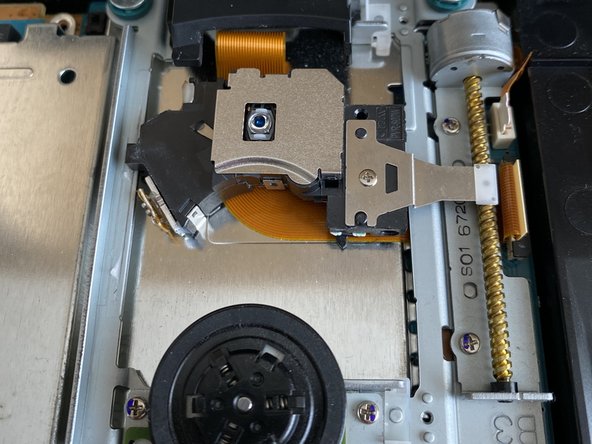
Take the new laser and open up the ZIF connector.
-
Place it back as shown in the 2nd photo.
-
Put everything back together. The 3rd picture show how it needs to be done!
-


다른 15명이 해당 안내서를 완성하였습니다.

팀

댓글 5개
Thank you for caring enough to show us how to do this and for your time. You are appreciated.
Hi Mark! No problem at all, happy to hear that I'm able to help you :)!!
Where do you recommend getting the actual part? Looking for a reliable seller
I am also looking for the best quality part. If I am going through the trouble of disassembling everything then I want to make sure I have a durable replacement. Excellent guide!
Jeremy B -
Thanks! Well, I'm afraid that the only option is to buy this from a Chinese webshop (AliExpress as example). You can't buy it on Amazon (as far as I looked it up). And getting one from another console which is not opened yet (original) is probably at the end of it's life time. I have some experience with a Chinese one, and they do work great so far!