주요 콘텐츠로 건너뛰기

PlayStation 2 Slimline SCPH-900xx Fan Replacement

필요한 것

  1. PlayStation 2 Slimline SCPH-900xx Fan Replacement, Lower Smart Plate: 1 단계, 이미지 1/1
    • Turn off your PlayStation 2 and remove the disc and Memory Card.

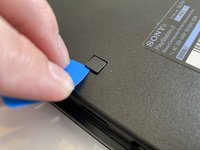
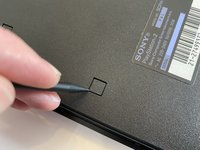
    • Turn over the PlayStation 2 and put it on a soft surface (e.g. a towel).

  2. PlayStation 2 Slimline SCPH-900xx Fan Replacement: 2 단계, 이미지 1/1
    • Locate the six covers.

    • Two are located underneath the feet.

    • One cover is located underneath the Void sticker.

  3. PlayStation 2 Slimline SCPH-900xx Fan Replacement: 3 단계, 이미지 1/1
    • Remove the Void sticker with a Spudger and some cleaning alcohol

    • Removing the Void sticker will void the warranty of your device!

    • Some versions of that console maybe don’t have the sticker or it’s relocated.

  4. PlayStation 2 Slimline SCPH-900xx Fan Replacement: 4 단계, 이미지 1/2 PlayStation 2 Slimline SCPH-900xx Fan Replacement: 4 단계, 이미지 2/2
    • Remove the covers by using either a Spudger, Opening Picks or your fingernail.

  5. PlayStation 2 Slimline SCPH-900xx Fan Replacement: 5 단계, 이미지 1/1
    • Remove the six Phillips #1 screws with a screwdriver.

    • The screws on the right are a bit deeper inside the shell as like the rest but are the same size.

  6. PlayStation 2 Slimline SCPH-900xx Fan Replacement: 6 단계, 이미지 1/2 PlayStation 2 Slimline SCPH-900xx Fan Replacement: 6 단계, 이미지 2/2
    • Separate the clips at the front and the overhanging side from their mounting using a Prying Tool.

    • Separate the two halves.

  7. PlayStation 2 Slimline SCPH-900xx Fan Replacement, Fan: 7 단계, 이미지 1/1
    • Pull the ribbon cable straight out from the socket.

    • To reinstall the cable, hold it near the end and push it straight into the connector, being careful not to kink the cable. If you can, apply the force to the plastic reinforcement rather than the cable itself.

  8. PlayStation 2 Slimline SCPH-900xx Fan Replacement: 8 단계, 이미지 1/1
    • Remove three Phillips #0 screws securing the fan.

    • Lift the fan straight up and out of the PS2.

결론

To reassemble your device, follow the above steps in reverse order.

다른 한 분이 해당 안내서를 완성하였습니다.

다음 번역가들에게 특별히 감사 드립니다:

de en

100%

MrJulian님은 저희가 세상을 수리하는데 동참하신 분입니다! 기여하시겠습니까?
번역 시작하기 ›

MrJulian

회원 가입일: 10/22/20

1,543 평판

안내서 7개 작성하였습니다

댓글 0개

댓글 쓰기

조회 통계:

24 시간 전: 2

7일 전: 8

30일 전: 46

전체 시간: 393