주요 콘텐츠로 건너뛰기

이 안내서에는 최근 변경 사항이 더 있습니다. 최신 비검증 버전으로 전환하십시오.

PlayStation 4 Slim Bottom Cover Replacement

필요한 것

  1. PlayStation 4 Slim Bottom Cover Replacement, Bottom Cover: 1 단계, 이미지 1/3 PlayStation 4 Slim Bottom Cover Replacement, Bottom Cover: 1 단계, 이미지 2/3 PlayStation 4 Slim Bottom Cover Replacement, Bottom Cover: 1 단계, 이미지 3/3
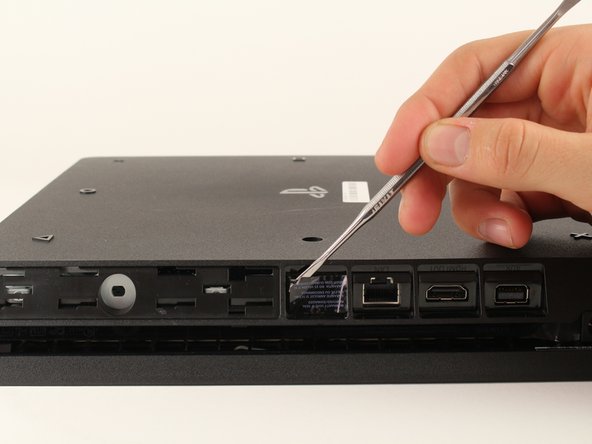
    • Locate the plastic warranty sticker next to the three ports on the side of the console.

    • Remove the warranty sticker by peeling it off with any kind of spudger.

    • Removing the warranty sticker will NOT cause your warranty to be null and void.

  2. PlayStation 4 Slim Bottom Cover Replacement: 2 단계, 이미지 1/2 PlayStation 4 Slim Bottom Cover Replacement: 2 단계, 이미지 2/2
    • Unscrew and remove the 5.0mm screw that was behind the sticker using a T8 security Torx screwdriver with a counter-clockwise motion.

  3. PlayStation 4 Slim Bottom Cover Replacement: 3 단계, 이미지 1/3 PlayStation 4 Slim Bottom Cover Replacement: 3 단계, 이미지 2/3 PlayStation 4 Slim Bottom Cover Replacement: 3 단계, 이미지 3/3
    • Place the Playstation 4 Slim upside down with the side of the screw you just removed facing you.

    • Pry up on the two corners that are facing you with your fingers.

    • This may take a bit of force to open up and you will hear a fairly loud click when the bottom cover detaches.

    • Remove the bottom cover by sliding it towards the back corners and lifting up.

결론

To reassemble your device, follow these instructions in reverse order.

다른 36명이 해당 안내서를 완성하였습니다.

Hernan Rodriguez

회원 가입일: 01/24/18

3,642 평판

안내서 3개 작성하였습니다

Cal Poly, Team S19-G4, Livingston Winter 2018 Cal Poly, Team S19-G4, Livingston Winter 2018 회원

CPSU-LIVINGSTON-W18S19G4

4 회원들

안내서 35개 작성하였습니다

댓글 2개

Wo kann man die Bodenplatte kaufen?

Emre Kaman - 답글

댓글 쓰기

조회 통계:

24 시간 전: 19

7일 전: 185

30일 전: 799

전체 시간: 47,351