이 버전에는 잘못된 편집 사항이 있을 수 있습니다. 최신 확인된 스냅샷으로 전환하십시오.
필요한 것
-
이 단계는 번역되지 않았습니다. 번역을 도와주십시오
-
Place the Playstation 4 Slim upside down with the side of the screw you just removed facing you.
-
Pry up on the two corners that are facing you with your fingers.
-
Remove the bottom cover by sliding it towards the back corners and lifting up.
-
-
이 단계는 번역되지 않았습니다. 번역을 도와주십시오
-
Place the Playstation 4 Slim right side up, with the PS logo on top and the side with the words "SONY" and "PS4" facing you.
-
Pry up on the two corners that are facing you with your fingers.
-
Remove the top cover by sliding it towards the back corners and lifting up.
-
-
이 단계는 번역되지 않았습니다. 번역을 도와주십시오
-
Unscrew and remove the two screws (left one 31.0mm and right one 24.0mm) using a T8 screwdriver with a counter-clockwise motion.
-
Unscrew and remove the 3.0mm screw using a Phillips #1 screwdriver with a counter-clockwise motion.
-
-
이 단계는 번역되지 않았습니다. 번역을 도와주십시오
-
Remove the metal sheet from the top of the power supply by grabbing and lifting up with your hands.
-
-
-
이 단계는 번역되지 않았습니다. 번역을 도와주십시오
-
Remove the antenna from the top of the power supply by guiding the wire with your fingers through the groves underneath the metal panel.
-
-
이 단계는 번역되지 않았습니다. 번역을 도와주십시오
-
Flip the Playstation 4 Slim onto its back.
-
Unscrew and remove the 4.0mm screw using a Phillips #1 screwdriver with a counter-clockwise motion.
-
-
이 단계는 번역되지 않았습니다. 번역을 도와주십시오
-
Use a plastic opening tool to make space between the power supply and console by wedging and wiggling it in-between the two.
-
Lift the power supply up and onto its back on the metal sheet using your hands.
-
-
이 단계는 번역되지 않았습니다. 번역을 도와주십시오
-
Disconnect the wire connection from the power supply by firmly gripping it with your fingers or tweezers and pulling out.
-
Remove the power supply completely by grabbing and lifting up with your hands.
-
-
이 단계는 번역되지 않았습니다. 번역을 도와주십시오
-
Unscrew and remove the 31.0mm safety screw using a T8 screwdriver with a counter-clockwise motion.
-
-
이 단계는 번역되지 않았습니다. 번역을 도와주십시오
-
Locate the two wires connected to the bottom of the motherboard.
-
Remove the wires by firmly grasping the metal connections with your fingers or tweezers and pulling up until they disconnect.
-
-
이 단계는 번역되지 않았습니다. 번역을 도와주십시오
-
Flip the device to the backside.
-
Unscrew and remove 14x (19x for CUH-21xx) 4.0mm black screws using a Phillips #1 screwdriver with a counter-clockwise motion.
-
Unscrew and remove 8x (7x for CUH-21xx) 6.0mm silver screws using a Phillips #1 screwdriver with a counter-clockwise motion.
-
Unscrew and remove 4x 3.0mm silver screws using a Phillips #1 screwdriver with a counter-clockwise motion.
-
-
이 단계는 번역되지 않았습니다. 번역을 도와주십시오
-
Unscrew and remove the two 5.0mm screws on the side of the console using a Phillips #1 screwdriver with a counter-clockwise motion.
-
-
이 단계는 번역되지 않았습니다. 번역을 도와주십시오
-
Locate the white wire connected to the corner of the top of the motherboard.
-
Disconnect the wire by firmly grasping the metal connection with your fingers or tweezers and pulling up until it detaches.
-
Unthread the wire from the tape and move it off to the side using tweezers or your fingers.
-
-
이 단계는 번역되지 않았습니다. 번역을 도와주십시오
-
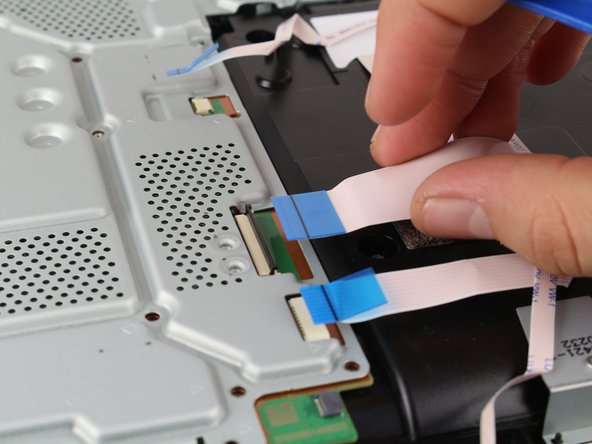
Remove the connections by pulling out on the blue tabs with your fingers.
-
Flip up the black clip on the largest tab with your finger before removing it.
-
Remove this wire connection by firmly gripping the wire with your fingers and pulling it out.
-
-
이 단계는 번역되지 않았습니다. 번역을 도와주십시오
-
Remove the metal plate by grabbing two sides of the plate and lifting up and away from yourself.
-
-
이 단계는 번역되지 않았습니다. 번역을 도와주십시오
-
Unscrew and remove the two 10.0mm screws (one silver and one black) using a Phillips #1 screwdriver with a counter-clockwise motion.
-
Remove the small metal plate by grabbing it with your fingers and lifting up.
-
-
이 단계는 번역되지 않았습니다. 번역을 도와주십시오
-
Remove this wire connection by firmly grasping it with tweezers and pulling out.
-
-
이 단계는 번역되지 않았습니다. 번역을 도와주십시오
-
Remove the motherboard by grabbing the edge of the board with one or two hands and pulling away and up.
-


다른 62명이 해당 안내서를 완성하였습니다.
팀

Cal Poly, Team S19-G4, Livingston Winter 2018 Cal Poly, Team S19-G4, Livingston Winter 2018 회원
CPSU-LIVINGSTON-W18S19G4
4 회원들
안내서 35개 작성하였습니다
댓글 10개
Hi Harry
I think this guide is fantastic. My PS4 slim is not coming on. It’s not the HDMI display port or anything of the sort. It powers on, you hear the beep and the blue power light stays on. That’s all. Nothing after this… no signal to the TV, cannot reinitialise, nothing. I’ve checked online to see if I can diagnose it. Based on the few signs I’ve seen I think the board is gone. So am looking to replace that hence I came across your guide. Is there a way you know to be certain my board is faulty. Thanks
I have a PS4 slim issue…. when connected to power it doesn't show it’s on and no light displays….. I would say the board is faulty and how do I work on such problem.
do you need to change the optical drive as well?
Hafiz Adam - 답글
my ps4 slim power supply ok no power motherboard